
BBQ Tips for Your Holiday BBQ

Memorial Day is just a few short weeks away! Are you having a BBQ this year? I know that I am ready to socialize, to get some sunshine and just have fun without the stress of this last year hanging over our heads. What better way to do that than with food?
These BBQ tips for your holiday BBQ will help you put on a fun and budget friendly BBQ to start this summer off right!
BBQ Tips for Your Holiday BBQ
I don’t know about you, but when I have to pay a lot for a party or get together, it stresses me out! I just can’t enjoy myself knowing that I just seriously strained my budget on activities like this. That’s why I follow some simple steps to keep the price under control. These tips for your holiday BBQ will help you throw an amazing BBQ without the stress of a high bill stressing you out.
Inventory Your Pantry
Before you do anything else, be sure and see what you have in stock at your house. Who knows, you might find that you have a pack or two of paper plates left over from last year’s BBQ. (I just cleared out my pantry recently and found paper plates and plastic silverware..Whoo hoo!)
Check out the Dollar Store for Supplies
For whatever else i don’t find that i have already, I head to the dollar store. As it turns out, they have a good selection of BBQ basics for just $1! They even have BBQ scrapers and utensils!
Check out the Meat Markdowns
Whenever I go grocery shopping, I check out the meat markdown selection. Why not do the same for BBQ foods? I instantly put everything in the freezer anyway and I enjoy the savings that comes with it.
Say Yes to the Offers of Food
When you invite someone to your BBQ and they say “Can I bring anything?” Don’t say no. They asked, so that means that they want to contribute and it helps you to bring down the costs a little bit. Plus, it could also save you some time on the cooking and prep.
Gardening Tips for Every Beginner

Are you planning to start a garden this year? If you answered yes, you may need a little bit of help trying to figure out where to begin. Gardening can be confusing and overwhelming, but I promise you, it is worth it!
No matter what you are hoping to grow, you will find that some of the rules with gardening tend to be the same. Check out these gardening tips for every beginner and see how you can thrive in your gardening this year!
Gardening Tips for Every Beginner
Choose Your Location Wisely
Choosing the location of your garden is incredibly important. There are 3 things that you need to look for when choosing the location of your garden.
Ease of Access – As much as you may not like to think so, it is quite easy to forget about your garden, so it is important to locate your garden in a place that it will be seen easily and it is easy to get to each and every day.
Sunshine – Make sure that the spot that you have chosen for your garden receives plenty of sunlight each day. Ideally, this spot should receive at least 6 hours of sunlight each day.
Water – Also make sure that your garden location is within easy reach of your water source. It’s imperative to water your garden regularly so it makes sense that your garden space will be accessible to a nearby hose.
Use Good Soil
Yes, you can use the soil from your yard, but for a great garden, don’t be afraid to splurge a little bit on soil. You can buy bagged soil from your nearby big box store or gardening center, or you can order an entire load of soil from a local farm store.
Choose the Right Plants
Here’s the thing about gardening. You need to choose the right plants for a successful gardening season. This is a two part issue. You need to figure out the plants that you like and the plants that your area likes.
Do a little bit of research to discover which plants tend to grow well in your area. Certain climates are better for growing certain plants.
Also, be sure to only grow plants/veggies that you are going to actually eat. Why work hard just to grow plants that you don’t like anyway? The more you like the plants/veggies that you have grown, the more excited that you will get when they grow successfully.
Do you garden? What tips have been the most helpful to you in your gardening journey?
10 Minute Cleaning Jobs That Can Change Your Home
As a busy mom and wife, I can tell you that it is very easy for me to fall behind on my housework. Also as a busy mom and wife, I can also tell you that when I fall behind on my housework, it affects my entire mood and my days. It’s hard for me to feel comfortable when I am constantly stressed about my housework. It is also difficult for me to complete other projects when I have housework hanging over my head.
If you feel like I do, you can probably benefit from these 10 minute cleaning jobs that can change your home in an instant. These are awesome because in just a matter of minutes, my living space and my mental space can be completely different.
10 Minute Cleaning Jobs That Can Change Your Home
Do the Dishes
As much as you may dread the chore, doing the dishes really doesn’t take long at all. Do me a favor. Grab your phone and set a 10 minute timer and get busy doing the dishes in your kitchen. Don’t touch your phone during this chore, just focus on getting the dishes done. Assuming you have a dishwasher and you don’t have to wash an insanely high mountain of food crusted dishes by hand, I’m willing to bet that it will take you less than 10 minutes.
A clean sink that isn’t full of dishes can make all the difference in your kitchen.
Take out the Trash
Do you have overflowing trash cans in your kitchen or bathrooms. It’s an easy task to put off, but it’s an even easier task to do and it too can make a difference in the appearance of your living spaces.
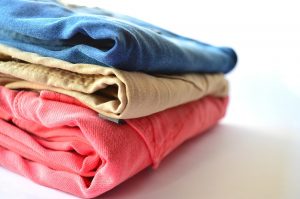
Fold the Laundry
Do you have piles of laundry on your sofa or table (no judgment, it happens)? Again, set your timer and get busy folding. Don’t allow yourself to be distracted during this job, just get busy folding and putting away.
Things to Do When You are Stuck at Home

If you are going to be stuck at home for a while, you may be wondering what on earth can you even do? I know, I know, we have all been home a lot over the last year or so, but you never know if you might have to quarantine again or you may just simply need to stay home for a bit.
So what have you found for things to do when you are stuck at home? This list below might help keep you busy during your time at home and honestly, you may just have lots of fun while you are doing it!
Things to Do When You are Stuck at Home
Paint
Pick up a brush and create your masterpiece. During the initial lockdown, my daughter started watching Bob Ross videos and boy has she loved it! She has anxiety and picking up the hobby of painting has been wonderful for her.
Listen to Your Favorite Playlist
Countless studies have shown that listening to music can help boost your mood. Sometimes when you are stuck at home it becomes easier to feel down. I don’t know about you, but I’m all about boosting my mood.
Grab a Book
When did you last take the time to read a book? Reading is a great way to unwind and relax. It is also a great way to learn new things! If you don’t feel like you have the time to actually sit down and read a book, grab it on an audio book and multi-task with your other projects. I have been listening to a lot of audio books lately and boy do I get a lot done when I do!
Spring Clean
Not to be dramatic, but spring cleaning your home and living space can give you a new lease on life. Seriously. If you are currently living in a cluttered space, it can really affect your mental health and it can make you feel so much better when you are surrounded by clean, open space.
What do you like to do when you are home alone?
Easy Last Minute Mother’s Day Gift Ideas
 Okay, it’s go time! Mother’ Day is Sunday. No need to stress if you haven’t got the perfect present yet. There is still time to get something for your Mom that shows how much you love her. Here are 5 ideas that are super easy that your Mom is sure to enjoy.
- Plant or Bush. Each year my mom asks for an annual or perennial or a bush that she can plant in her yard. So head to your local flower nursery and pick out one that would work in her yard. This is a fun gift that will last months! If your mom has flower pots or planters outside, you could also grab a few flowers and soil to fill that up too!
- Gift Card to a Spa or Massage Center. This is one of my favorite ways that I spoil myself. Most likely you could go online to a local spa and snag a gift card to give to your mom. Easy peasy, yet so fun!
- Sunglasses. This is something that most women forget to buy, but is SO needed. Grab a pair of cute sunglasses from Target and choose same day pickup so you can go grab those TODAY! You can pair these will a favorite treat or flowers. Get ready for summer!
- Make an outside space for your mom. This may seem daunting, but it can be super easy and fast. Think of a place your mom likes to sit outside, then make that space dreamy! Buy a rug and new outdoor pillows, or buy a planter with plants and an outdoor lantern. If your mom doesn’t have a place to be outside, then maybe start with an outdoor chair and a cute pillow. You can find them here at Home Depot. You can go over to your moms home and create this space as her gift. Being outside is so good for the body, so making a nice outdoor space would be a perfect gift.
- Jane.com Gift Card. Have you ever shopped Jane? There are SO many fun things to buy. They have a good variety that any mom would love.
5 Awesome Glow Stick Games Your Whole Family Can Enjoy!

Glow sticks are great for all ages. We love to hand them out during fireworks, late night games, Halloween and even taking them camping. Not only are they awesome to wear while you’re running around playing but they make some great games too. With just a few supplies and your glow sticks you can put these games together at your next gathering!
Ring Toss Game
Supplies – glow sticks, wooden dowels and rubber bands
To set this game up you’ll simply take one of your glow sticks and tie it onto your wooden dowel with the rubber bands. Then stick your dowel into the ground and step back. Each take turns tossing your glow sticks (link them together to form a ring with the bracelet attachments) towards the dowel/glow stick.
Tic Tac Toe
Supplies – glow sticks
It’s a simple yet fun game to play in the dark. You’ll attach your glow sticks together using the bracelet attachments that comes with your glow sticks. Create your tic tac toe board then make 5 of the X’s and 5 of the O’s out of glow sticks. This is a great one to play while camping or with neighbors.
Glow Stick Capture the Flag
Supplies – glow sticks (2 per player) 2 separate colors, 2 larger glow sticks (or connect multiple together) for your “flag”
The game rules are the same for if you were playing capture the flag but in the dark with glow sticks. Each player will have one glow stick around each wrist and all the players on that team will wear the same color glow stick. You are able to “hide” your glow stick while trying to capture the flag but you are not allowed to put them under your sleeve or shirt (you can find them behind your back).
Glow Stick Tag
Supplies – Glow sticks
For set up you’ll need to create one large circle by connecting two glow sticks together. This is for the person who is “it” to carry around with them. Everyone else will need to attach 1 glow stick to each of their wrists. (If playing with a large group you could just have each player use one glow stick). Then start then game – once a player has been tagged by the person who is “it”, they’ll need to remove 1 of their glow stick bracelets and hand it to the tagger. The tagger then adds that bracelet to their large circle and continues onward. (Note: no one else can be tagged until the tagger has added the bracelet to the larger circle) Game is over once the tagger has collected all the glow sticks.
Bowling
Supplies – Glow sticks, 6-plastic bottles, water, soccer ball or similar
To begin you’ll need to fill the 6 plastic bottles with water and activate your glow sticks and put them in each bottle (you might want to add 2 or 3 to each bottle to get a good glow). Then set up your water bottles and begin bowling! To make the game extra fun you can search for a glow in the dark ball.
How to Save Money on Medicine

Most of us have some sort of medication expense that we deal with every month. Whether someone in our family has an ongoing medical issue that requires a prescription, whether someone has allergies, or maybe it’s just a tummy bug, a cold, or someone hurt themselves. The fact is, we all need medicine of some kind at some point. Knowing how to save money on medicine is important though because medicine is pricey!
Unfortunately, medication is one of those things that can make or break people when they are already living paycheck to paycheck. In order to try and prevent this, it’s important to note that there are things that you can do to save money on medicine of all kinds.
How to Save Money on Medicine
For Prescriptions:
Ask for generic – Most pharmacies will automatically give you the generic version of your medication, but it’s good to ask just to be sure. The price difference between the generic and the name brand is significant.
Search for coupons – Many medications offer coupons for their medication. A simple Google search will often bring them up.
Sign up for a prescription discount program – If you don’t have prescription insurance, look into signing up for a Prescription Discount Program instead. Some people save a significant amount of money this way.
For Over the Counter Medicine
If you are buying medicine that is over the counter, there are still a couple of different ways that you can save money here.
Look for coupons – Coupons are a great resource for saving money on most things, medicine included. Here are some of the ways that you can find coupons:
- Sunday Paper -(yes, there are still coupons in the Sunday paper)
- Check your store’s loyalty program – Most stores these days have a loyalty program that offers the ability to clip coupons online.
- Reach out to the brand – Reach out to the brand and request coupons for their product. The best way to do this is through their social media channels.
Browse the clearance rack – The clearance rack is a wonderful place to find discounts on all sorts of things. Make sure to cruise passed this rack during your shopping trip so you don’t miss any great deals.
Stock up – If there is a good sale or clearance deal on medicine, be sure and stock up! You can never be too prepared.
Yummy Butterscotch Rice Krispie Treats Recipe
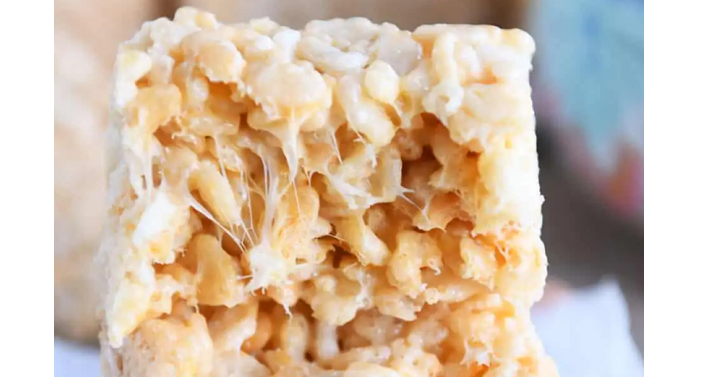
Yum. If you love Rice Krispie Treats, then you’re surely love this variation. I love these easy treats for after school when the kiddos get home, or for a lighter Sunday night treat. They are so easy to make even your kiddos can help you make them. This recipe and photo is by Mel’s Kitchen Cafe. She seriously has the best recipes.
Yummy Butterscotch Rice Krispie Treats Recipe
Recipe & Picture by Mel’s Kitchen Cafe
INGREDIENTS:
- 1/2 cup (8 tablespoons, 4 ounces) butter (I use salted)
- 16 ounces large marshmallows
- 1 teaspoon vanilla extract
- Pinch salt
- 8 cups (8 ounces) crisp rice cereal, like Rice Krispies
- 1/2 cup (3 ounces) butterscotch chips
DIRECTIONS:
- Butter the bottom and sides of a 9X13-inch pan. Set aside.
- In a large saucepan, melt the butter on low heat and let it cook until the solids start to turn golden brown and it smells caramelly and fragrant (here’s a browned butter how-to if you’d like a visual).
- Add the marshmallows and cook on low, stirring constantly until mostly melted, a few small lumps here and there are ok. Add the vanilla and salt and stir to combine.
- Remove the pan from the heat and add the rice krispies and butterscotch chips. Stir until evenly combined.
- Scrape the mixture into the prepared pan and using lightly greased or barely wet (with cold water) hands, lightly press the mixture into the pan (mashing them too hard and you’ll end up with very firm rice krispie treats – so use a gentle hand if you want them chewy). Let cool before slicing into squares.
How to Update Your Kitchen Counters for a Fraction of the Cost!
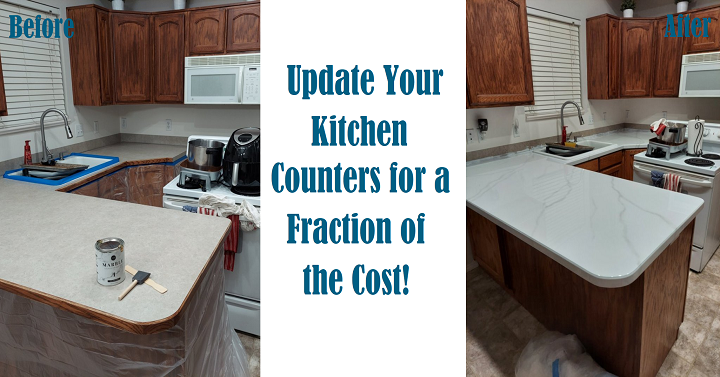
I have to say my kitchen isn’t that outdated but ever since we moved in I’ve wanted to give it a little face lift. So, I researched, looked around, found what I loved and did it myself for a fraction of the cost. And I’M IN LOVE! They turned out beautiful and I am so excited to share the process with you. It is easier than you might think.
First off let me tell you what I bought and went with. After lots of research and looking at different prices I went with this kit from Amazon. I was afraid the kit was going to be overpriced so I went looking for each individual item. In the end, the kit was a much better price, I got the exact amount I needed, and I am not spending money on extra supplies that are just going to end up sitting around until I decide to do it again. (Which we do not plan on moving so that is not happening in the near future.) One kit gave me just enough to do my counters in the kitchen (it covers 35 square feet of surface). It also comes with:
- White Primer
- Grey Veining Mineral
- White Highlight Mineral
- Epoxy Activator and Resin
- 6” Roller Arm
- 3 Roller Pads
- 2” Brush
- 4” Paint Sponge
- 2” Foam Brush
- Artist Brush
- Misting Bottle
- Practice Board
- 3 Wooden Stir Sticks
- Sandpaper
- Epoxy Gloves
- 9’x12’ Plastic Drop cloth (I ended up needing to buy more)
- And instructions
See, everything was included and the only things I bought extra of was the drop cloth just to be safe and cover every square inch which is important since you will be pouring the epoxy on the counter to give you that smooth finish.
Once you have bought the kit make sure you watch the instructional video they have on their site (you will find it in their instructions as well). This is IMPORTANT! I watched it multiple times to make sure I knew exactly what I needed to do when. Do not be intimidated, this project just takes more time than it does anything else because you need to make sure each layer cures fully before you start on the next layer. Also, keep little figures away. It’s so tempting to want to touch, especially after the epoxy is poured. Learn from my mistake and tape off the whole kitchen for at least the 3 days they recommend. I know that’s a long time but learn from my mistake. I’ll just say, I’ll have finger prints of my sweet littles in case anything happens to them…(anyone else a true crime addict  ).
).
Also, take their advice and draw out your design on paper first. This helped to make sure my veins were all headed in the same direction. I studied ideas and samples at the store before I even started. I pinpointed my favorites and copies those. The more you look at ideas and marble samples the more realistic your own will come out.
Other than that everything is pretty straight forward. They do a really good job at walking you through the steps and making it nearly fool proof. You got this, I believe in you!! (And don’t forget to share your before and after’s with us when you’re done!)
Paddleboard vs. Kayak: Which One To Choose and Why!

We’re gearing up and getting ready for all our summer fun. With that being said, we looked into some water fun toys for the family and weighed the options between getting a paddleboard or a kayak. We did our research and wrote down the pros and cons to each so we could pick the best water sport for us. Here’s what we came to:
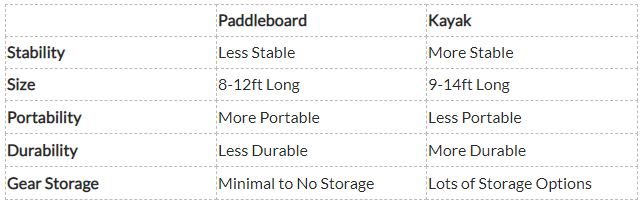
I found this awesome comparison helpful when thinking out our options. For our family we weren’t looking to store any gear. We wanted to use them while we’re out camping and bring them in off the water when we’re ready to pack up for the day. Also, portability was a big deal. We already have our trailer we’ll be hauling and there’s minimum storage there to haul more toys so we need it to take up as little space as possible. Thank goodness for inflatable paddleboards, there’s definitely going to be room to store an inflatable. Stability was something we took a good look at too. I know each of them are going to have their own challenges but with kids I didn’t want to make the challenge to difficult while still having fun.
Now I know price is always a big question, we’re always trying to save the most while getting the best value for our money. While paddleboards are less durable they have great options out there. So read TONS of reviews on the ones you’re looking at if you go that route. They can be a great help in making sure you’re getting a good product for your money. Kayaks are similar in price but if you end up having to store and transport your kayak keep those costs in mind. Many will put a rack on top of their vehicle to transport and install racks in the garage for safe keeping. Each of those can add up in costs where as an inflatable kayak won’t need either.
So what did we choose? You can probably guess we went with the paddleboard for our family. It was the right choose for us and something I’m excited to take out on the water!
How to Save Money on a Rental Car

Are you head out for vacation soon? Are you flying or driving? Or, are you planning to fly into your destination and then rent a car and drive from there? Well, due to the pandemic and the countless ways that it has affected our economy, rental cars are no different.
There is a shortage in rental cars this year at rental car companies, which has turned into higher than expected costs for some people who are renting a car these days. If this is something that you want to avoid (who wouldn’t?), check out these tips on how to save money on a rental car.
How to Save Money on a Rental Car
Sign Up for AAA
I was searching for a rental car recently and was finding the prices to be far higher than I expected. At some point during my search, I remembered that I have a AAA membership. I hopped on over to my AAA app to look for deals and for the 7 day span I was planning to rent the car, the cost would have been about $70 less through AAA.
Use a Corporate, Union or other Club Discount
If you are a member of a union, be sure to check and see if your union happens to offer discounts for rental cars. The same goes for corporate discounts, alumni discounts or any other club that you may be a part of.
Check Costco
If you have a Costco membership, you can often find travel related deals with your membership. I was looking here during my recent search too and found some pretty good deals.
Check out Your Credit Card
Be sure and check out your credit card account. Oftentimes you will have offers available to save money on various things and car rentals often make that list.
Additionally, find out if your credit card offers rental car insurance. This can save up to $10 per day off of the rental car insurance through the rental car company.
Sign up for the Rental Car Loyalty Program
Most rental car companies offer loyalty programs where you can often save 10% or more on rental car costs.
Easy 4-Ingredient Cranberry Chicken Recipe
 I love fast and easy recipes to cook on busy school nights. This Easy 4-Ingredient Cranberry Chicken Recipe is one of our favorite recipes that take a matter of minutes to assemble. It may sound a bit interesting with these ingredients mixed together, but it truly tastes wonderful. We always get compliments with this recipe! Give it a try.
Cranberry Chicken Casserole
Recipe and photo by Recipegirl.com
Ingredients:
1 Cup bottled French Salad Dressing
1 Envelope Dried Onion Soup Mix
1 – 16 oz Can Whole Berry Cranberry Sauce
2 Pounds Boneless, Skinless Chicken Breasts
Instructions:
1. Preheat the oven to 350 degrees
2. Mix the salad dressing, onion soup mix, cranberry sauce and chicken breasts together
3. Cook for 45 min and check chicken to make sure it’s done
4. Serve with steamed rice
My Top 10 Items on Sale at Costco for April 14-May 9, 2021!
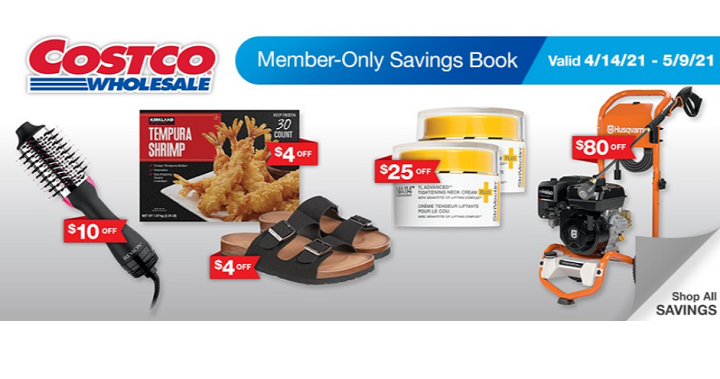 I love shopping Costco. They always have some great products on sale each month and I love shopping those deals! Here are my Top 10 Items on Sale at Costco for April 14-May 9, 2021! Remember, items may vary according to location. All of the items listed below are with the warehouse price, meaning you must go in-stores to get these prices. You can shop online for some of these items but the price may be a little higher.
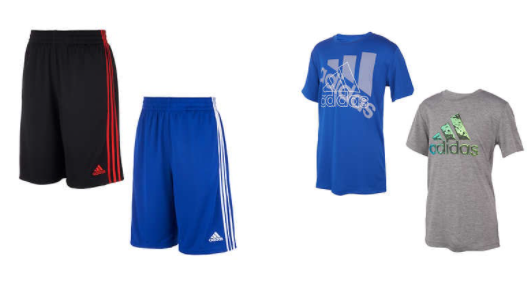
Adidas Youth 2 pack Shorts or Shirts Only $14.99 (Warehouse price)
 Skechers Ladies’ Two Strap Sandals only $15.99 (Warehouse price)
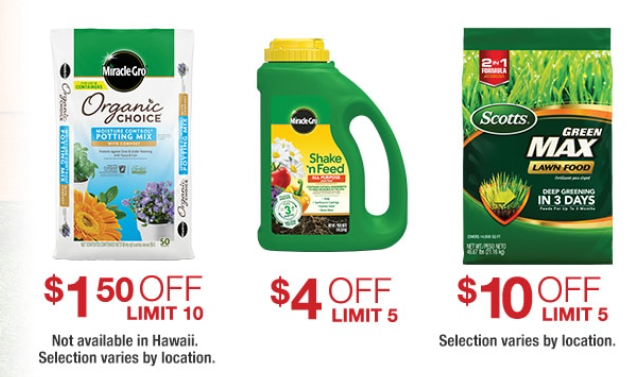
Lawn and Garden Care Items on Sale!
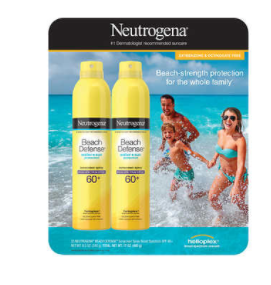
Neutrogena Beach Defense (2 pack) only $11.99 (Warehouse Price)
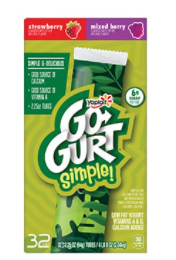
Yoplait Go-Gurt Variety pack take $3.50 off coupon (Warehouse only)
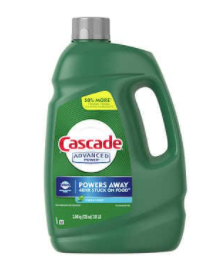 Cascade Dishwasher Detergent take $2.50 off coupon (Warehouse only)
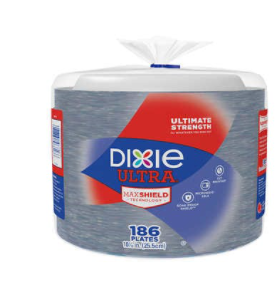
Dixie Ultra plates 186 count take $3.70 off coupon (Warehouse only)
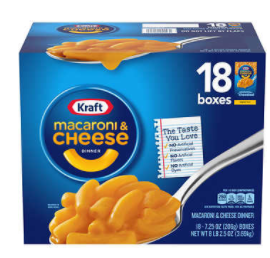
Kraft Macaroni & Cheese 18 boxes take $4.00 off coupon (Warehouse only)
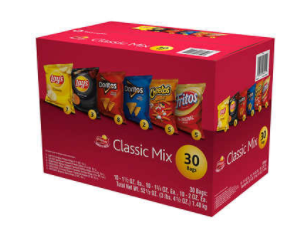 Frito Lay Classic Mix 30 bags take $3.90 off coupon (Warehouse only)
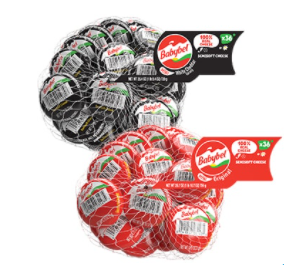
Mini Babybel cheese take $4.00 off coupon (Warehouse only)
There are a lot more items that are on sale. These are the items that are at great stock up prices.
What is the difference between Arctis 7 & Arctis 7 Pro Gaming Headsets?
SteelSeries’ award-winning Arctis 7 & Arctis 7 Pro headsets. It is the best choice for gamers that arrive just in time for the next generation of consoles in two distinct variants – the Arctis 7 and Arctis 7 Pro. These series are compatible with PC, Mobile Phones, Laptops, and PlayStations. Along with the long-life battery shelf, it comes with USB-C connectivity. If you are willing to make your gaming experience joyful picking up from these two will be a great choice for you. These two have a base that acts not only as a wireless transmitter but as a charging station. Getting the headsets with flashing LEDs, neon coloring, and unreasonably large ear cups is a dream, for every gamer. That’s why by keeping in mind the SteelSeries has launched two latest Arctis Headphones 7 & 7 Pro versions that are stylish and easily compatible with many devices. With a lot of similarities in these two models, people get confused about which one to pick first. So, to help you out we at Headphone Critics have brought the differentiation between Arctis 7 & Arctis 7 Pro headsets. In this article, we will discuss in detail about features of both headsets and devices.
Which Gaming Headsets from Arctis 7 & 7 Pro has better software?
SteelSeries’ headsets have a wireless connectivity option that comes with the PC, Xbox, PS console compatibility. Both headsets share the same dynamic drivers with high audio quality. Both headphones are designed with the same Engine software as a hub for all of your SteelSeries peripherals. By allowing the gamers power-saver adjustments these provide comfort while gaming. You can create a custom EQ with Arctis 7 & Pro headsets. So, enjoy gaming smoothly with unaffected whether you do or don’t download Engine software. Both headsets include a USB-C to USB-A adapter cable that allows you to plug the dongle into just about any USB device.
Connectivity of Arctis 7 & 7 Pro Headphones
SteelSeries Arctis 7 Headphones have compatibility with Xbox but the Arctis 7 Pro Headphones can’t be used for in-game voice chat, private chat, audio for video chat. Both 7 & 7 Pro has a standard 3.5mm male connector for easy compatibility. So, if you are willing to use SteelSeries Arctis 7 & SteelSeries Arctis Pro then these can be used wirelessly that allow users more freedom of movement. Buy a fantastic headset with improved battery life & USB-C connectivity with a fresh coat of paint to match your new Xbox Series X or PS5. Get the wireless connectivity options in Arctis 7 headphones but where in Arctis 7 Pro you can get the Wired or Wireless Options both. But both devices don’t offer the multi-pairing option to gamers. The Arctis 7 Pro covers all your bases, while the Arctis 7 is a bit more limited in terms of compatibility.
Which one to buy Arctis 7 or Arctis 7 Pro Headphones?
Both are fantastic the SteelSeries models that come with multiple features at different prices. But they are similar enough but can be distinct on some specific features. The SteelSeries Arctis Pro wireless is best for elite gamers that are proactively into gaming. But SteelSeries Arctis 7 headsets are for those who are new to gaming or don’t spend that much time in gaming. In terms of functionality and expanded frequency response, Pro sets are more accurate and responsive. So, picking up Arctis 7 Pro is the best for dedicated gamers, especially PC gamers and some PlayStation 4, 5, or Xbox gamers.
On the other hand, the SteelSeries Arctis 7 is the perfect choice for beginners that don’t need expanded surround sound and frequency response. Also, 7 offers the wireless connectivity option only with a frequency range between 20-20,000 hertz, which captures most of what you need to hear.
Wrapping Up
We believe that you have got the right idea for choosing the right headsets for your gaming. Both SteelSeries headphones are best in terms of features, compatibility & price. So, it completely depends on which type of gamer you are. If you need a casual gaming experience picking up Arctis 7 will be the best choice for you but if in case you are looking for professional gaming then Arctis 7 Pro is an amazing set of gaming headphones, especially for the price. So, spending extra money for the Pro will be effective if you are a true gamer otherwise we at Headphone Critics advise you to go for Arctis 7 Gaming Headphones.
The Top 10 Items That Add Clutter To Your Home!

Spring cleaning at my house doesn’t just mean cleaning, it also means time to declutter! I honestly love decluttering my home, probably a little to much my family might say but when I have less clutter my mind can think clearly. So here are my top 10 items that cause your home to look and feel cluttered.
- PAPERS – I think this is a given but take a look around at all the paper in your home. This is a great time to clear it out. I’ve honestly switched to a digital filling cabinet. So any medical/bank statement or important paper work is filled digitally on my phone. There are quite a few apps out there but for right now I’m just using my google drive. Don’t think about scanning in all the papers you have laying around right now, just start today. Set up a system that works for you and start “filling” those papers that come into your house digitally. Then you’re not worried about playing catch up.
- CORDS – we live with so much technology that everything comes with a charging/power cord now a days. These cords start to add clutter to your home if you’re not careful. We’ve found that having a basket in the main part of our home for all the charging cords has helps a ton. Then when our kids or ourselves need to charge a device, we know right where to look. I’ve also started using zip ties for the cords that run the computer and items on the kitchen counter. It’s cleared it up and makes it more appealing to the eye.
- ITEMS ON THE FLOOR – this one I’m a little OCD about. I don’t like things on the floor that don’t belong. I’m constantly having to pick up shoes or put away nerf gun bullets off the floor. (Please tell me I’m not alone on this?) But I’ve found even in a closet or the pantry, when I keep things off the floor the whole closet looks better. So clear up that space and leave it as empty as you can. You’ll be surprised just how much better that area looks with nothing on the floor.
- DECORATIONS – I have a weakness for decorate items, especially when I’m at Hobby Lobby. They’re just so cute. But the more items I add to my house the more it starts to look clutter. I’m all about less is more when it comes to decorating my wall space and shelving. Even stuff on the kitchen counter can start to make the area look cluttered if there’s to much. Take a look around your house and decide what you love and should stay and what you might be able to part with to help clear up the space.
- BATHROOM ITEMS – this takes up space and with all the little items laying around it can look cluttered. I recommend making it organized and easy to access but tucked away under the sink. I know those cute little trays they make for your makeup can look pretty, it can also make it look cluttered when left on the counter.
- REMOTES – We have about 3 different remotes in must our family room (on top of all the gaming systems controllers). So we made a basket for all these loose items to be stored it and it’s cleared up all the clutter. Then it’s a lot easier to find the remotes when we’re ready to sit down and relax.
- THE FRIDGE – I think there’s mixed feelings on this one. I prefer a cleared off fridge with nothing on the outside of it. I find it makes my kitchen feel less cluttered. Don’t worry the kids still have a place to hang their artwork and creations it just not on the fridge anymore. So if you can clear that off, you’ll see a big difference.
- PET TOYS – do you have a furry family member in your house? You’ve probably noticed they’re not that great a cleaning up after themselves causing more clutter. Find a cute basket or container that you can collect all their toys into when cleaning up. And keep them minimum. Just like kids, animals don’t need a lot of toys to keep them happy, a couple will do just fine.
- MAGAZINES – I know there’s so much good information in them but I promise you can find all the same information right online and avoid adding clutter to your house. Now if it’s just one or two and you rotate through I can see that not being bad but when they start to pile up and you’re having them all over the house it’s time to unsubscribe to all those magazines and get your house clutter free.
- CLOTHING & SHOES – does everything fit and do you wear everything in your closet? If not you probably find your closet cluttered and it’s time to clean out! Keep only the items that “spark joy” and toss the rest. You’ll find power in being able to make hard decisions and enjoy walking into your closet once you’ve cleaned it out.