
A PYP Best Blog! Making file boxes from cereal boxes!
Just in case you missed this DIY article on making file boxes from cereal boxes the first time we shared it a couple of years ago, we are republishing it. After we published this blog originally, we got an awesome response. This is one of the PYP Best Blogs!
My kids love, love, love anything that has to do with art, coloring, drawing, etc. We have tons of coloring books, how-to-draw books, workbooks…you name it! But I get frustrated with the mess it can create…books all over the place! This isn’t even all of them!

As you can see in the photo, I have a couple of plastic file boxes. I love organizers of any kind! I am working on organizing all these books, and I want more file boxes. But I am too thrifty to just go spend $7+ dollars on several more organizers….so I am making my own! We all have empty cereal boxes around the house. Here is one way to use them.
Supplies you will need:
a large cereal box (large enough to fit the books inside)
modge podge
brush
scissors
scrapbook paper to cover the cereal box
 You can see on the cereal box I took a permanent marker and drew the lines where I wanted to cut the box. I just used my current file boxes as a template. You can eyeball it with a ruler too.

Then cut your box on the lines you drew. Here is what mine looked like after I cut it:

Then you will want to take your scrapbook paper and trace to cut.

At first I was going to use a couple of different kinds of paper on the box, but then I changed my mind. Here are all the paper pieces, ready to be put on the box.

Take your modge podge and paintbrush and cover one side at a time. Line up the paper pieces that fit on that side and press firmly. Get out all the air bubbles and smooth out.

When you are all done with each side here is what it looks like. Pretty cute, huh!

After it dries for a bit, take your paintbrush and paint modge podge over the edges and corners to reinforce durability.
Now you have a cute file box! I put it in the cupboard…and it looks great! Now I need to make a few more. I will also label them with the book contents to make it easier for the kids to put things back where they belong.
 I already had all my supplies on hand for this project, so I didn’t have to spend any extra money to start organizing my kids workbooks. Next time you need to do some organizing, think thrifty and pinch your pennies!
PickYourPlum! Chalkboard Frames! Metal Stamping Sets & Pendants! Striped Lace Trim Socks! Striped Tunic!


 Write About Now – Chalkboard Frames
It doesn’t get more rustic-chic than this.
Starting at $7.99 (52% off) Retail: $16.99
Stamp on It! – Metal Stamping Sets & Pendants
Let’s get stamping.
Starting at $5.99 (53% off) Retail: $12.99
Knock Your Socks Off! – Striped Lace Trim Socks
Sometimes your toes just need to wear something cute.
Starting at $1.99 (71% off) Retail: $6.99
In Style in Stripes – Striped Tunic
Show off your sense of style in stripes.
$13.99 (60% off) Retail: $34.99
Plus lots more CUTE deals!
LOTS of cute deals! Inexpensive shipping!
PickYourPlum! Trick or Treat Halloween Bags! Brag Book! Draped Cardigan! More!


A Little Tricksy – Trick or Treat Halloween Bags
Because pillow cases are old news.
Starting at $4.99 (61% off) Retail: $12.99
Something to Brag About – Brag Book
Worth bragging about.
Starting at $6.99 (53% off) Retail: $14.99
Perfectly Draped – Draped Cardigan S to 3X!
Perfectly draped fabric is the best kind to wear.
$12.99 (61% off) Retail: $34.00
Home Run – Patch Sleeve Baseball Top
This shirt scores a home run.
$11.99 (57% off) Retail: $28.00
Plus lots more CUTE deals!
LOTS of cute deals! Inexpensive shipping!
A PYP Best Blog! Thrifty and Fun Birthday Cake Gift!
Just in case you missed this DIY article on making a thrifty and fun birthday cake gift the first time we shared it a couple of years ago, we are republishing it. After Marne wrote this blog originally, we got an awesome response. This is one of the PYP Best Blogs!
Are you looking for a gift to give a teenager or friend for their birthday? Look no further! This is a fun, quick, easy and satisfying gift idea for all ages! In fact, I made this today for my son’s 12th birthday…as his birthday cake! He LOVED it!

Here is what you need to make this fun birthday cake!

Empty 2 liter bottle (with the top cut off so it sits flat)
8 soda cans of your choice
12-14 mini candy bars of your choice
wide ribbon for the cake
thin ribbon for the top
candle
cake plate
tape
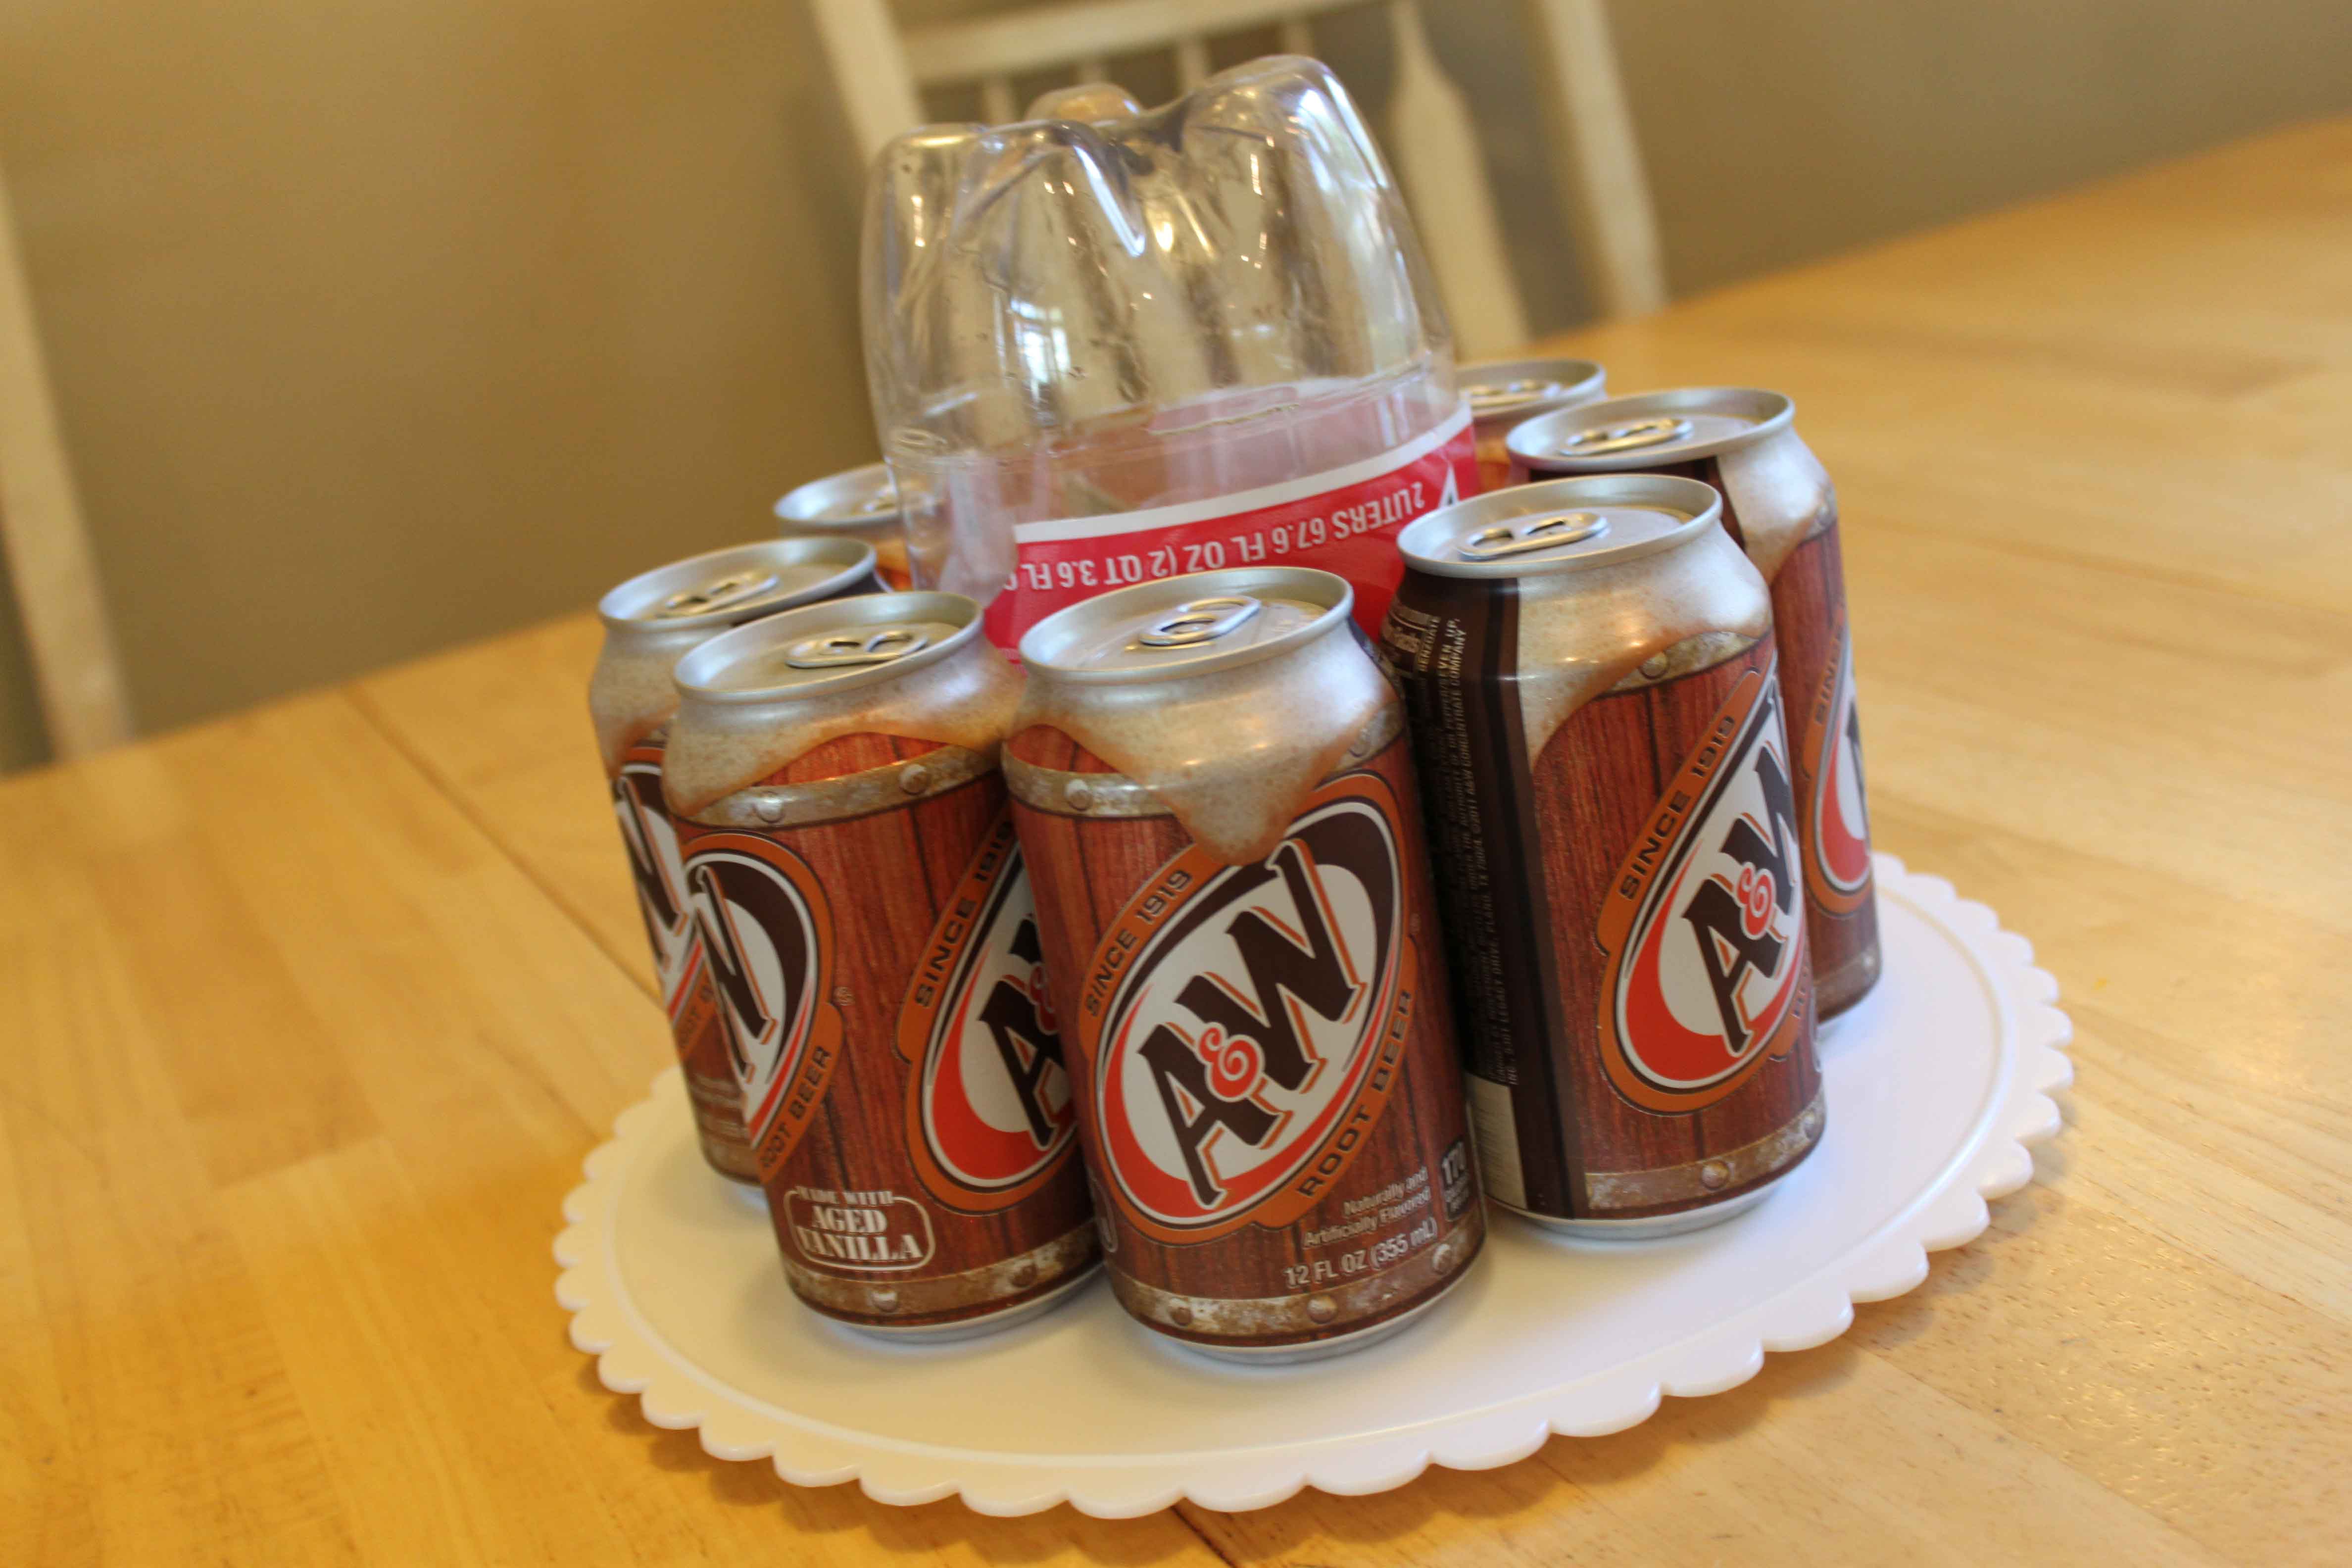
Begin by placing the two liter on the cake plate upside down (so the rutted edge bottom is now the top) and place the soda cans around it. You can place tape on the soda cans so they stick to the plastic bottle and don’t shift.
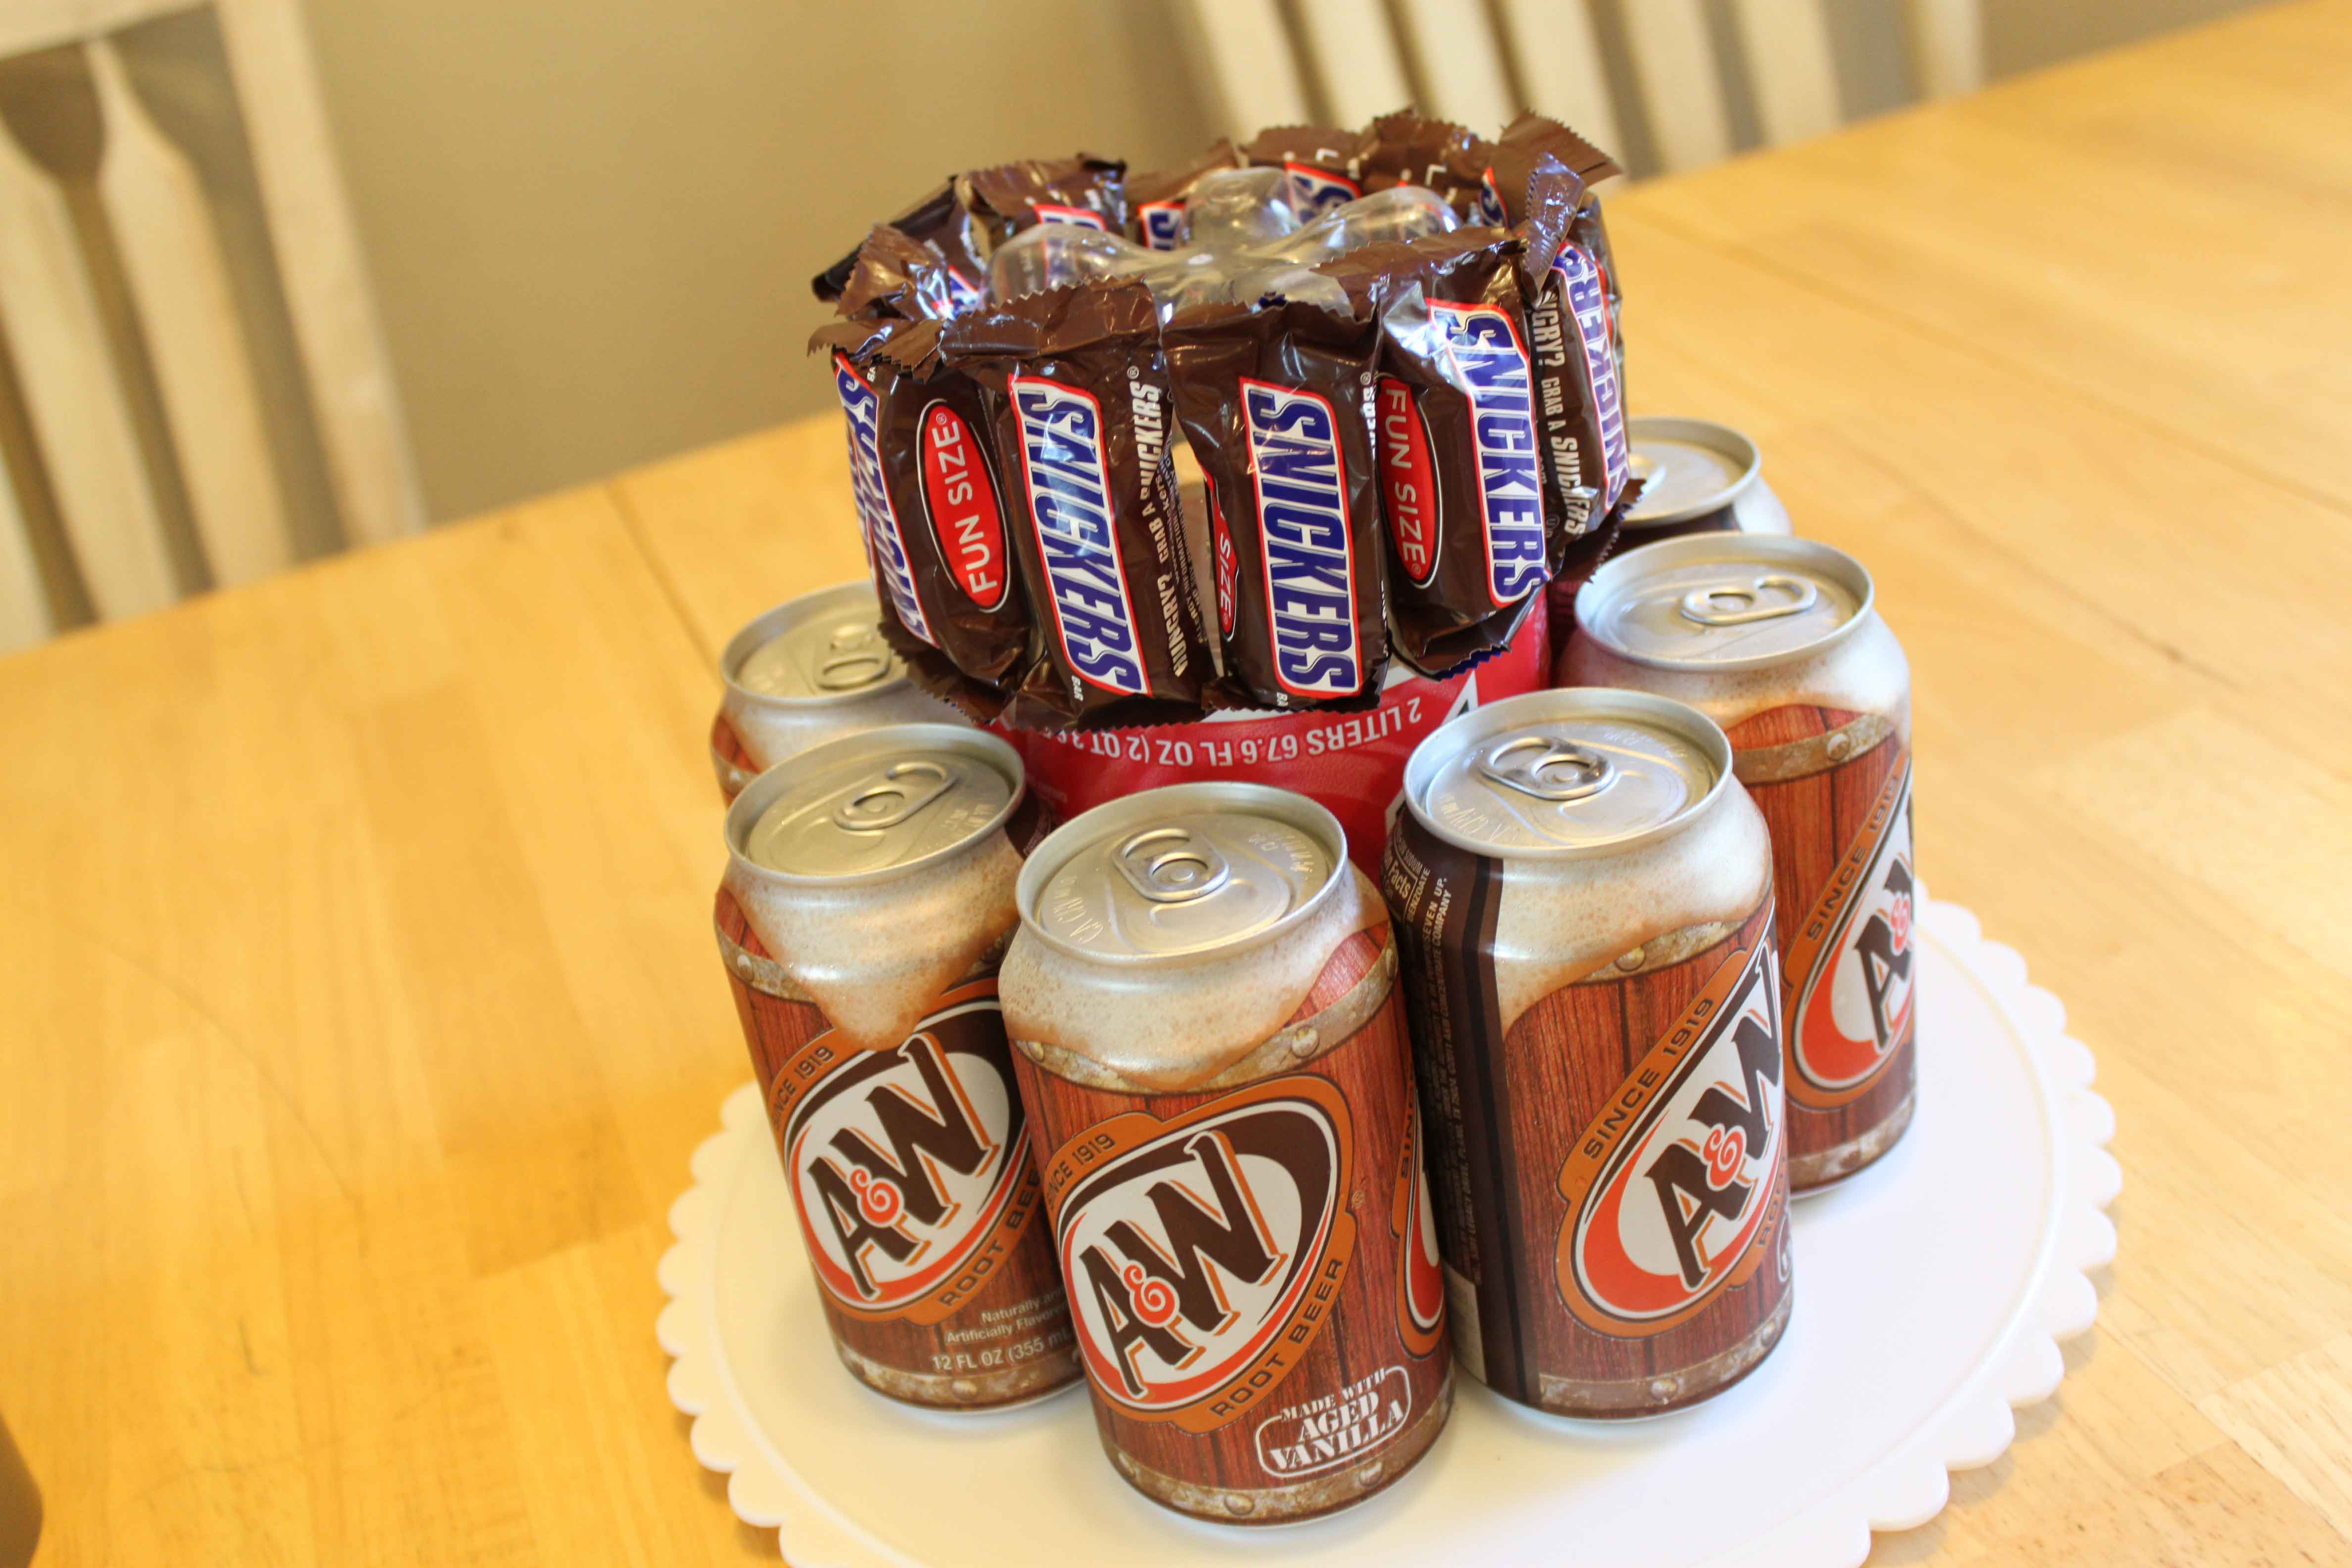
Then place the candy bars around the same way. I also used tape so they didn’t fall. I placed them up a little higher as the wide ribbon would cover it.
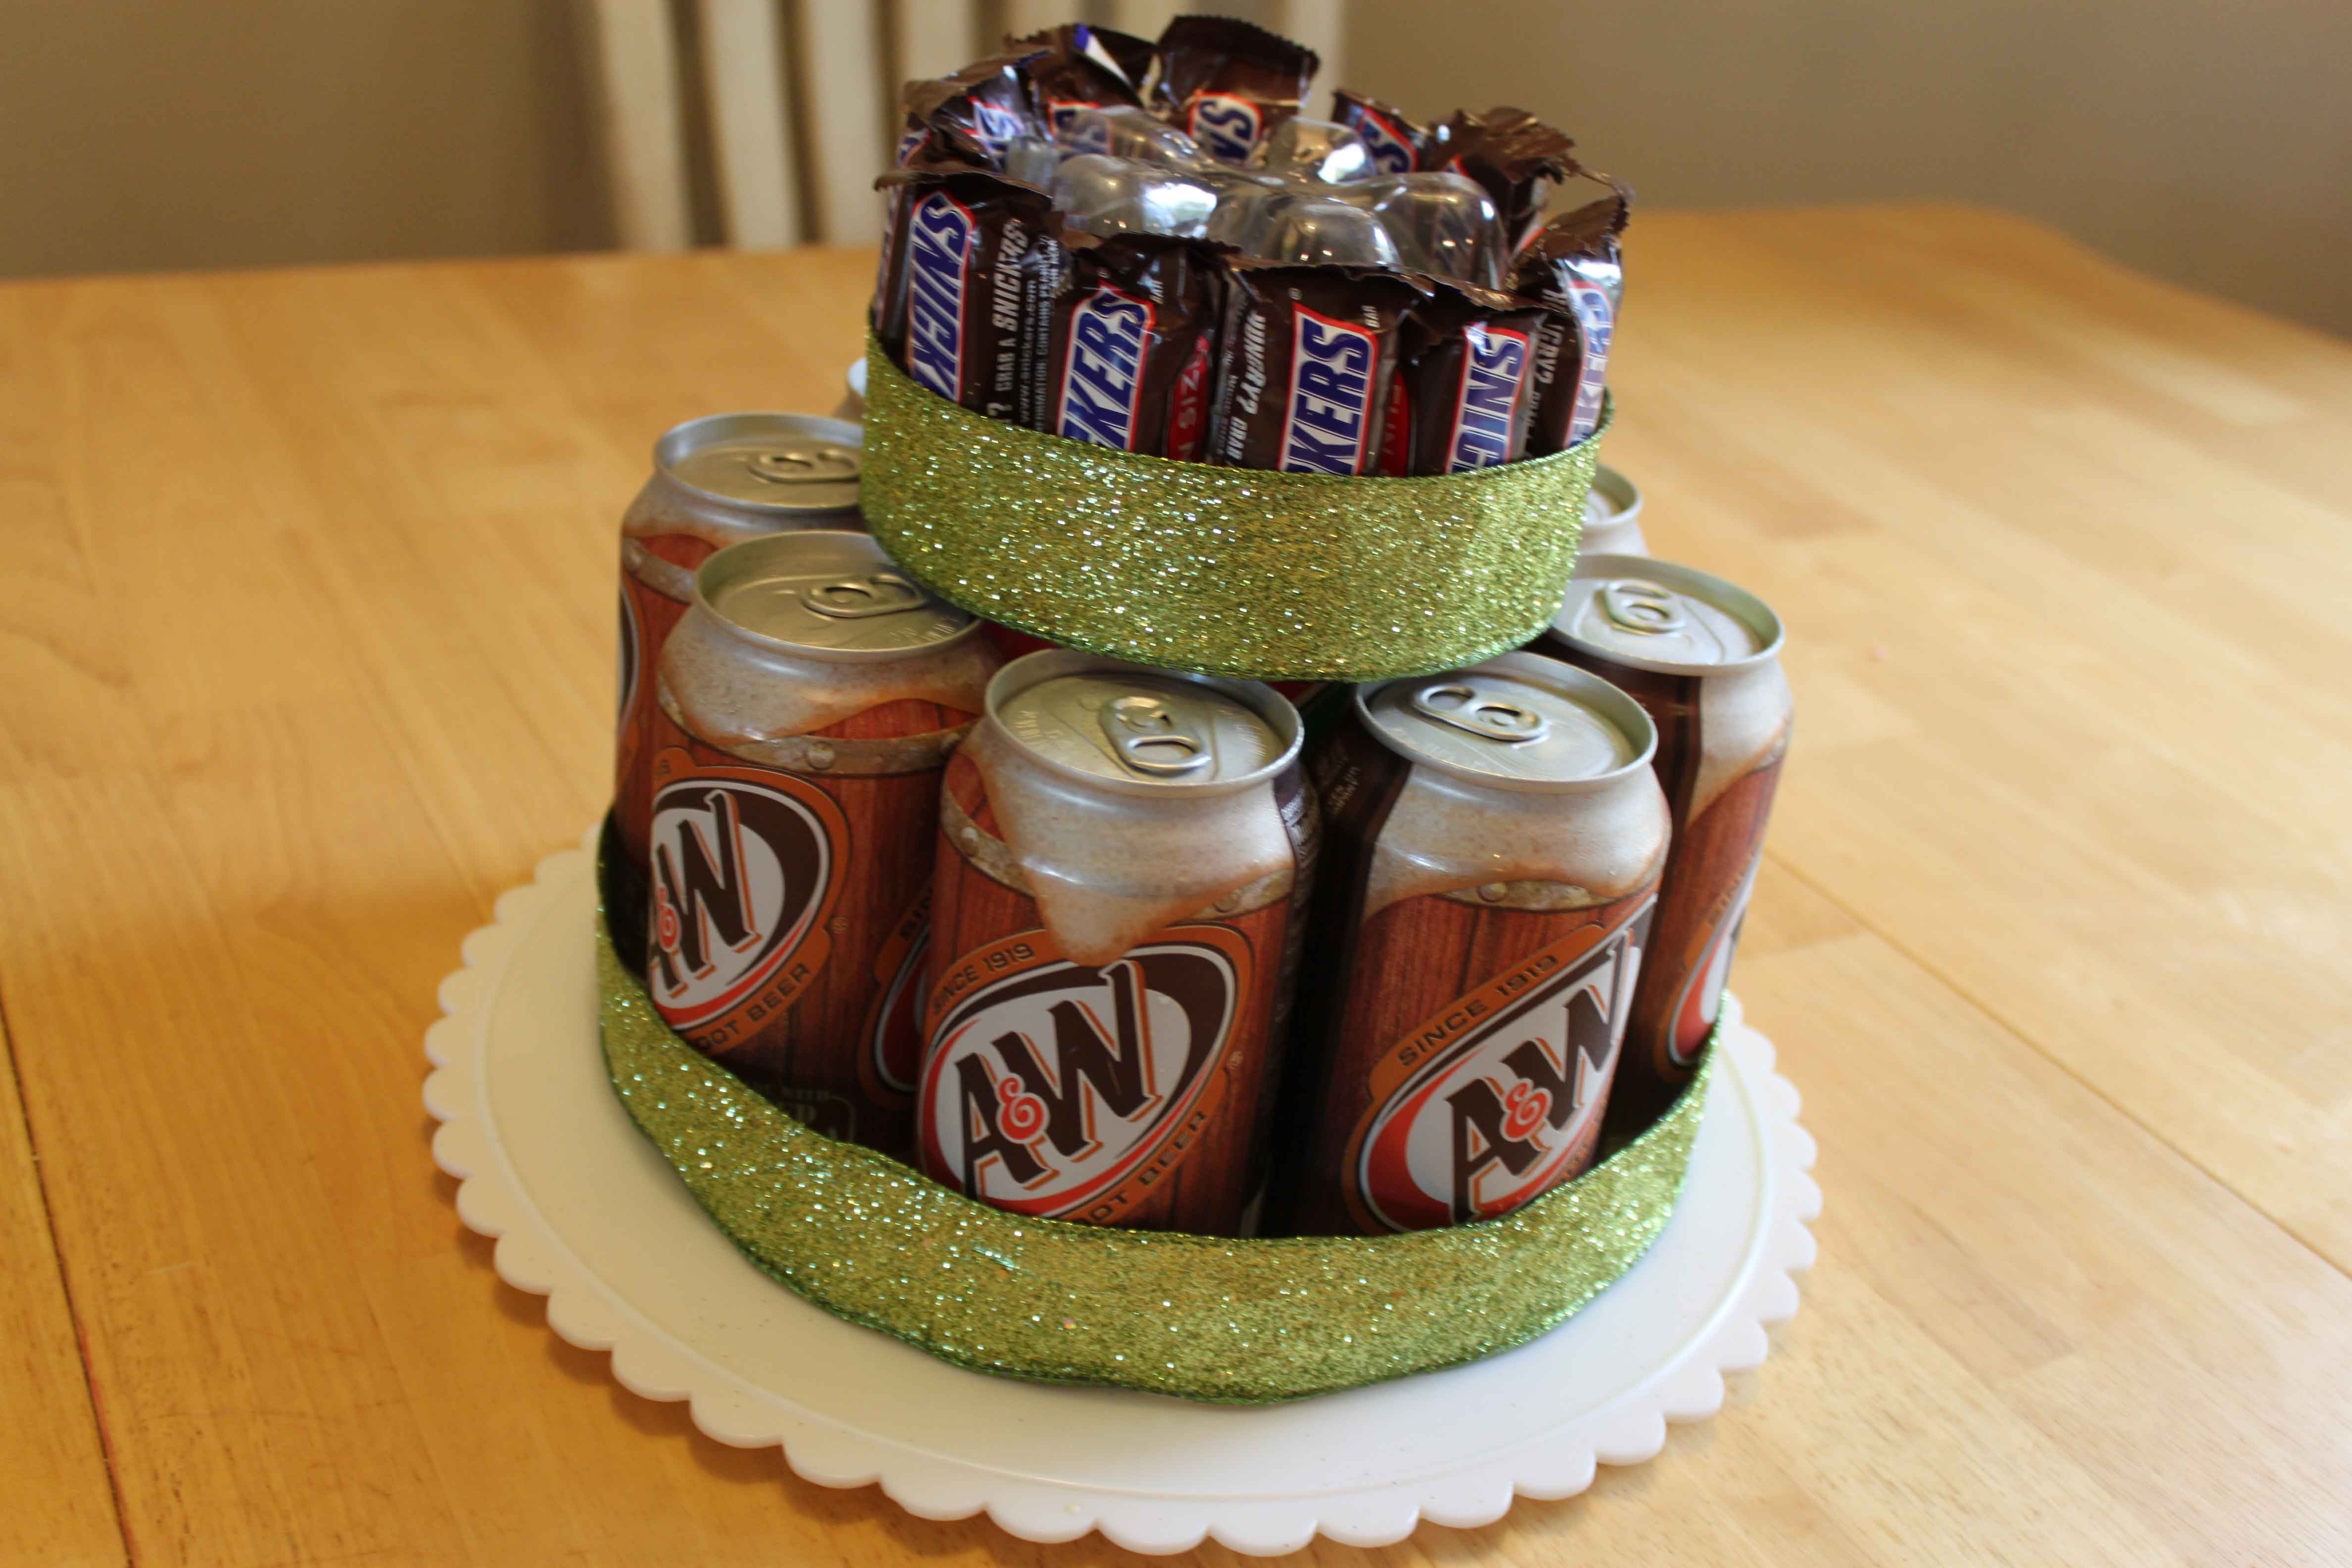
Then cut the wide ribbon to size and put it around both spots as shown. I stapled my ribbon together after measuring it and cutting it, then slipped it over where it needed to go.
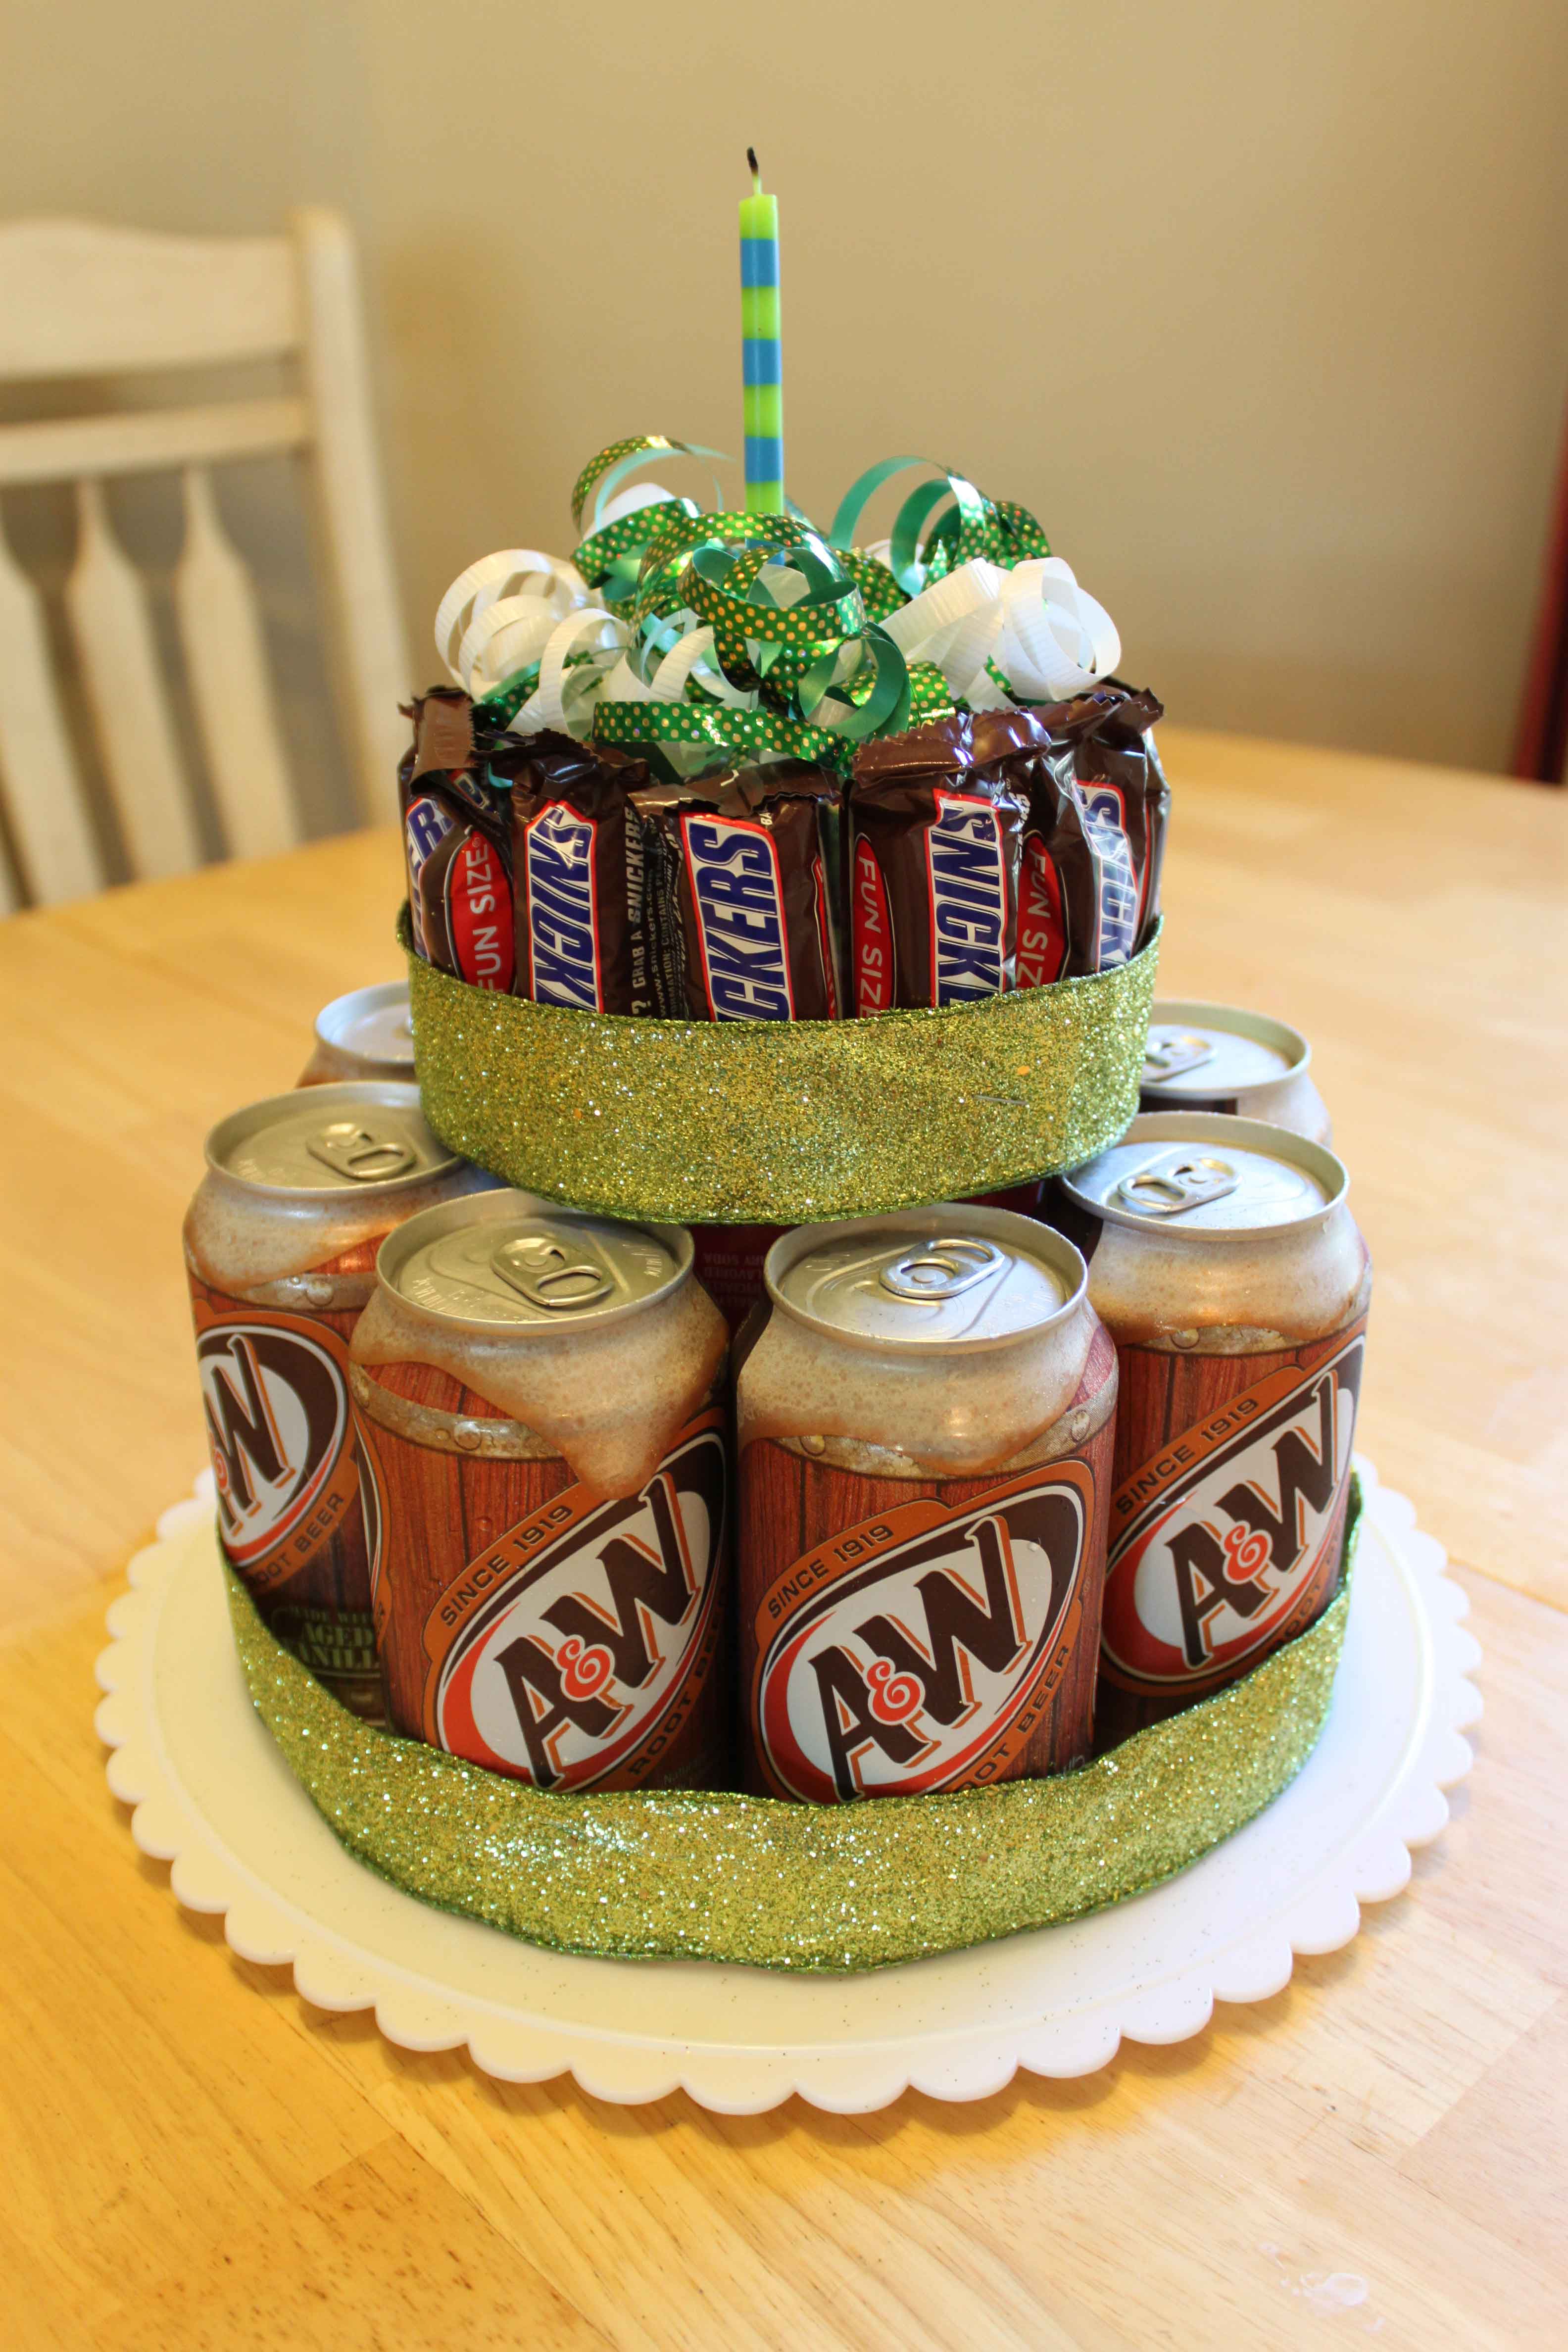
The last step is to poke a hole in the top of the bottle (in the middle of the notches) and put your candle in. I actually hot glued my candle on tonight, and it worked just fine! Then cut a bunch of thin ribbon, curl it, and tape it in place to cover the rest of the bottle. Now you have a totally fun, cute, thrifty and awesome gift for a birthday! This is a perfect idea for those who don’t bake.
PickYourPlum! Tin Bucket with Dividers! Fox Socks! Washi Tape! Striped Sweater!


Tin is In – Oval Tin Bucket with Dividers
There is such a thing as the perfect tin.
Starting at $13.99 (65% off) Retail: $39.99
The Big Bad Fox – Crochet Fox Socks
F-O-X
Starting at $9.99 (50% off) Retail: $19.99
You’ll Want to Washi Everything – Chalkboard Washi Tape
Once you start, you won’t want to stop.
Starting at $2.99 (57% off) Retail: $6.99
The Perfect Fall Sweater – Extra Long Striped Sweater
Cozy and stylish. What more could you ask for?
$11.99 (64% off) Retail: $34.00
Plus lots more CUTE deals!
LOTS of cute deals! Inexpensive shipping!
A PYP Best Blog! DIY Garage Mudroom on a Budget!
Just in case you missed this article on DIY garage mudroom on a budget the first time we shared it a couple of years ago, we are republishing it. After Marne wrote this blog originally, we got an awesome response. This is one of the PYP Best Blogs!
I have been looking at mudroom ideas online for months. The idea of making a garage mudroom is not a new one, but I needed to really tweak all these ideas I was finding. Simply because we have hardly any space. We have a 2-car garage and are pretty cramped. But I KNEW I could do it, and we did! My only regret was that I forgot to take before pictures! We were too anxious to get it done before we left for Thanksgiving. This post is proof that you don’t have to spend much money to have a functional and organized mudroom! Here is what we did.
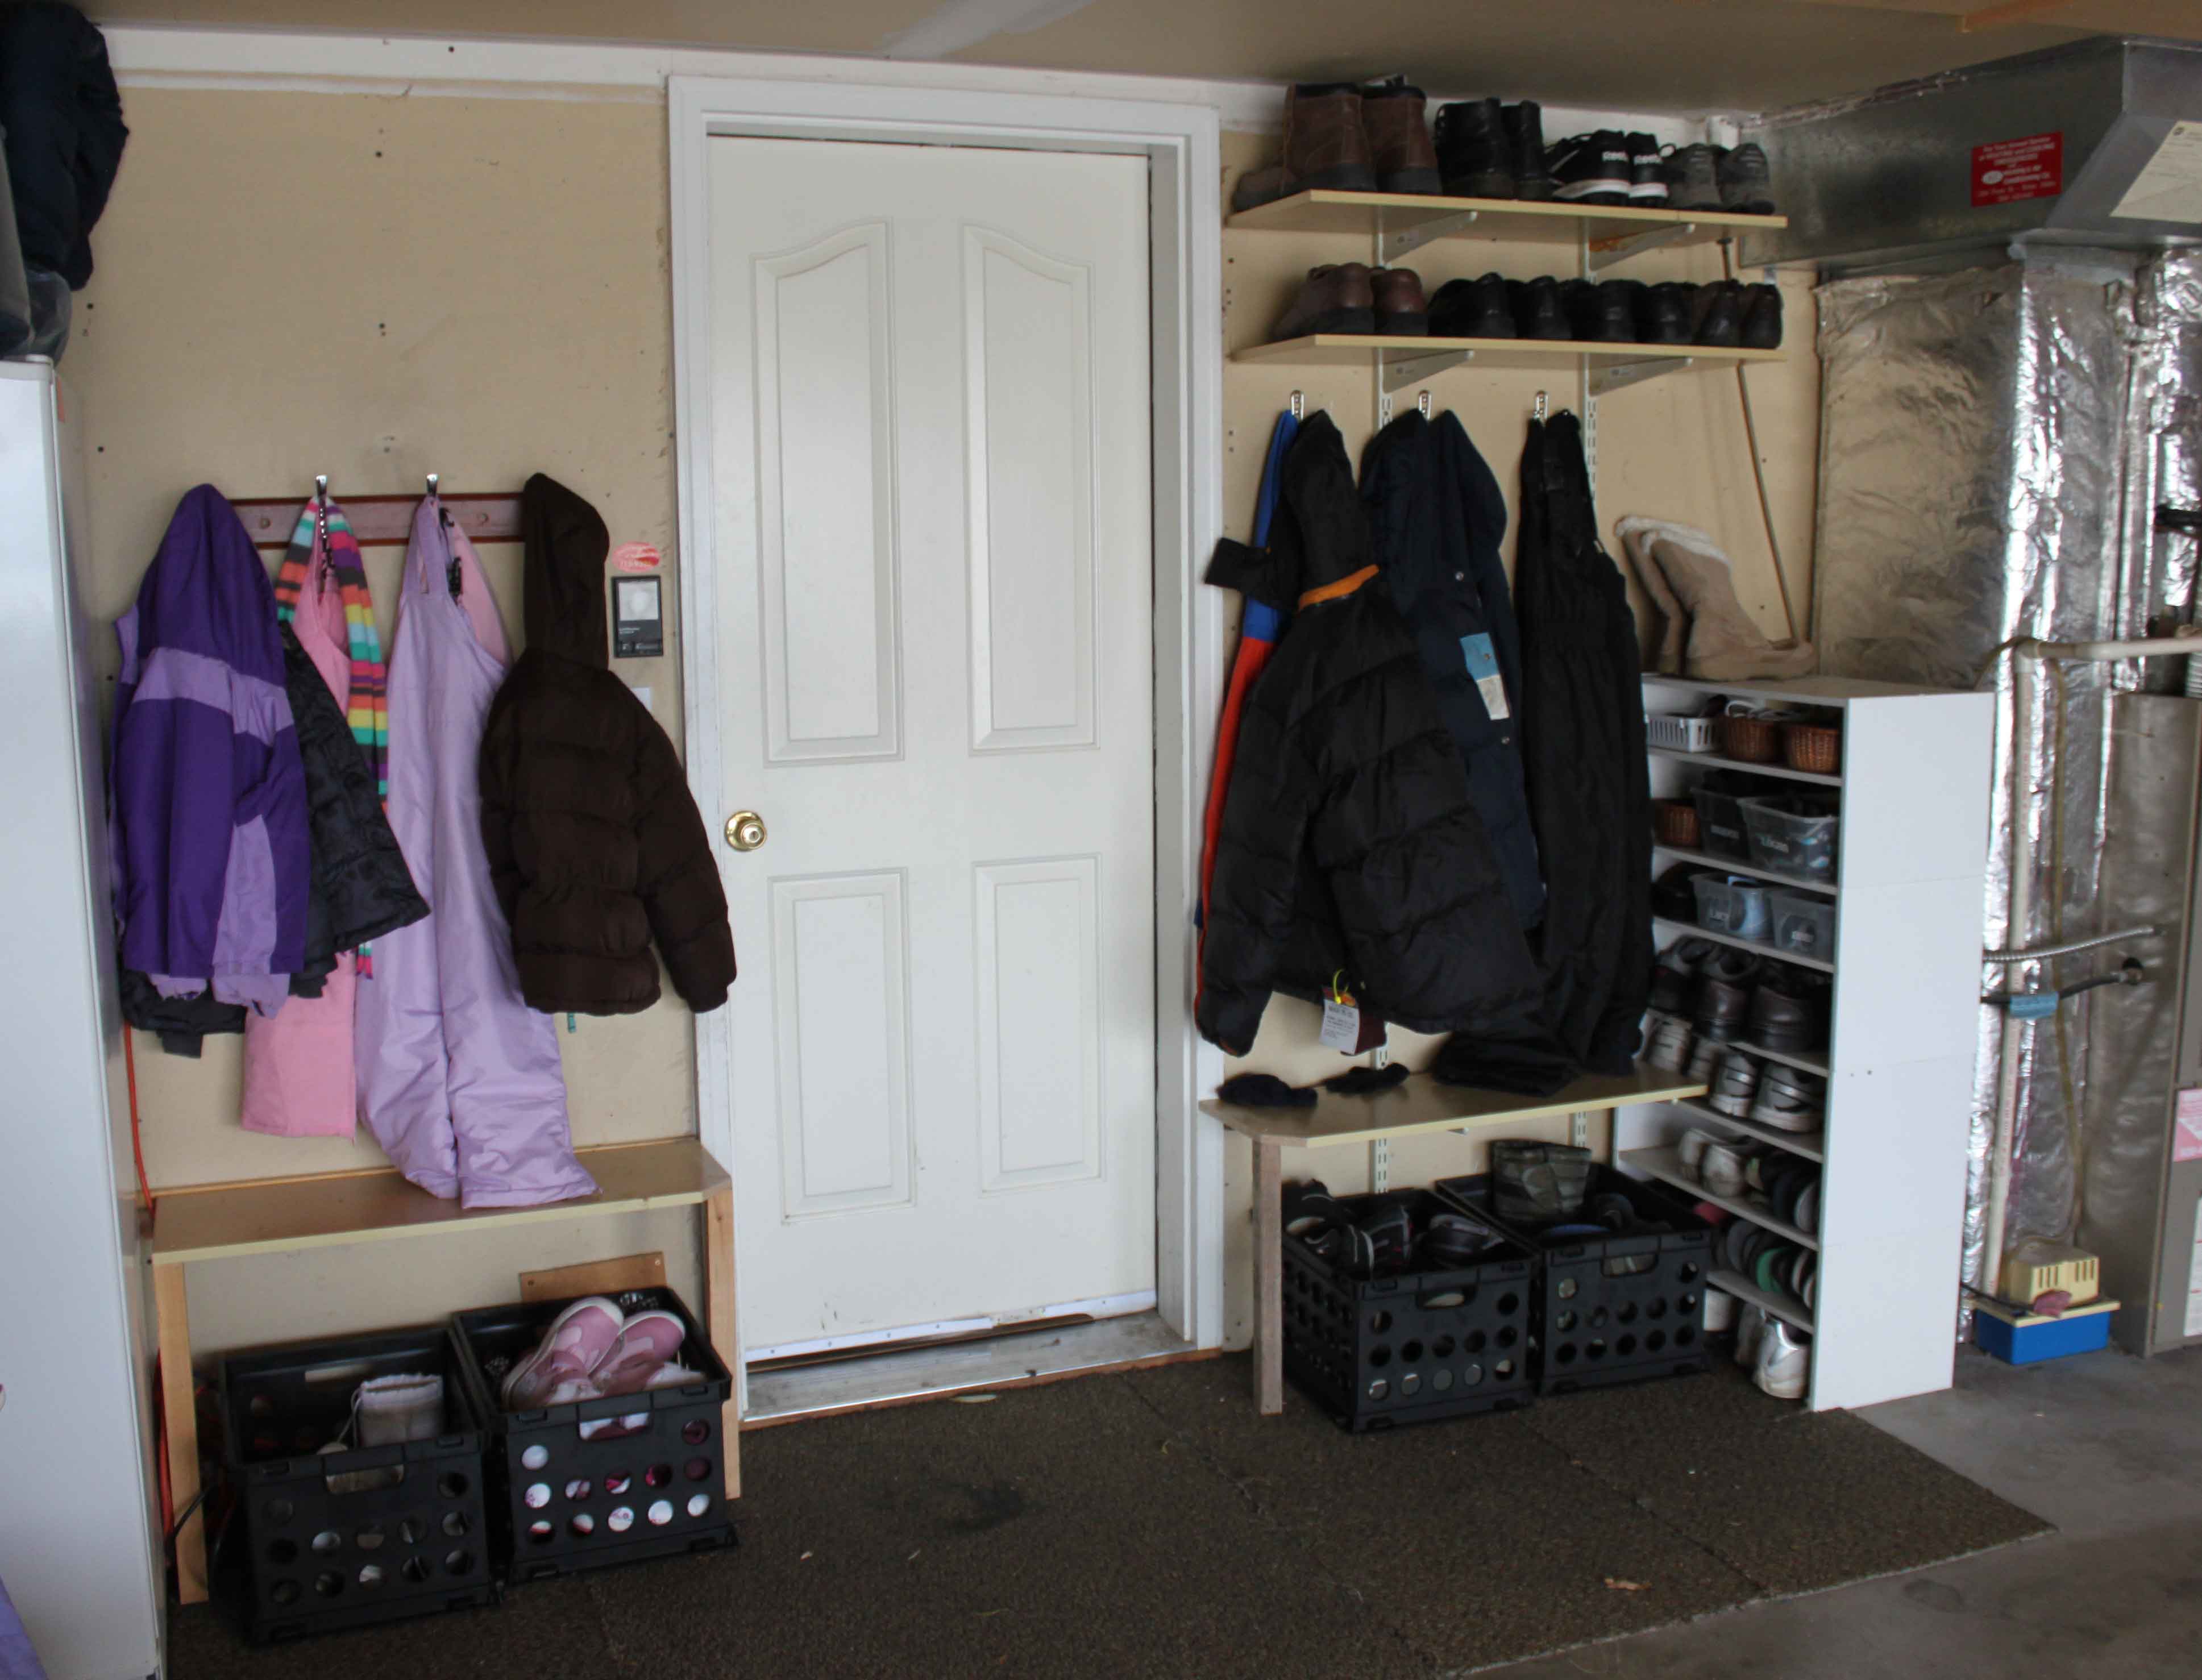
1. I originally wanted cubbies, but when I looked at the space we had, I realized that wasn’t possible. So we just did hooks. We already had the 4-hook one on the left, then I bought 3 hooks for the right side.
2. I bought a black bin for each child ($7 at Walmart in the office supply section) to put their shoes in.
3. My hubby build two benches for each side with wood scraps already in the garage.
4. We put two shelves up high (that we already had, just stored away) for hubby’s shoes. He can reach them!
5. We moved around & cut some carpet scraps we had to make them fit perfectly around the area.
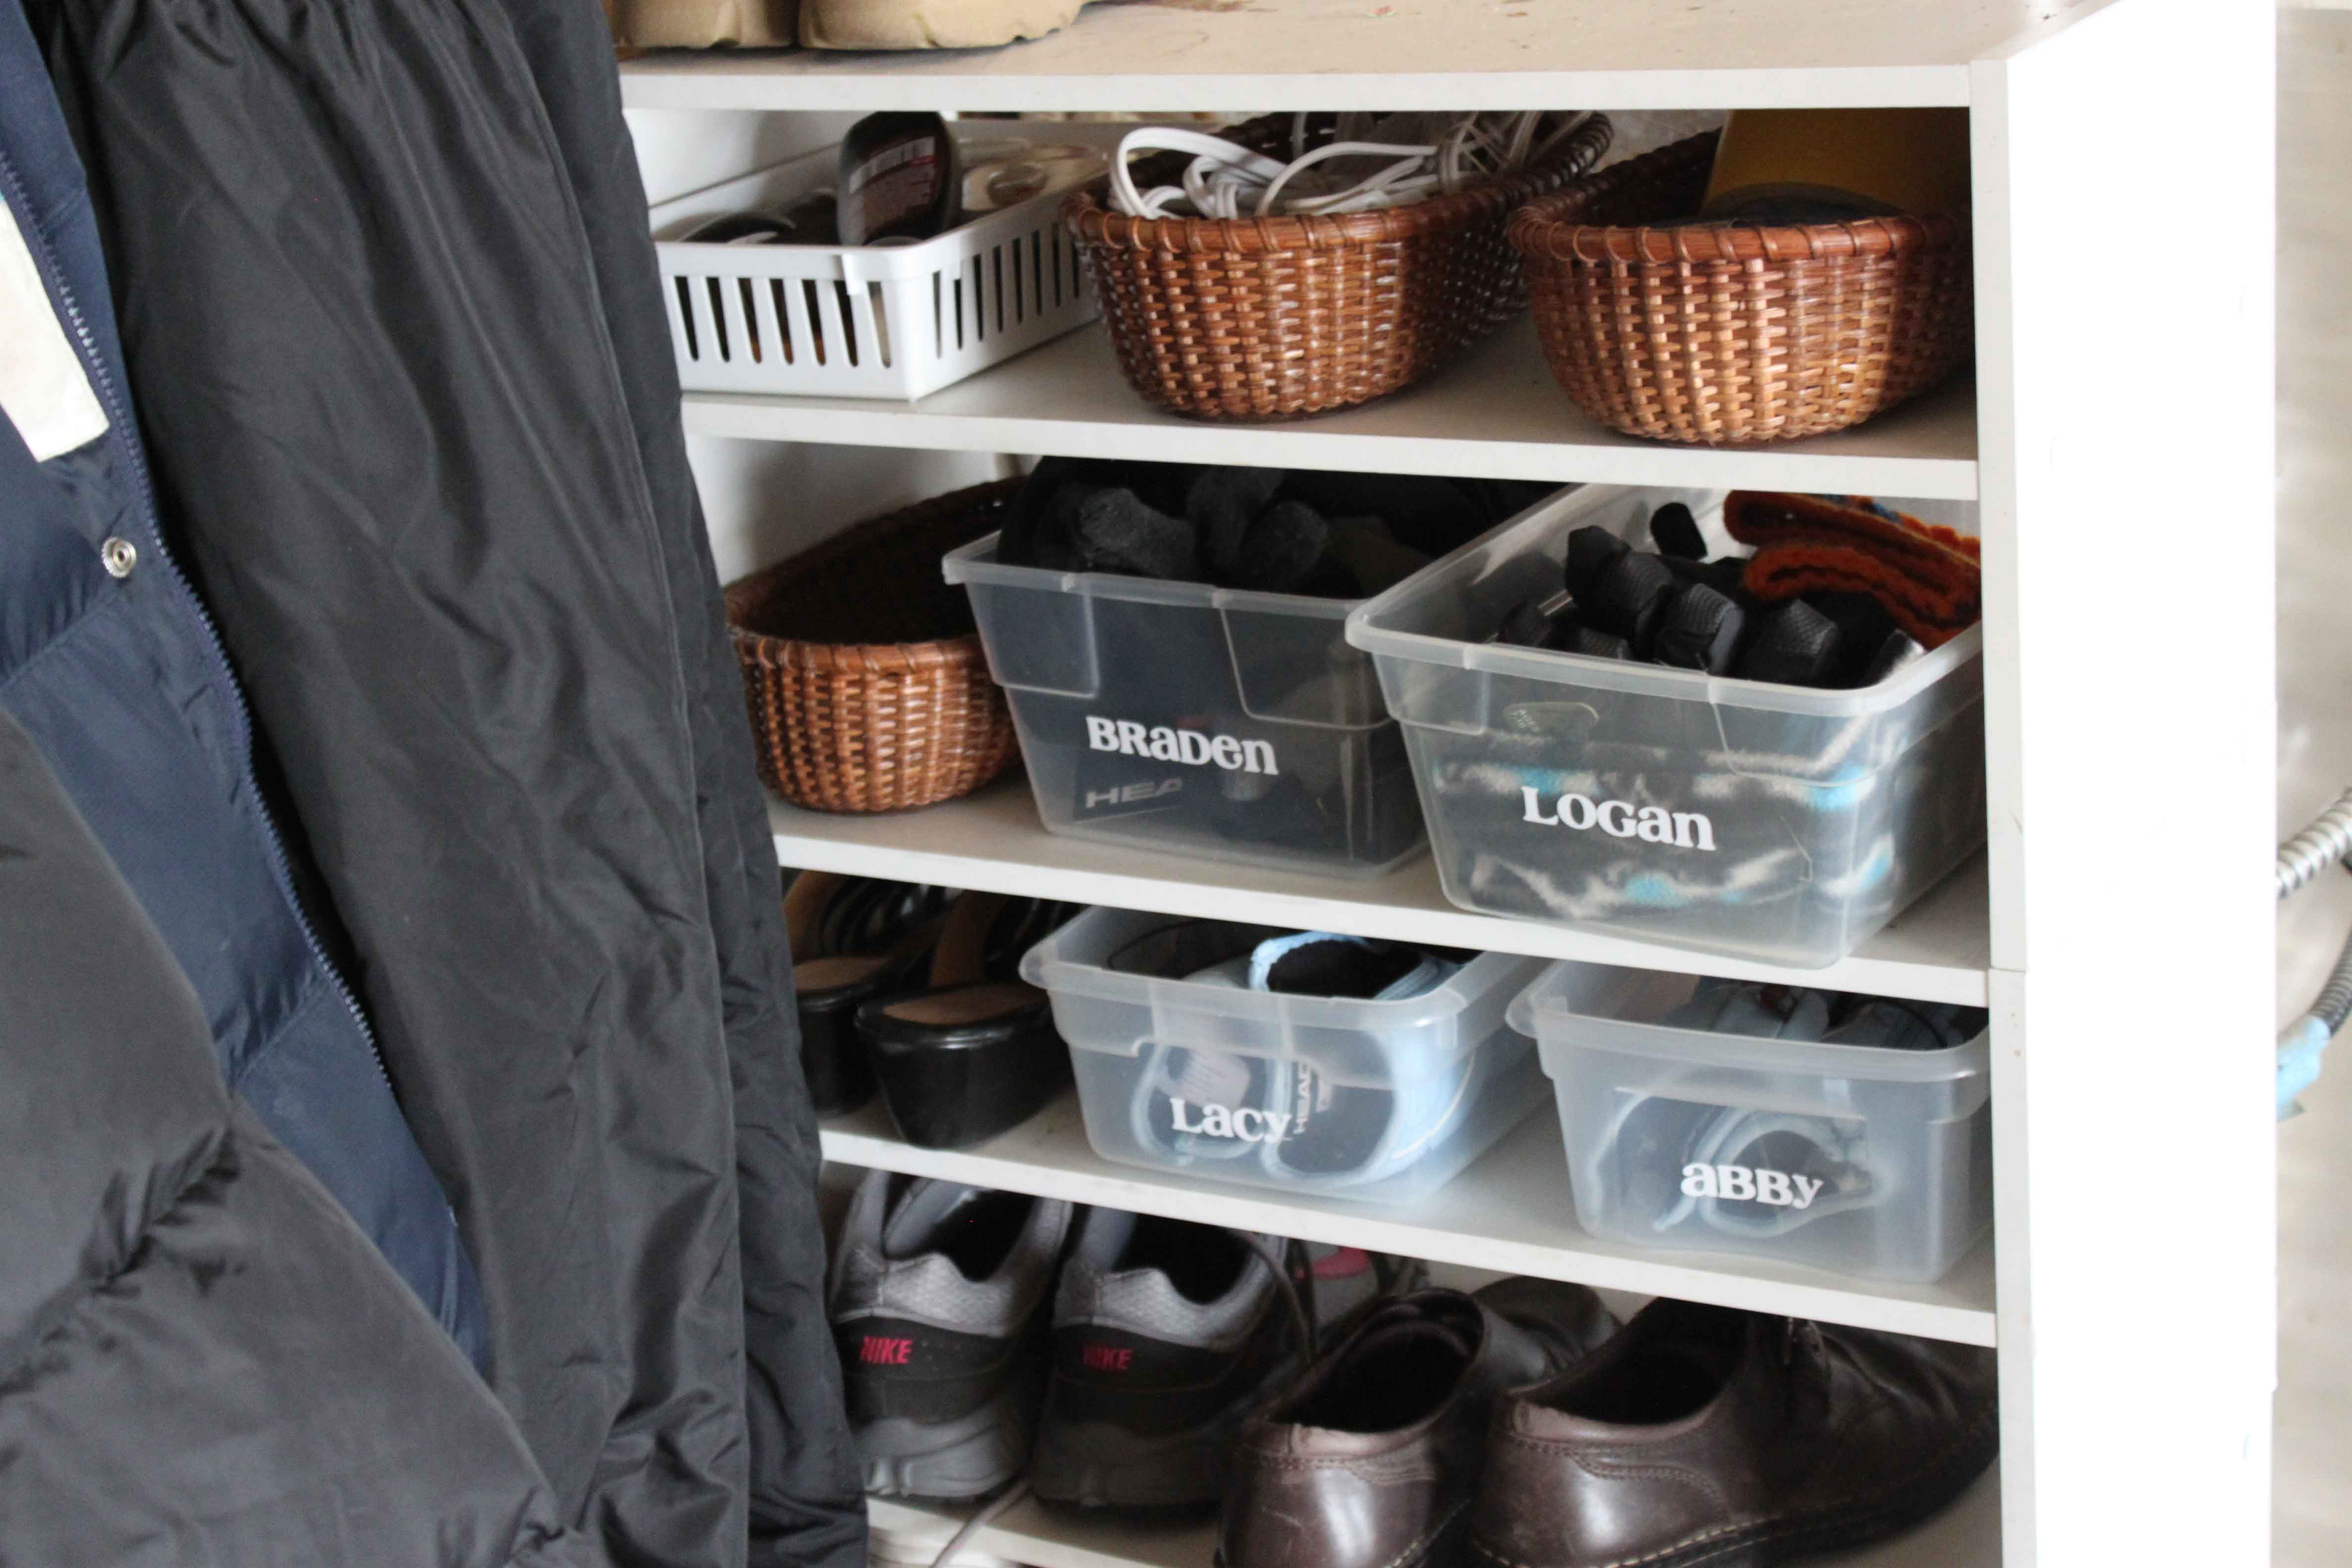
6. The original shoe shelf on the left still hold my shoes and hubby’s. As you can see, I gathered up 4 clear bins in my house I wasn’t using and made them homes for the kids’ winter gloves, hats, and scarfs. Then I used 3 small baskets I already had to store duct tape, shoe shine/shoe brush, and electrical cords that we always use.
We spent a grand total of $35.45 on this garage mudroom! I know it isn’t the fanciest, but if you saw the mess before (shoes EVERYWHERE, and coats all over the house & not enough room for them) you would be so impressed! I love that is is so functional for our family. I was proud of myself for trying hard to use what we already had instead of spending more money.
We are still planning on doing the following things:
1. Putting 4-5 more hooks on the left side above the girls’ hooks for all hats we have. That will also be a big help for us.
2. Putting a wire shelf (that we already have) on top of the white shoes racks to make one more level for the winter boots.
So what do you think? Have you done a garage mudroom for your family?
PickYourPlum! Cosmetic Bag! Jute Bags! Decorative Tags and Envelopes! Ruffle top!


Time To Make Up – Cosmetic Bag
Lights, Camera, Make-up.
Starting at $8.99 (47% off) Retail: $16.99
Return the Favor – Jute Bags with Tie Top, 3pk
Kick your party game up a notch.
Starting at $2.99 (57% off) Retail: $6.99
Tag, You’re It – Decorative Tags and Envelopes
Tagging someone is always fun.
Starting at $2.50 (64% off) Retail: $6.99
Who Doesn’t Look Good in Ruffles – Ruffle Top
Let’s face it, anyone can pull off ruffles.
$6.99 (72% off) Retail: $24.99
Plus lots more CUTE deals!
LOTS of cute deals! Inexpensive shipping!
Frozen Dolls 2 for $20, Halloween Crafts & Decor, Football Leg/Arm Warmers, Maxi Skirt Blowout & More!


Jane.com LINK
- $4.99 Felt Superhero Masks
- $5.99 Football Leg/Arm Warmers!!!
- $12.99 Wooden Halloween Crafts- 3 Styles!
- $12.99 5 Styles Modest Closet Maxi Skirt Blow Out
- $19.99 Princess Dolls – Set of 2!
- $10.99 Fall and Halloween Burlap Banners!
More cute stuff available today! Low shipping prices!
New at Zulily! Labor Day blow-out sale in every department!

Labor Day blow-out sale in every department!
Take some time to kick back, relax and reward yourself this weekend with our Labor Day blow-out sale! We’ve got something for everyone, from gadgets and housewares to clothes and accessories. It might be hard work picking a favorite from this amazing selection, so snag a few and content yourself with the feeling of a job well done.
PickYourPlum! Fun Set of 40 Bandages! LED Animal Lamp! Wood Pumpkin Chalkboards!


You Should See the Other Guy – Fun Set of 40 Bandages
For all life’s battle scars.
Starting at $5.99 (45% off) Retail: $10.99
All Bark, No Bite – LED Animal Lamp
No need to be scared of the dark, you’ve got a guard dog.
Starting at $7.99 (38% off) Retail: $12.99
It’s Pumpkin Season – Wood Pumpkin Chalkboards
You can’t ever have too many pumpkins.
Starting at $5.99 (57% off) Retail: $13.99
A New Staple For Your Wardrobe – Striped Cardigans
You can never have too many staples in your wardrobe.
$8.99 (71% off) Retail: $32.00
Plus lots more CUTE deals!
LOTS of cute deals! Inexpensive shipping!
New at Zulily! Aztec Inspiration: Jewelry — up to 85% off!

Aztec Inspiration: Jewelry — up to 85% off
Rich, bold and full of unique drama, this Aztec-inspired jewelry is sure to put a chic twist on your style statement! Featuring everything from woven leather bracelets to beaded bib necklaces, these tribal pieces enchant style-seekers and add artistry to wardrobes. So, next time you’re in need of a unique fashion-finisher, turn up the trendiness with some tribal flair!
PickYourPlum! Get it first! Tabletop Party Tins! Paper Garlands! Cupcake Sets!


Let the Party Begin – Tabletop Party Tins
Are you ready to party?
Starting at $19.99 (71% off) Retail: $70.00
Time to Party – Pom Pom and Paper Garlands
Bring out the pom pom & garland. It’s party time.
Starting at $3.99 (69% off) Retail: $12.99
Cupcake Sets! – Liners 24pk & Flags 24pk
It’s time for cake.
Starting at $1.99 (84% off) Retail: $12.99
Fall in Love – Striped Dolman
You’ll love it so much you’ll want to show everyone.
$12.99 (61% off) Retail: $34.00
Plus lots more CUTE deals!
LOTS of cute deals! Inexpensive shipping!
PickYourPlum! Grab Boxes – Get Them Before Your Neighbor! Go, Go, Go! Will sell out!

Grab Boxes – Get Them Before Your Neighbor. Ready. Set. Go!
Get it before your neighbor.
Starting at $35.99 (55% off) Retail: $80.00
Plus lots more CUTE deals!
LOTS of cute deals! Inexpensive shipping!

PickYourPlum! Washi Tape! Canvas Bag w/ Rope Handle! Teacher Stamps! Roll Tab V Neck!


Back to School – Washi Tape
All Washi-ed Up
Starting at $1.50 (78% off) Retail: $6.99
For the Bag That Runneth Over – Canvas Bag with Rope Handle
Big and bold and under control.
Starting at $8.99 (54% off) Retail: $19.95
Raise Your Hand if You Love the Teacher – Teacher Stamps
Give your teacher a stamp of approval.
Starting at $9.99 (69% off) Retail: $32.99
Fall’s Best Look – Roll Tab V Neck Shirt
Let it Roll.
$7.99 (69% off) Retail: $26.00
Plus lots more CUTE deals!
LOTS of cute deals! Inexpensive shipping!