
PickYourPlum! Metal Cake Stand! Draped Sleeve Dolman Shirt!


Cake, Baby – Metal Cake Stand
What tastes good should look good too.
Starting at $9.99 (66% off) Retail: $29.99
Perfect Back to School Dolman – Draped Sleeve Dolman Shirt
Basics at their best.
$9.99 (62% off) Retail: $25.99
Plus lots more CUTE deals!
LOTS of cute deals! Inexpensive shipping!
Martha Stewart Living Magazine Just $12.29 for 1 Year!

Martha Stewart Living Magazine Just $14.99 for 1 Year!
July 27th Only – Use Coupon Code BIGSALE and Save an Additional 18%!
PickYourPlum! Ruffly Fabric! Tire Lights 4Pack! Cell Phone Dry Bags! Nautical Tops!


Luffly and Ruffly – Ruffly Fabric
Ruffle some feathers.
Starting at $2.99 (85% off) Retail: $19.99
Let it Glow – Tire Lights 4 Pack
Light things up.
Starting at $3.99 (60% off) Retail: $9.99
High and Dry – Cell Phone Dry Bags
Don’t be left high and dry.
Starting at $3.99 (73% off) Retail: $14.99
Dress it Up or Down – Nautical Stripe Boat Neck Top
Stand out in a crowd.
$8.99 (71% off) Retail: $32.00
Plus lots more CUTE deals!
LOTS of cute deals! Inexpensive shipping!
PickYourPlum! Time Teacher Clocks! Leg Warmers! Maxi Skirt! Marker Holders!


It’s About Time – Teacher Clocks
Who doesn’t want the gift of time?
Starting at $12.99 (56% off) Retail: $30.00
Heat ‘Em Up! – Leg Warmers
Keep your legs warm.
Starting at $3.99 (84% off) Retail: $25.00
Total Statement Maker – Stripe Jersey Maxi Skirt
Stripes really are the greatest.
$11.99 (62% off) Retail: $32.00
Hear it Click – Marker Holders
Because your markers look best with their lids on.
Starting at $5.99 (53% off) Retail: $12.99
Plus lots more CUTE deals!
LOTS of cute deals! Inexpensive shipping!
PickYourPlum! Pillow Covers! Necklace and Bracelet Set! Stripe Zip Hoodie! Tanks!


You Are Getting Sleeeeepy – Pillow Covers
The best kind of pillow is one that’s dressed to put you out.
Starting at $6.99 (58% off) Retail: $16.99
Light and Lovely – Necklace and Bracelet Set
Fall into Fashion.
Starting at $1.99 (90% off) Retail: $19.99
Stylish Comfort – Stripe Zip Hoodie
Are you ready for comfy fall fashion?
$11.99 (60% off) Retail: $29.99
The More Layers the Better! Extra Long Racerback Layering Tanks
Layers go with anything…
$5.99 (66% off) Retail: $18.00
Plus lots more CUTE deals!
LOTS of cute deals! Inexpensive shipping!
PickYourPlum! Indoor/Outdoor Vinyl! French Fry Boxes Pack! Girls 2 Piece Outfit!


Vinyl is for the Cool Kids – Premium Removable 3 Year Indoor/Outdoor Vinyl
Get smart. Get vinyl.
Starting at $1.99 (60% off) Retail: $4.99
Something on the Side – French Fry Boxes Pack of 10
Side order of fries, please.
Starting at $2.99 (66% off) Retail: $8.99
Mismatched to Perfection – Girls 2 Piece Outfit
For your little sass-a-frass.
$14.99 (62% off) Retail: $39.99
Plus lots more CUTE deals!
LOTS of cute deals! Inexpensive shipping!
PickYourPlum! Pencil Skirts! Women’s Tights! Metal Lanterns!


Take Note – Pencil Skirts
These earn an A+.
$8.99 (55% off) Retail: $19.99
Keep it Tight – Women’s Tights
For when your every day legs just won’t do.
Starting at $4.99 (64% off) Retail: $13.99
Truly Revo-luminary – Metal Lanterns
Shine bright with a lantern. Limit 4 per order.
Starting at $9.99 (50% off) Retail: $19.99
Plus lots more CUTE deals!
LOTS of cute deals! Inexpensive shipping!
PickYourPlum! Personalized Wooden Books! Girls 2 Piece Outfit! Colorful Paper Tags!


Talk About a Hardback – Personalized Wooden Books
Your nose will like being stuck in this book.
What’s Black and Red and Cute All Over? – Girls 2 Piece Outfit
Big style for little girls.
$14.99 (40% off) Retail: $24.99
Light it Up – Colorful Paper Tag 40 Pack
Because the best packages are wrapped to the nines.
Starting at $3.49 (61% off) Retail: $8.99
Plus lots more CUTE deals!
LOTS of cute deals! Inexpensive shipping!
PickYourPlum! Wooden Chalkboards! Barbeque Rosewood Handle Spatula! V-Neck Layering Tee!


Get the Message? – Wooden Chalkboards
Because chalk’s not just vintage. It’s fun!
Starting at $8.99 (55% off) Retail: $19.99
Order’s Up – Barbeque Rosewood Handle Spatula
Serve ’em in style.
Starting at $12.99 (56% off) Retail: $29.99
Layer Away – Extra Long V-Neck Layering Tee
There’s no such thing as to many layering shirts.
$5.99 (64% off) Retail: $16.99
Plus lots more CUTE deals!
LOTS of cute deals! Inexpensive shipping!
PickYourPlum! Tin Organizer! Polka Dot Skinnies!


Get Sorted Out – Tin Organizer
Time to clean up your act.
Starting at $17.99 (48% off) Retail: $34.99
The New Skinny – Polka Dot Skinnies
What’s the skinny?
$12.99 (62% off) Retail: $34.99
Plus lots more CUTE deals!
LOTS of cute deals! Inexpensive shipping!
A PYP Best Blog! Making a DIY Bandana Tablecloth!
Just in case you missed this article on making a DIY bandana tablecloth the first time we shared it a couple of years ago, we are republishing it. After Marne wrote this blog originally, we got an awesome response. This is one of the PYP Best Blogs!
I have been wanting to make a bandana tablecloth, and I finally did! It was so easy that I wanted to share with you how I did it. I chose to make one for the 4th of July, and I LOVE IT! It turned out just like I wanted.
You will need:
bandanas in the color of your choice, I needed 12 (I got them at Walmart for $1 each)
sewing machine
iron
Wash, dry, and iron your each bandana. Then lay them out on the floor how you want the finished product to look.
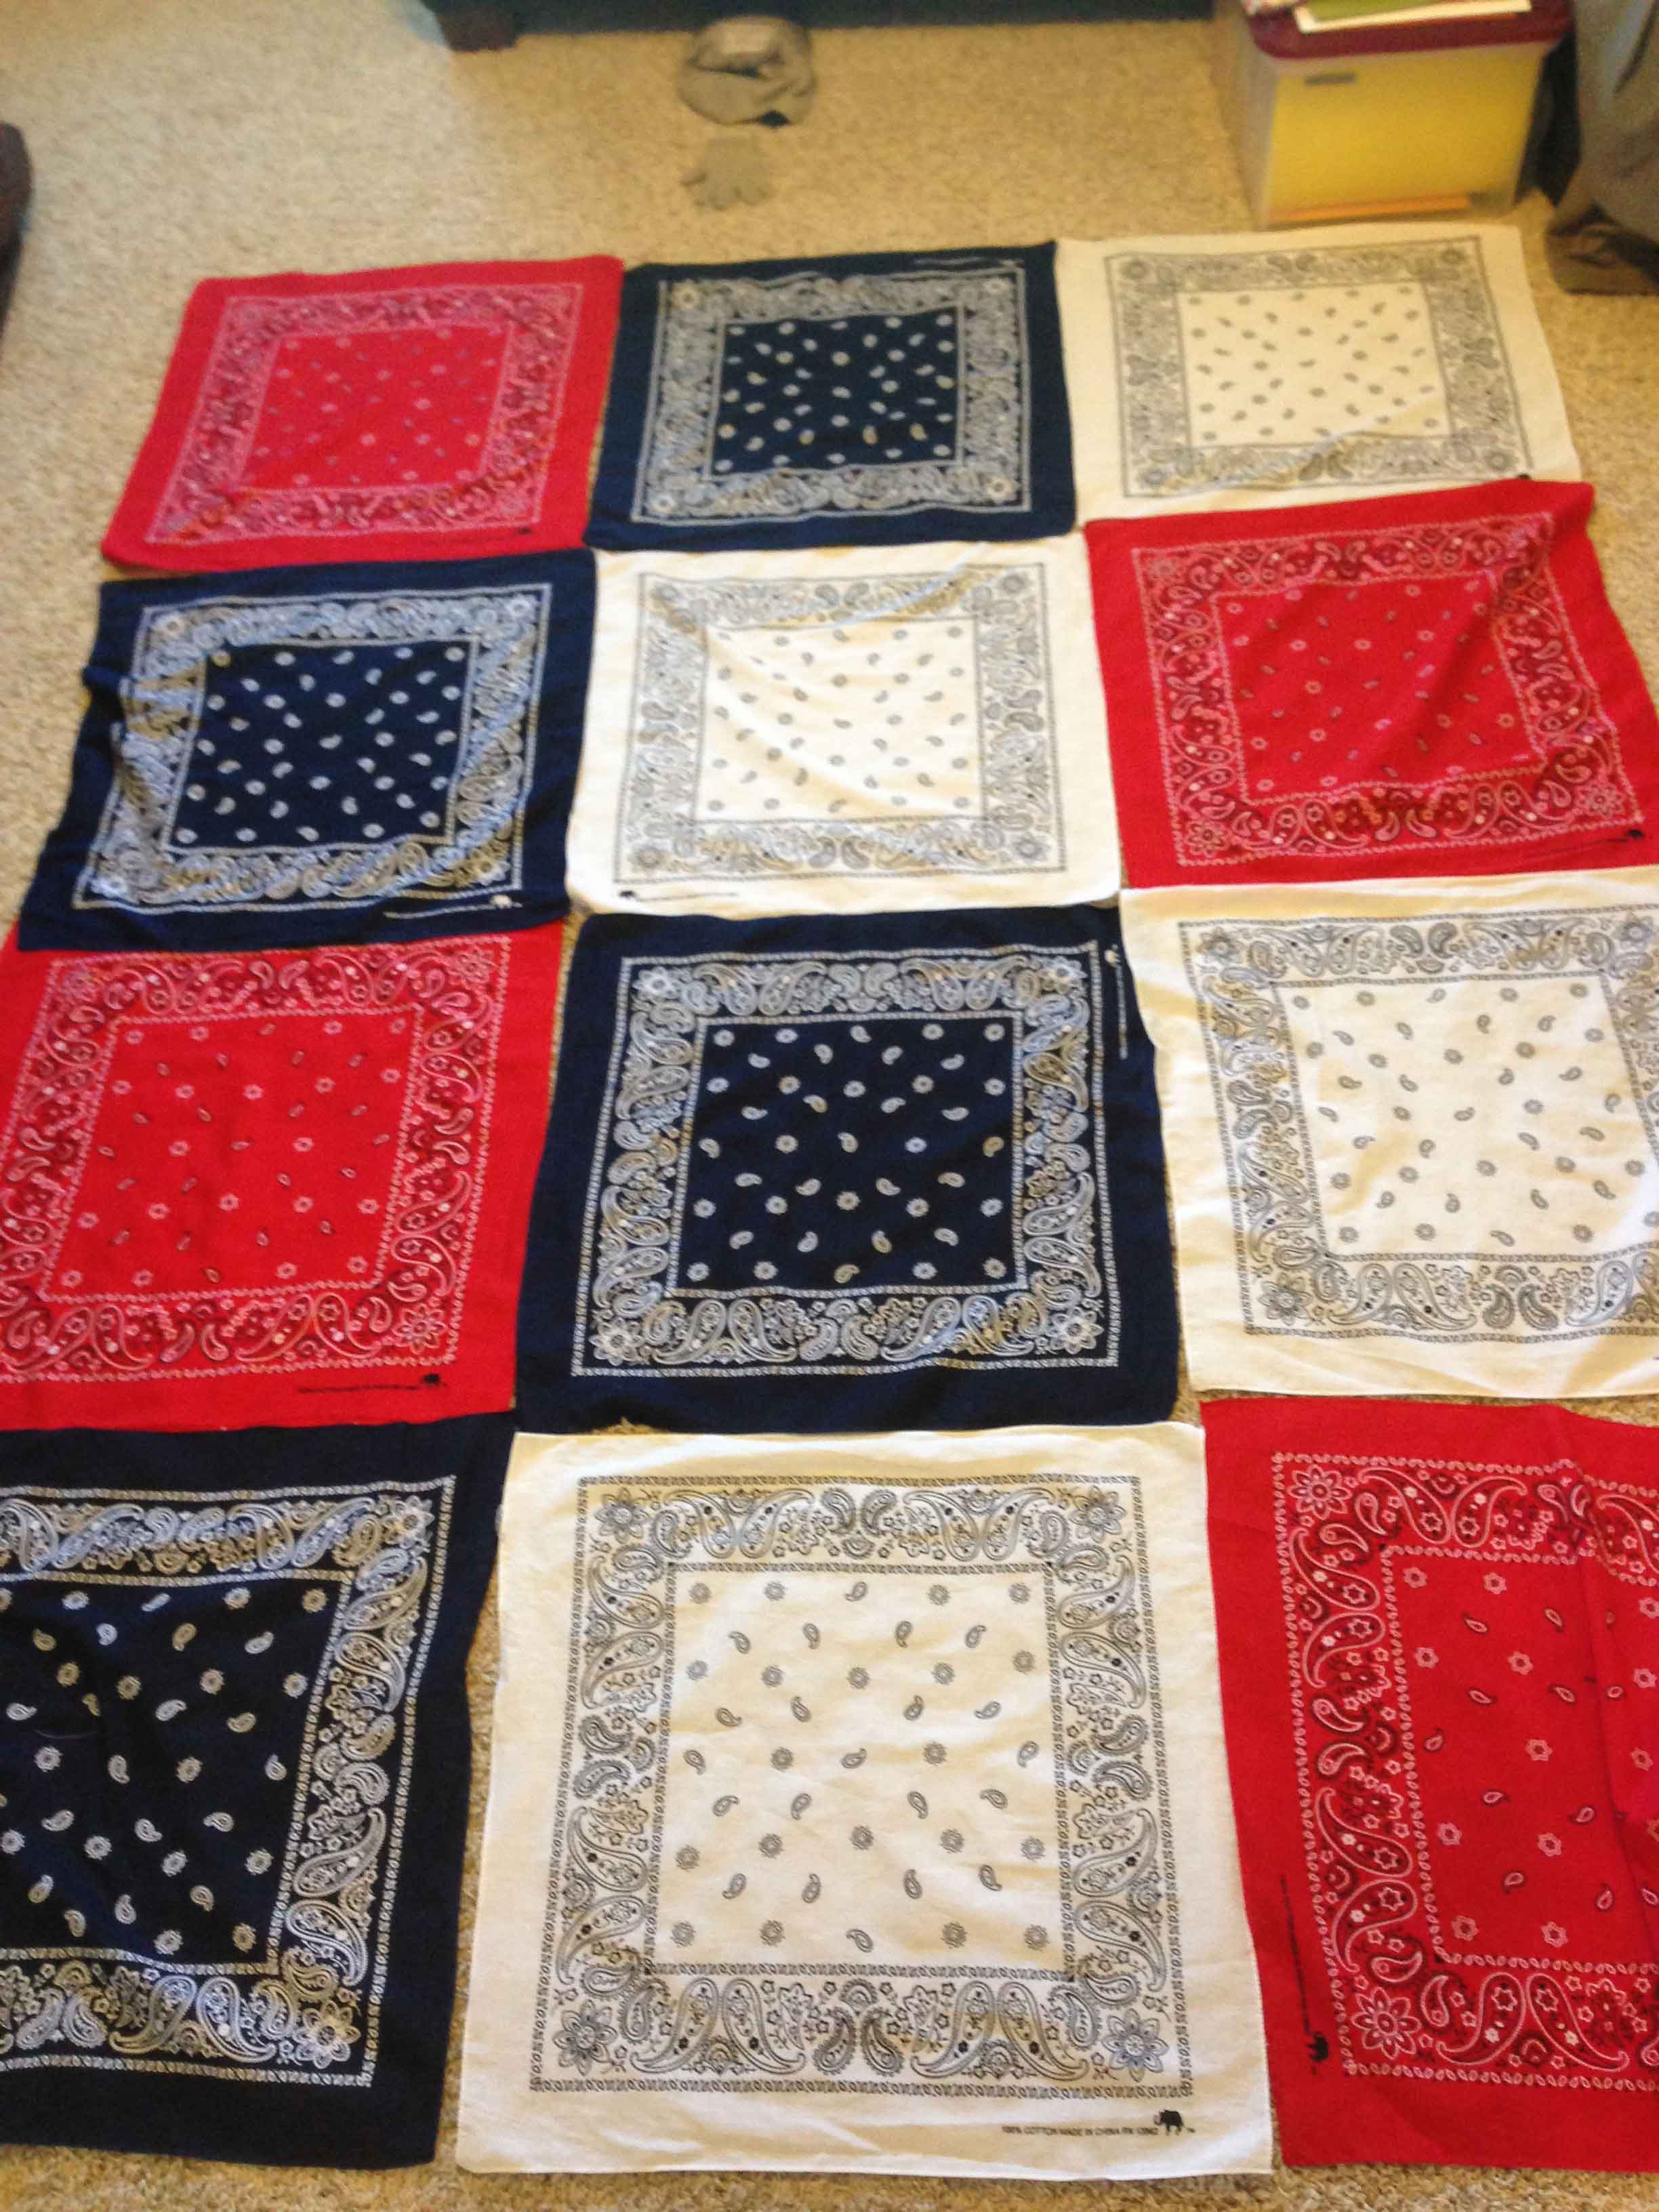
After you are finished with that, take them 3 at a time and sew them in order of how you placed them. Make sure you are sewing each bandana wrong sides together so they will all be uniform. I used a 1/4 inch seam allowance.
I sewed 3 bottom together, the next 3 together, then I did the two top rows of three. Then my last row of sewing was the middle when I sewing the two sections of six together. Make sense?
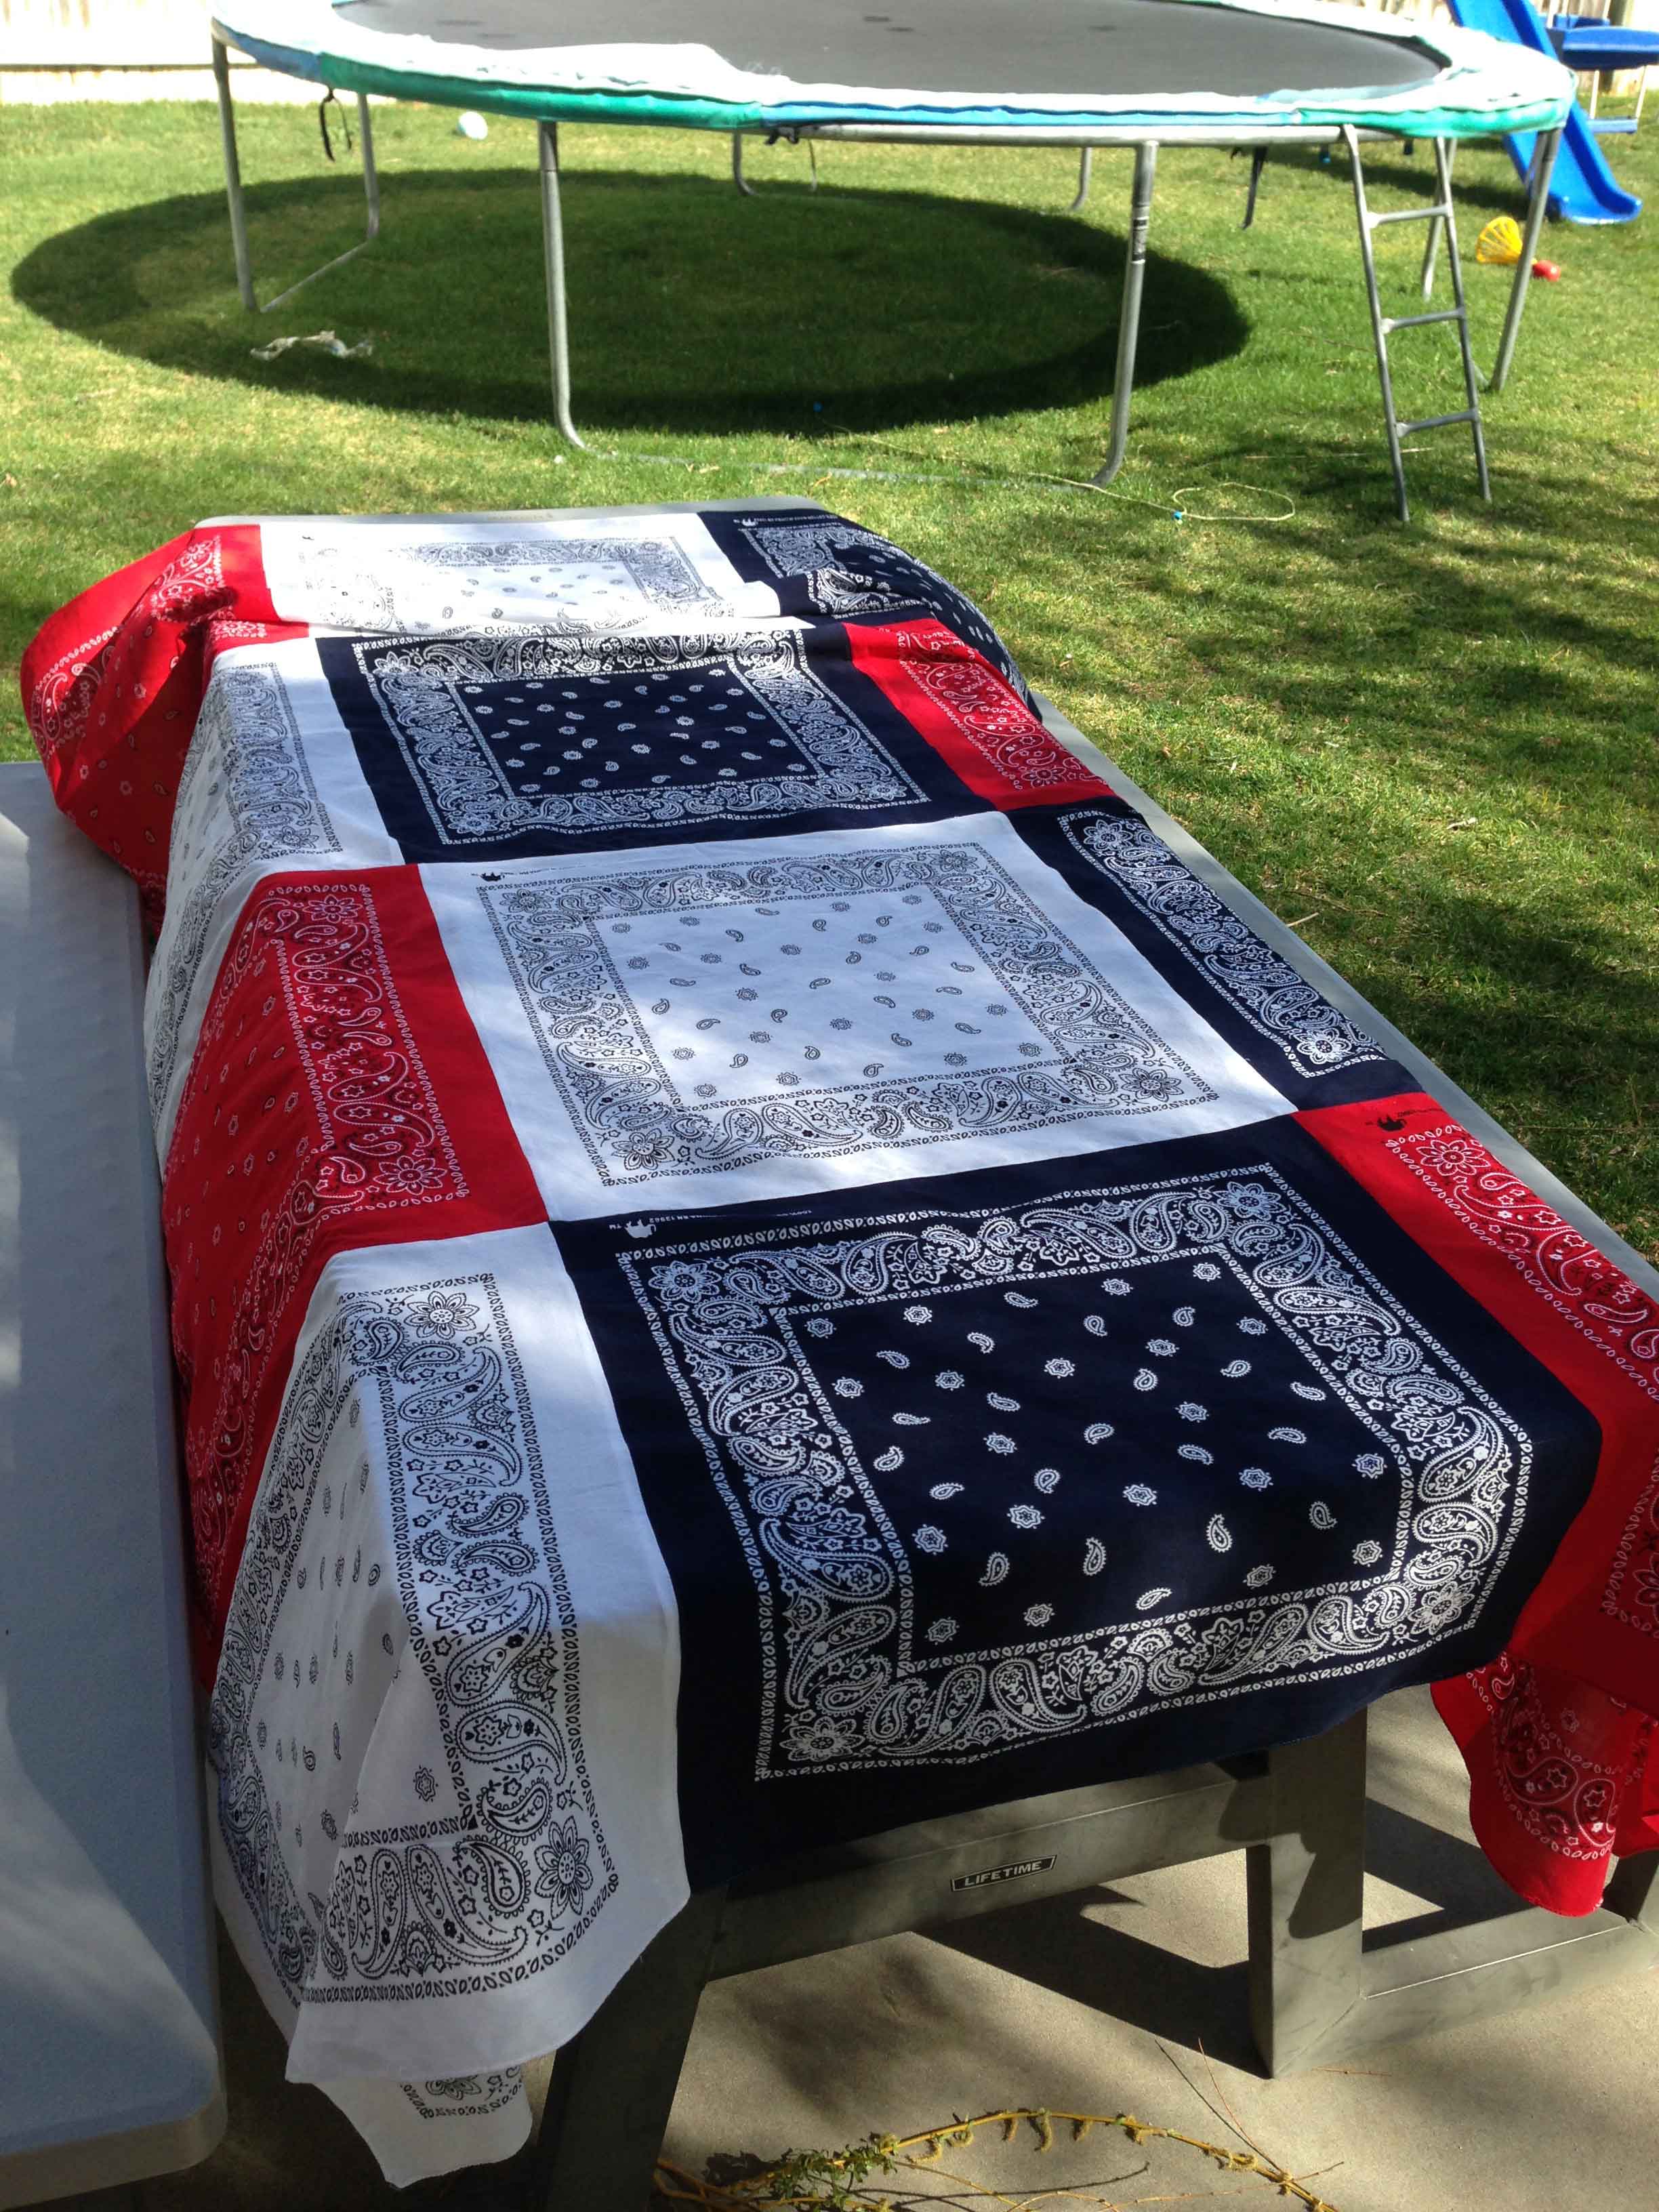
I have a picnic table in the backyard I was making this for, so I knew that I needed 12 bandanas. You can make yours as small or any size you wish! The possibilities are endless. Here is what mine looked like when I finished. I’m excited to use it soon!
NOTE: You can purchase bandanas at the dollar store for 2/$1, but they are very thin and not as good of quality. I recommend purchasing them for at least $1 each so the table cloth will be more durable.
PickYourPlum! Women’s Athletic Hoodies! Metal Watches! Draped Sleeve Dolman Shirt!


Exercise in Comfort – Women’s Athletic Hoodies
You’ve never been more comfortable during a workout.
$12.99 (48% off) Retail: $24.99
Keep a Close Watch – Metal Watches
Who needs a phone when your bracelet can tell time?
Starting at $6.99 (53% off) Retail: $14.99
Perfect Back to School Dolman – Draped Sleeve Dolman Shirt
Basics at their best.
$9.99 (61% off) Retail: $25.99
Contain Yourself – Four Bottle Metal Container with Handle
Get carried away!
Starting at $14.99 (57% off) Retail: $34.99
Plus lots more CUTE deals!
LOTS of cute deals! Inexpensive shipping!
Hello Kitty Collection – up to 60% off – apparel, tableware & gear!

Hello Kitty Collection – up to 60% off – apparel, tableware & gear!
Say hello to fall with the adorable style of this iconic character. She’s captured hearts around the world, and now she brightens up back-to-school season and welcomes a warm, fuzzy winter. Hello Kitty keeps kids company on outfits and backpacks, in the lunchroom, on the soccer field and at home with books and blankets. We even have gear for grownups, all topped with a big bow!
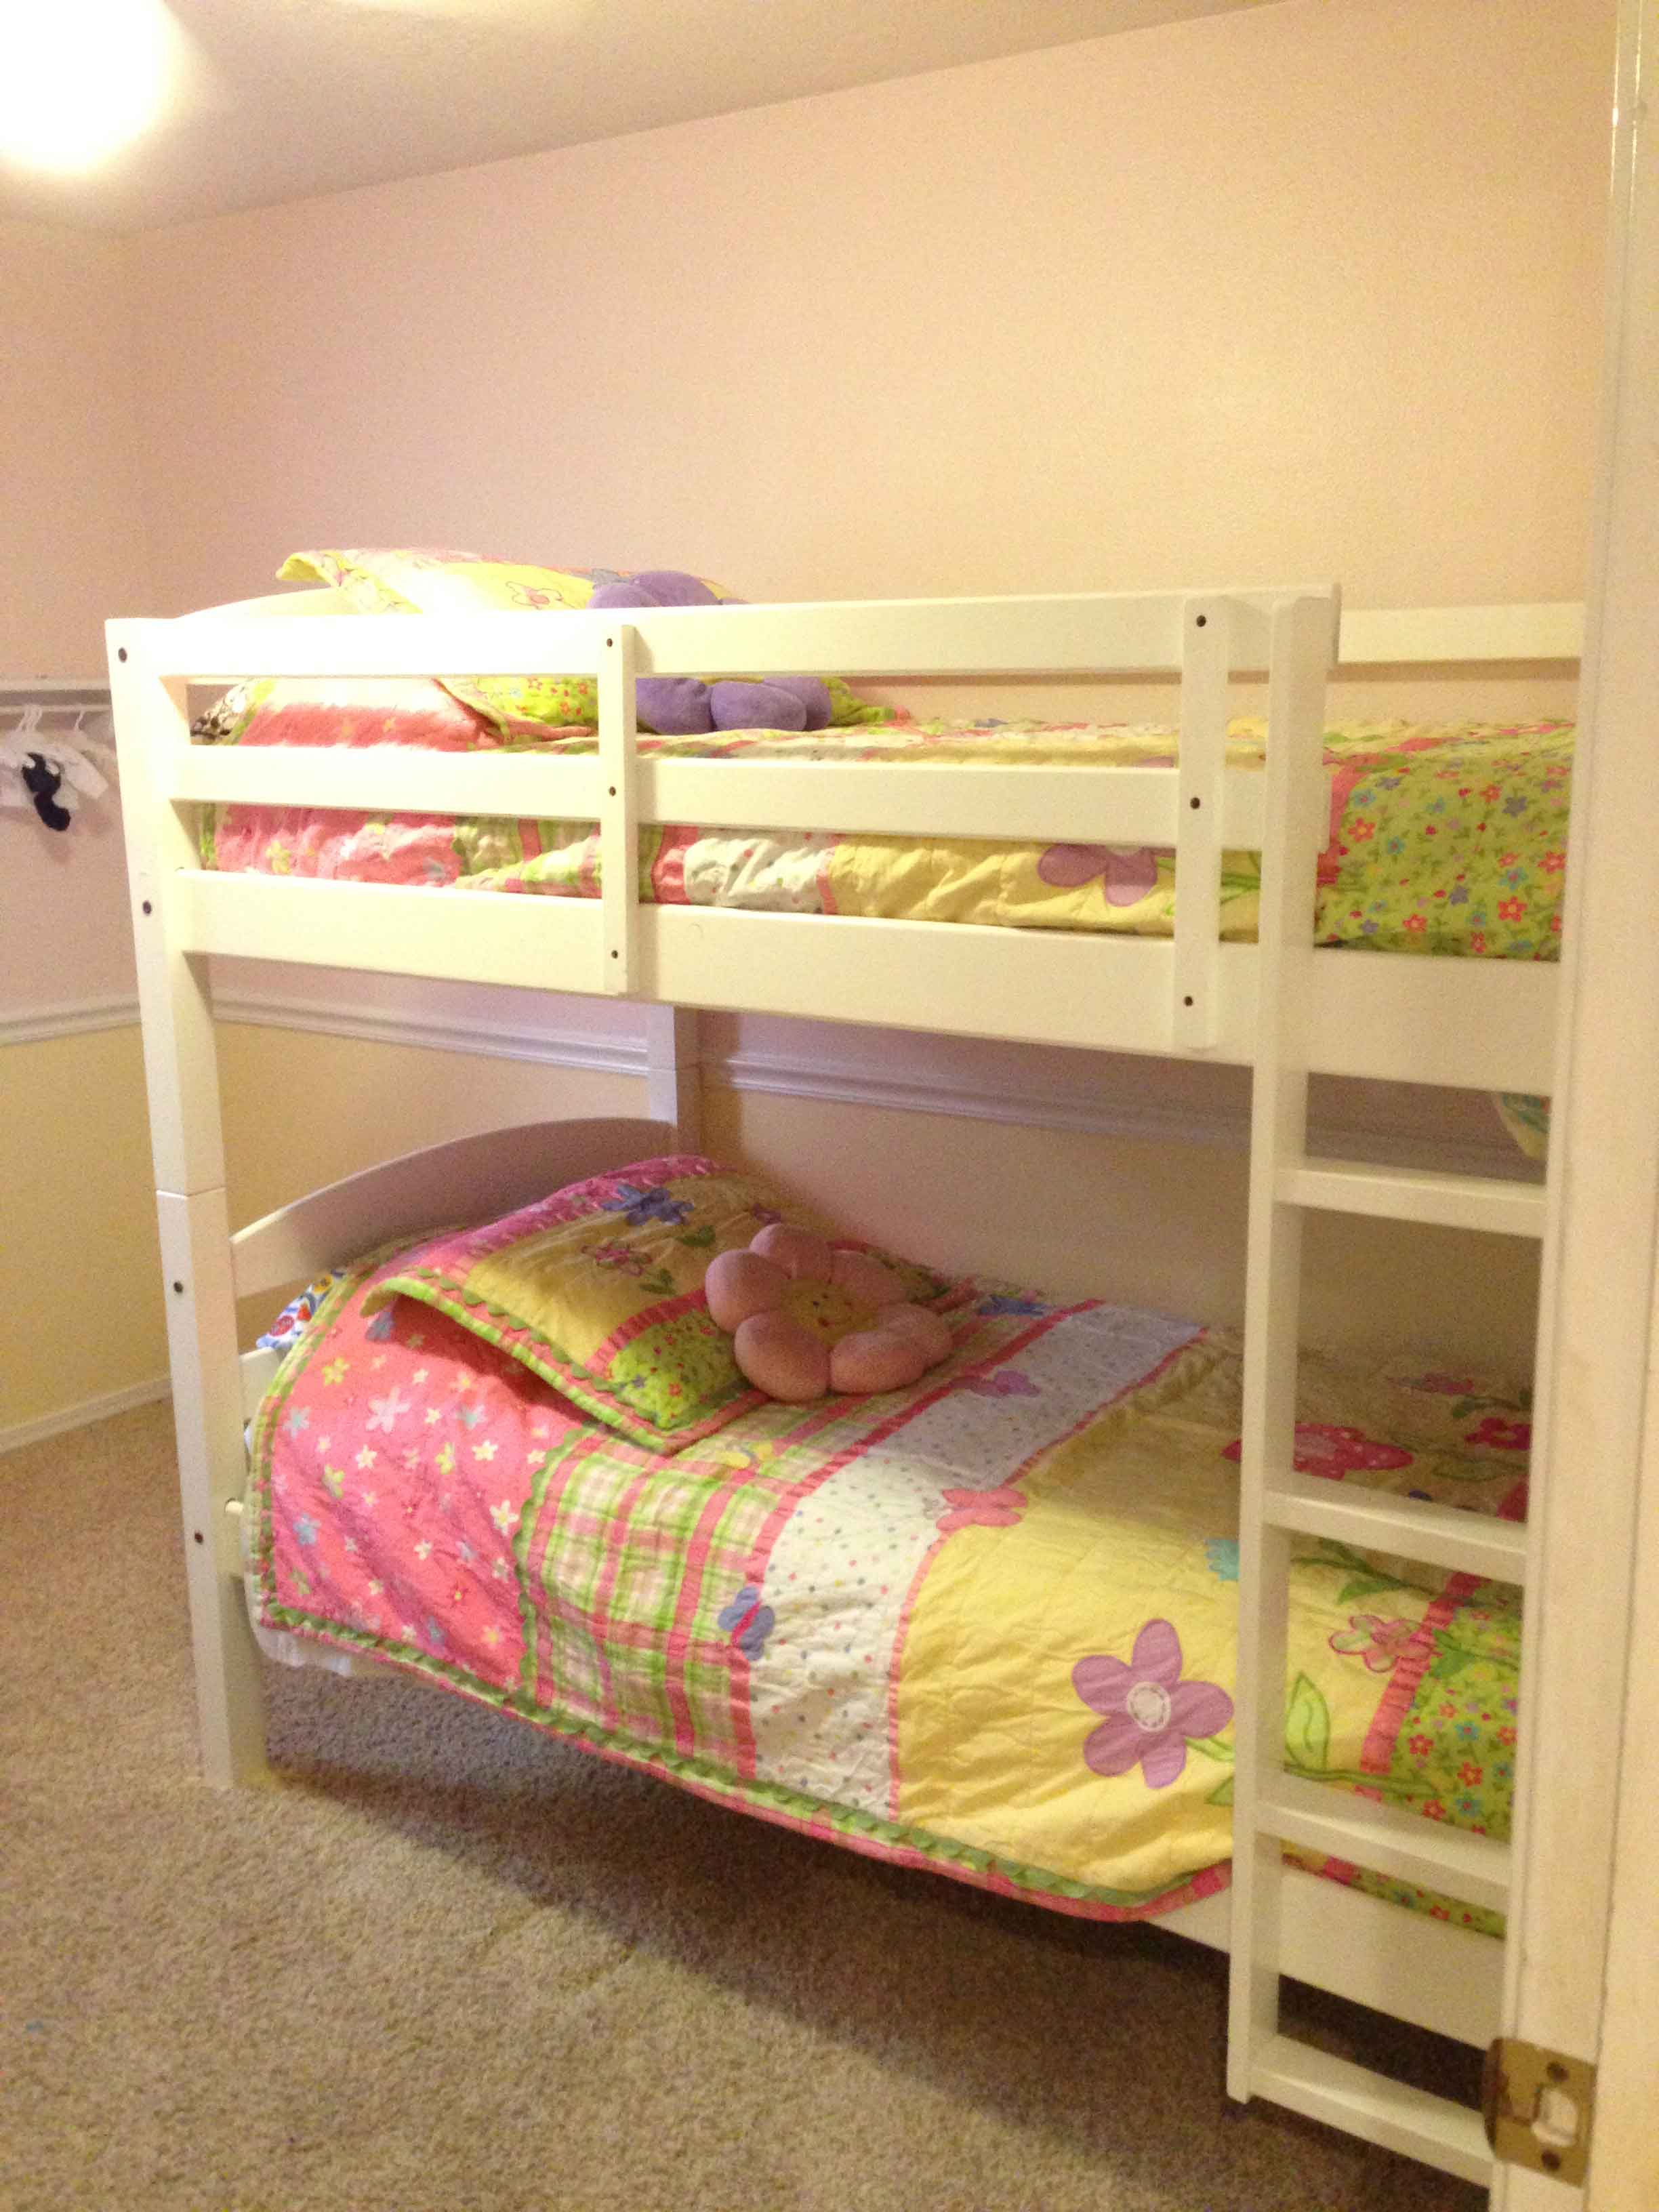
A PYP Best Blog! How to Paint Bunkbeds!
Just in case you missed this article on painting bunkbeds the first time we shared it a couple of years ago, we are republishing it. After Marne wrote this blog originally, we got an awesome response. This is one of the PYP Best Blogs!
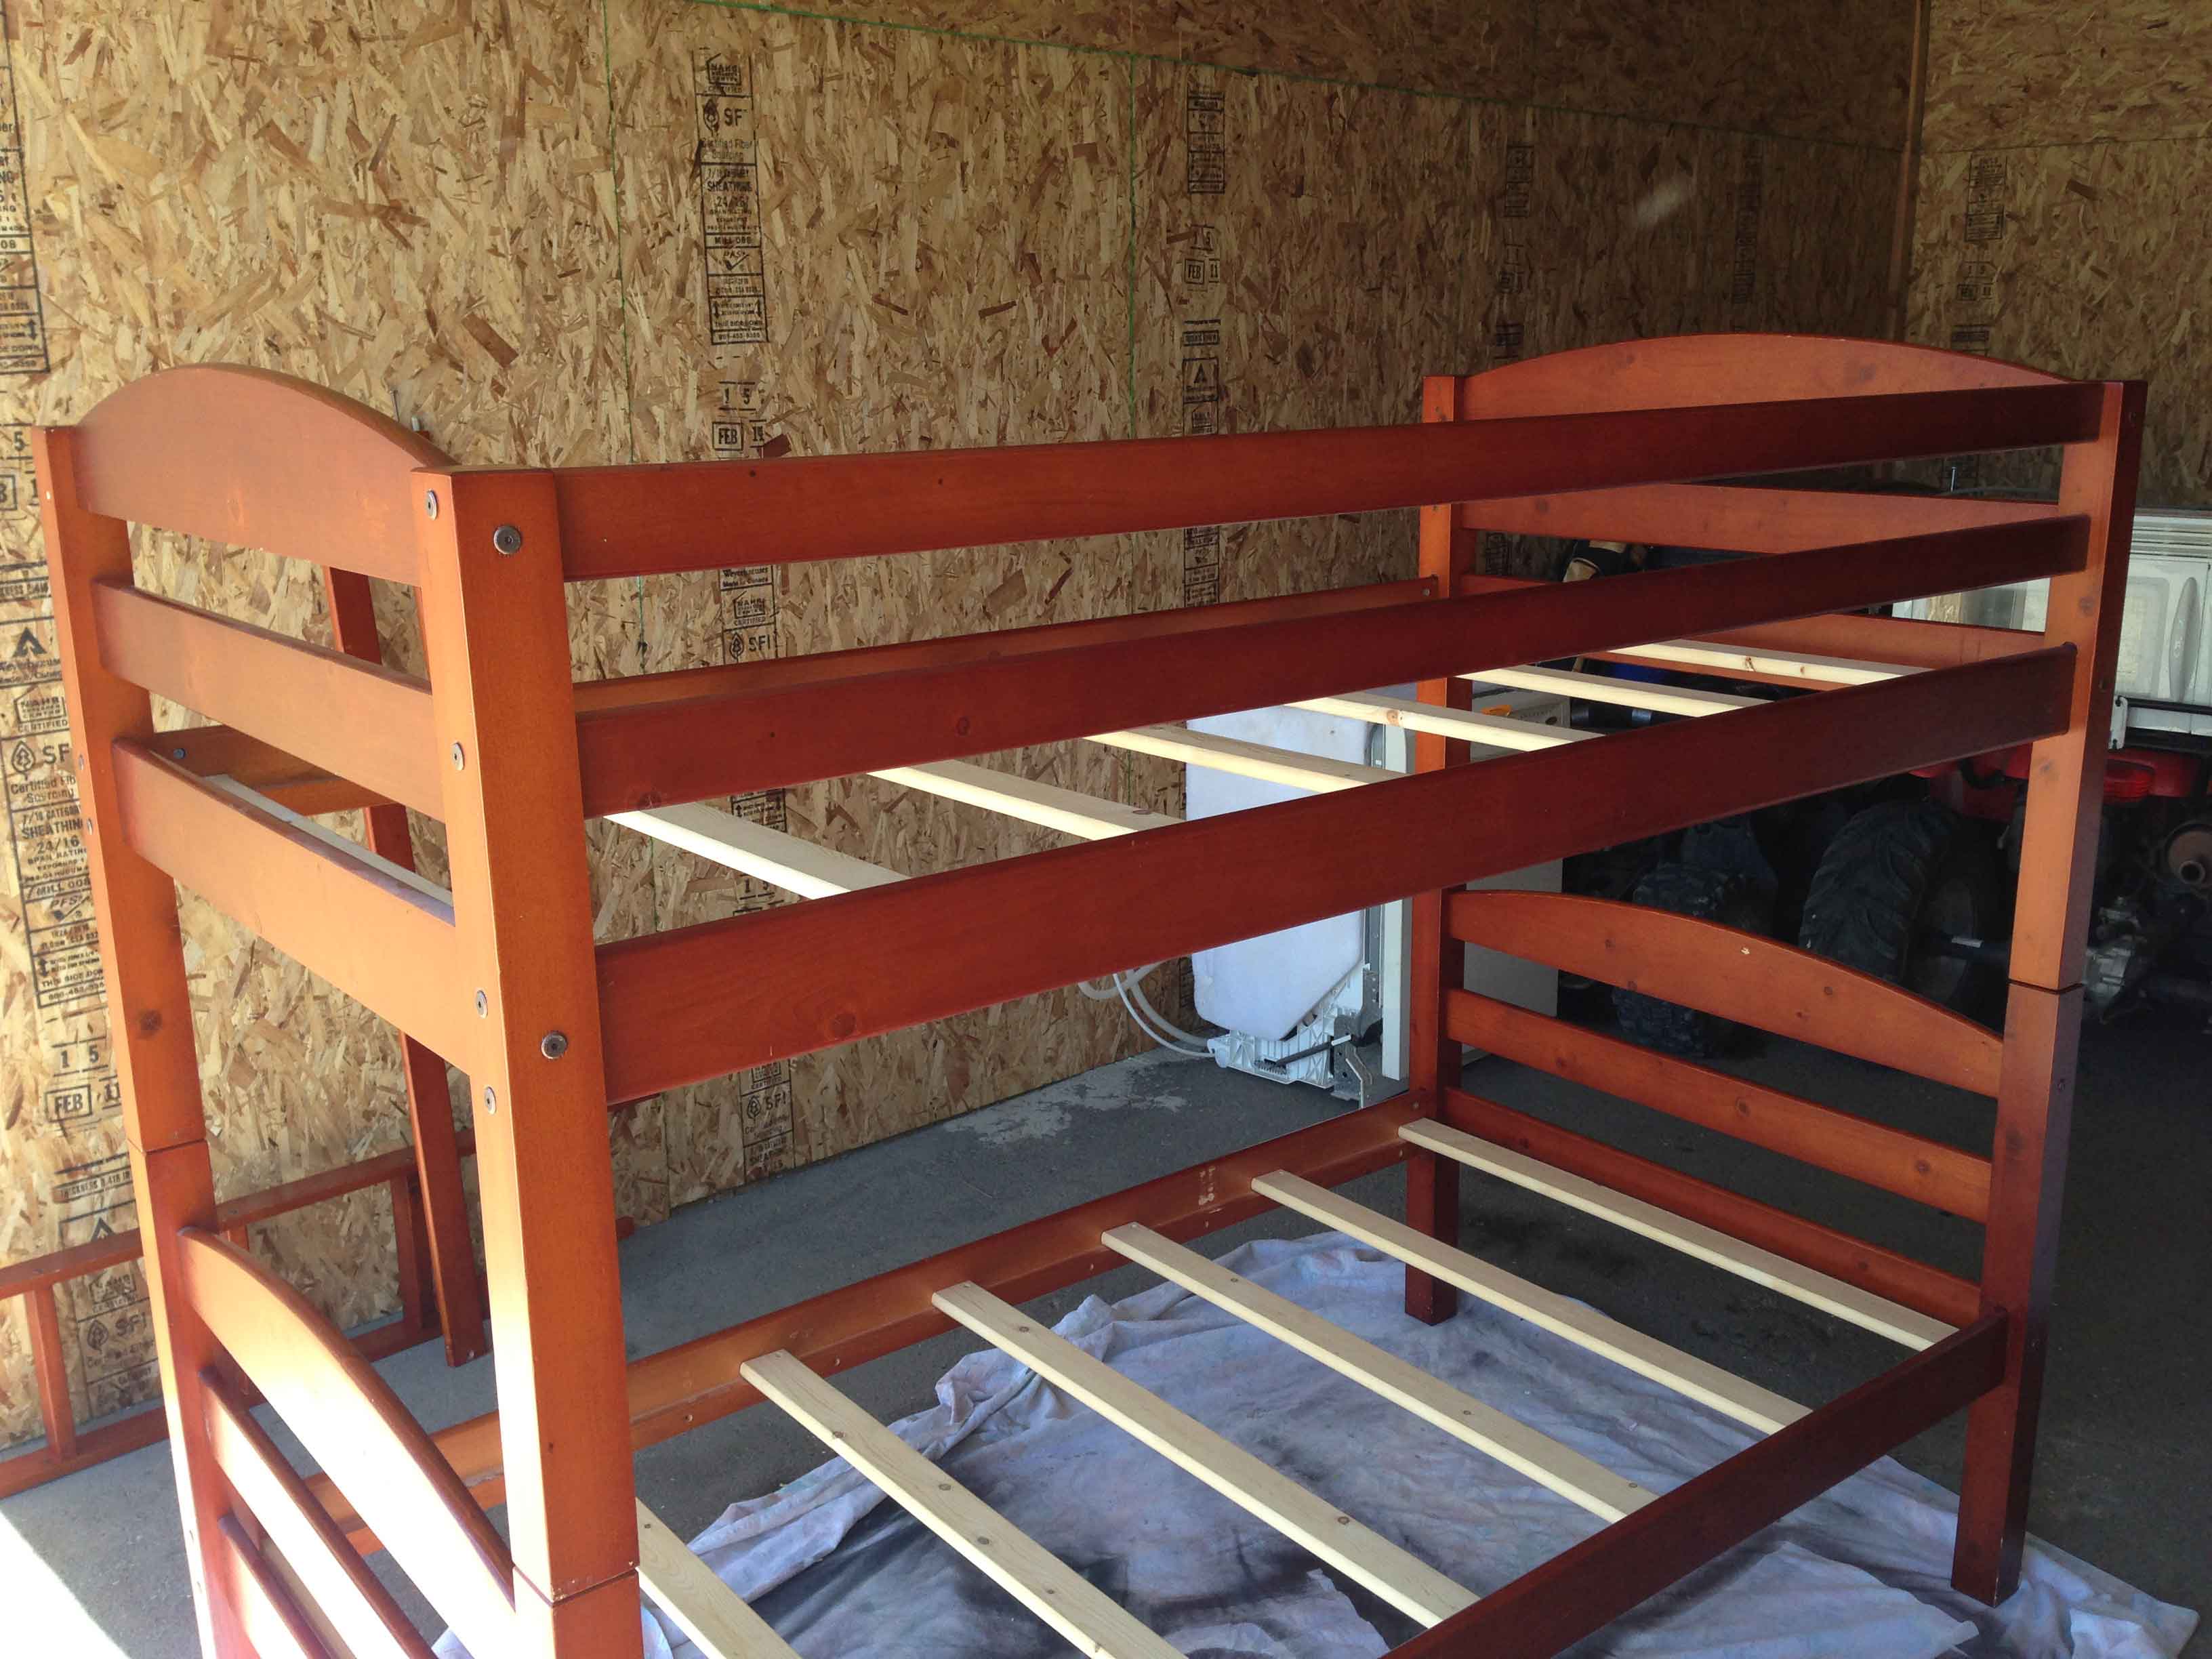
I recently decided to paint some bunkbeds that I found on Craigslist for my daughters’ bedroom. It was quite the undertaking, and I learned alot in the process. I consulted the internet and friends of mine who know how to refinish furniture. I want to share with you the process that I did, and hopefully it can help someone!
Before beginning, make sure you:
1. Take the bunkbed apart to paint. You will get better coverage, and will be glad in the long run! Make sure you save the screws and all parts and label them if needed.
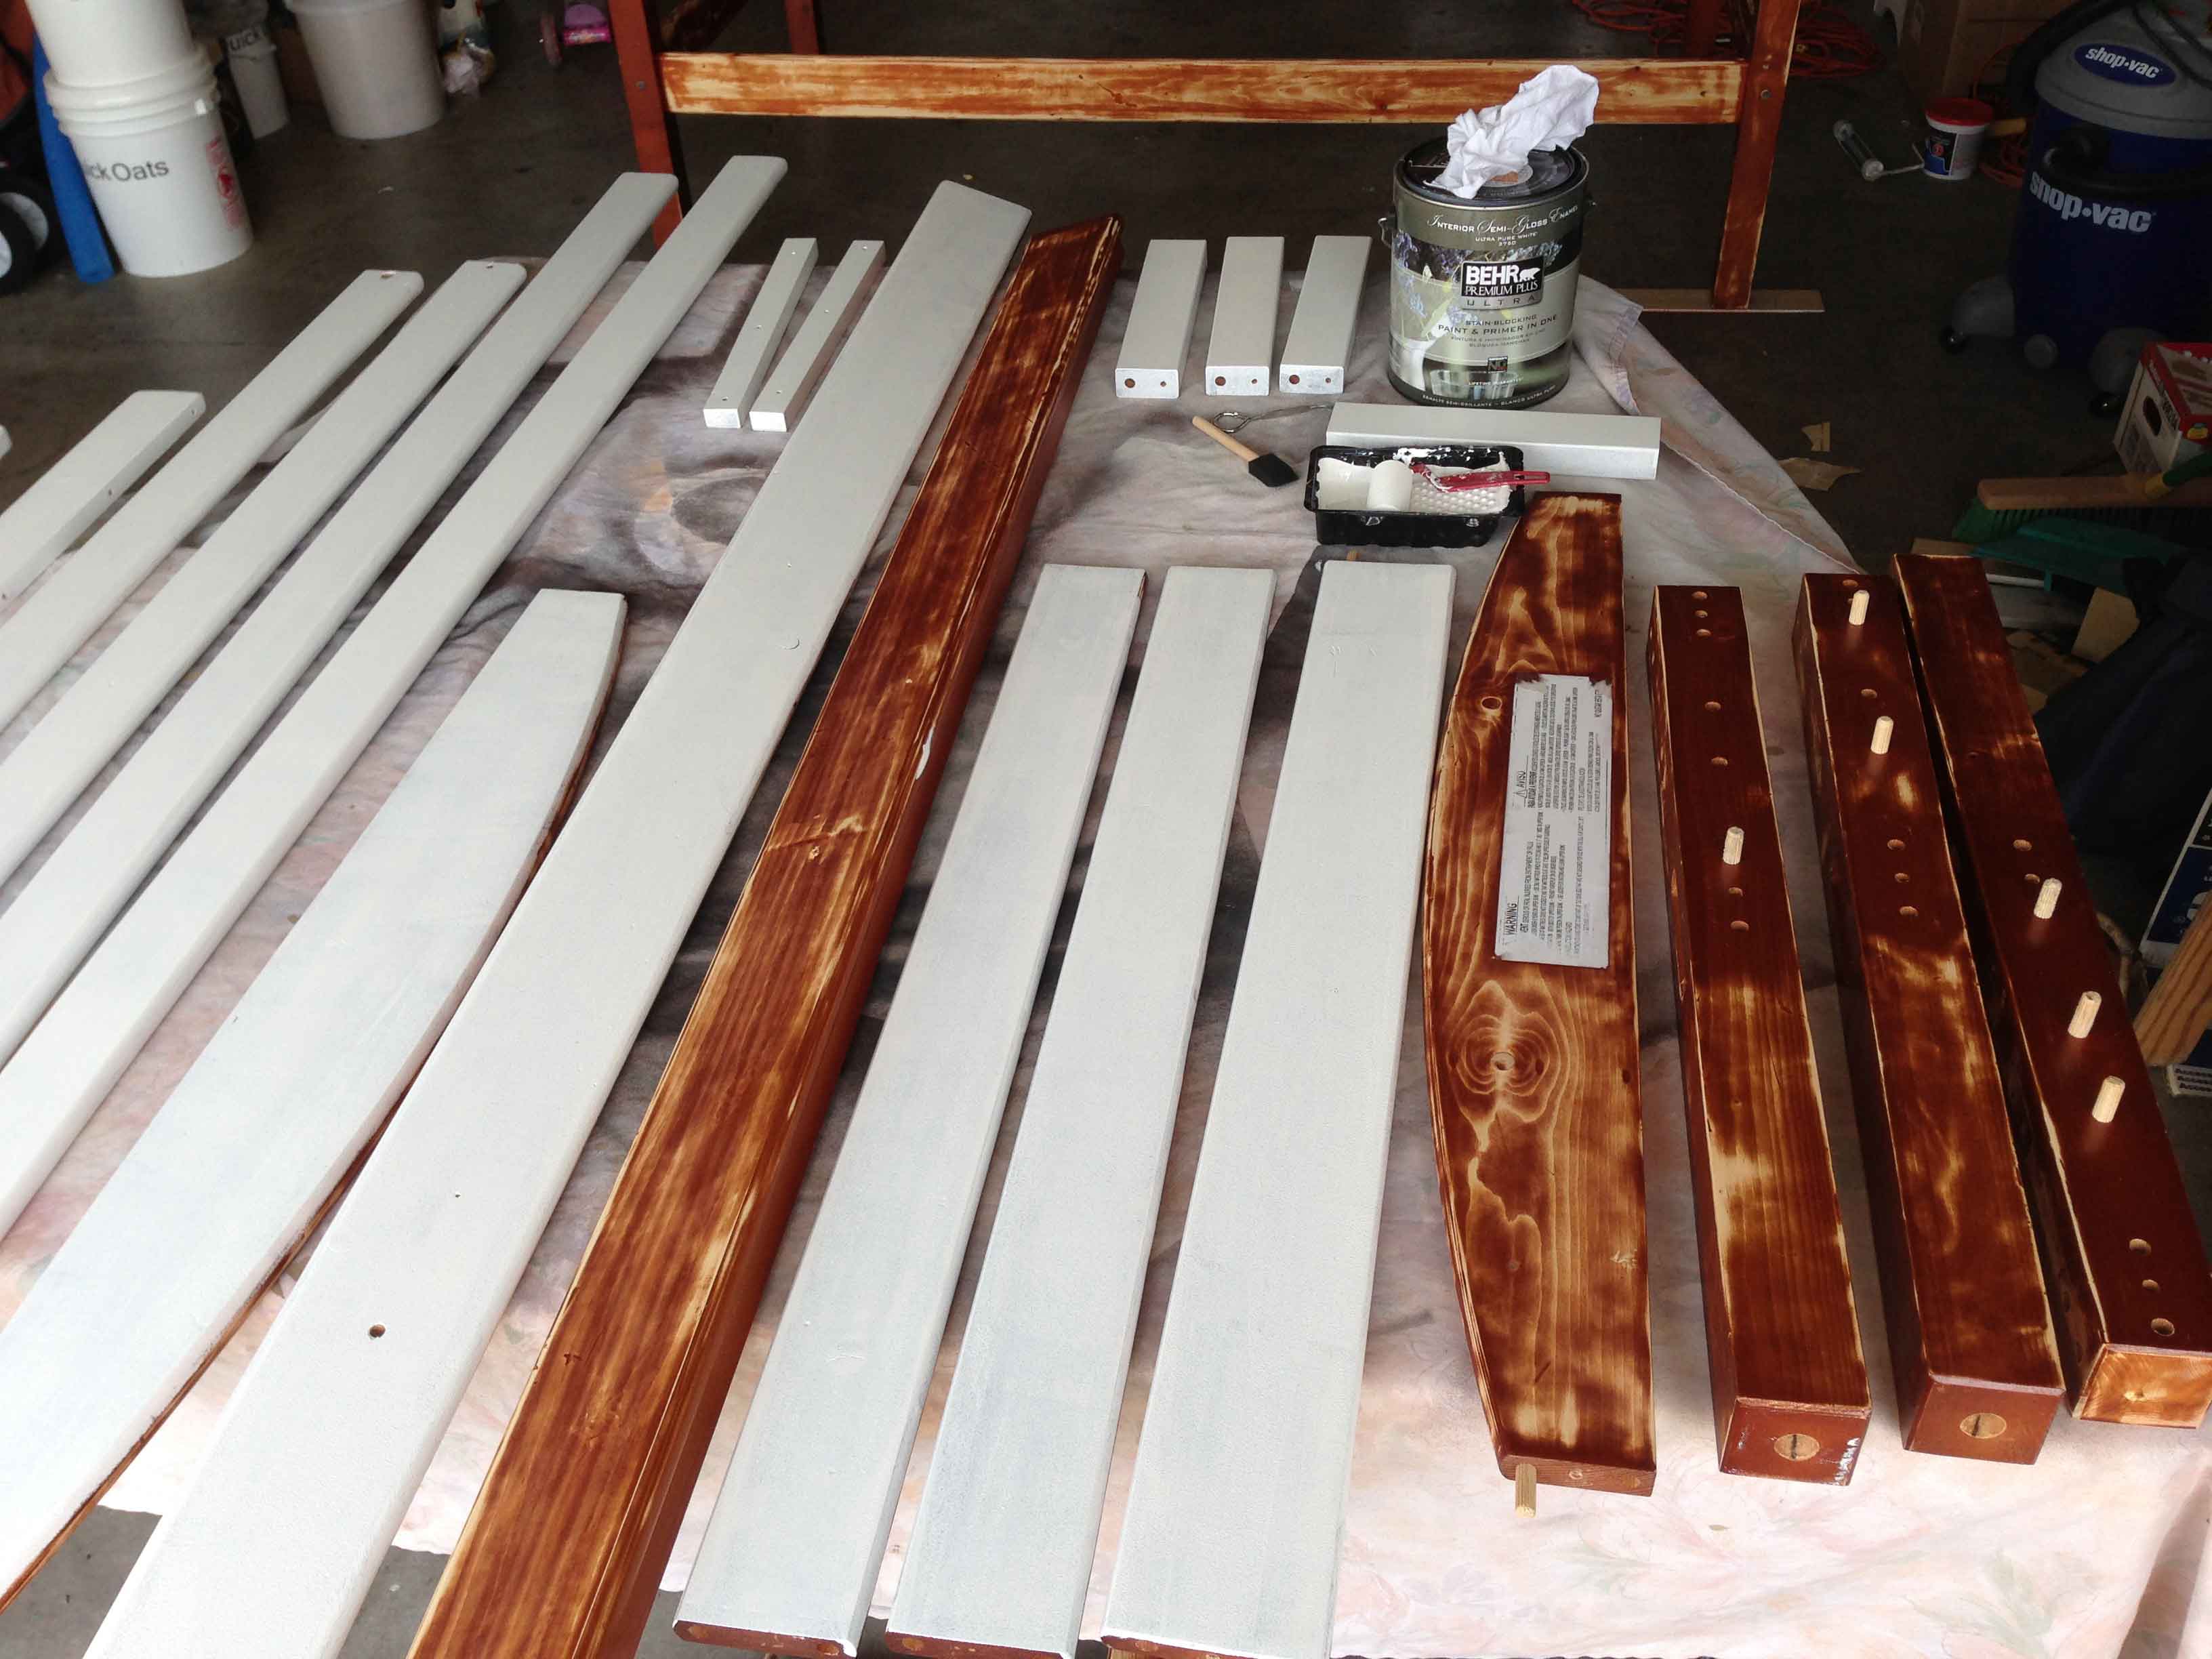
2. Pick out a good quality paint (I used Behr Paint Plus Primer in Decorator White)
3. Have all your supplies ready: sander, rags, small foam rollers, high quality paint brushes, etc
Have a workstation ready to do the painting. I covered some long tables with cloths to paint. Worked great.
1. First figure out what kind of wood you are dealing with. Mine were pine with a cherry finish. If it isn’t real wood, you may want to google different options. I am not a paint expert, but that is what I was told.
2. Give your wood a good roughing-up. I used a sander with 220 grit sandpaper on it. In these photos here you can see that I got down to the bare wood in some areas. I did sand a little too much. All you need to do is rough it up so the paint has something to stick to.
Another option is liquid sandpaper. I used liquid sandpaper on part of the bunkbed when I got tired sanding. If I were to do this over again, I think I would do liquid sandpaper on the entire project. It was just as effective and easier.

3. After sanding, make sure you wipe down the bed really well. You don’t want any fine sand in your project.
Use rags that are lint-free.
4. Now you are ready to begin priming your project! If you are using a Paint + Primer, you may not need to use regular primer. A good primer to use is Kilz or Zissner. Primer it well with a high-density foam roller. After it has dried, sand with a 320-grit sanding block to smooth it out before painting. Wipe down good again to clean off.
5. Now you can paint! For my bunkbed, I ended up using 3 coats of paint. It sounds like a lot, but since the boards are small it wasn’t. Judge for yourself on how it looks to know if you want to do more coats. Let dry on each side before turning over to paint on the other side.
6. After you are done with the final coat of paint, give it another light sanding with the 320 grit sanding block to smooth it all out. You will be more happy with it if you do!
7. Now you are ready to put on the Polycrylic coat. This will help seal the paint, make it more durable, and in my case since I was using white paint, it will keep my paint from yellowing over time. Make sure you get polycrylic, NOT polyurethane! Polycrylic is water-based, it doesn’t stink and cleans up easily with water. It also dries quickly so make sure you apply it according to the directions on the can. Use a high quality paint brush to apply, like Purdy. You will notice a difference!

8. Let the paint cure for several days before putting together. Then you have a wonderful finished masterpiece to be proud of!
PickYourPlum! Push Pop Container 6 Pack! Girls Floral/Lace Outfit! Footless Tights!


Push It Good – Push Pop Container 6 Pack
Sometimes it’s OK to push.
Starting at $4.99 (61% off) Retail: $12.99
Fresh as a Daisy – Girls Floral and Lace 2 Piece Outfit
Floral, low price, and everything nice.
$13.99 (53% off) Retail: $29.99
Hold on Tight! Girl’s Footless Lace Trim Tights
Hold on tight, these will fly out the door.
$3.49 (65% off) Retail: $9.99
Plus lots more CUTE deals!
LOTS of cute deals! Inexpensive shipping!