PickYourPlum! Charging Holders! iPhone LED light USB Cables! Wall Decor Boards!


On a Power Trip? – Charging Holders
Serious staying power.
Starting at $2.99 (70% off) Retail: $9.99
Power Player – iPhone LED light USB Cables
You’ve got the power!
Starting at $6.99 (65% off) Retail: $19.99
Statement Piece – Wall Decor Boards
Say it out loud.
Starting at $12.99 (65% off) Retail: $37.99
Plus lots more CUTE deals!
LOTS of cute deals! Inexpensive shipping!
A PYP Best Blog! Create an Ombre Painted Dresser!
Just in case you missed this article on creating an ombre painted dresser the first time we shared it a couple of years ago, we are republishing it. After Sharon wrote this blog originally, we got an awesome response. This is one of the PYP Best Blogs!
I’m not usually one for following what is trendy in my home decor, but I do love the ombre look. Even if you don’t know the word, I’m sure you’ve seen it around; it refers to a gradation of color and can be spotted everywhere – from ombre home decor:

to ombre clothing:

to ombre hair:

and I love it!
If you want to add this ombre trend to your home, it is a pretty easy technique to produce a big wow factor.
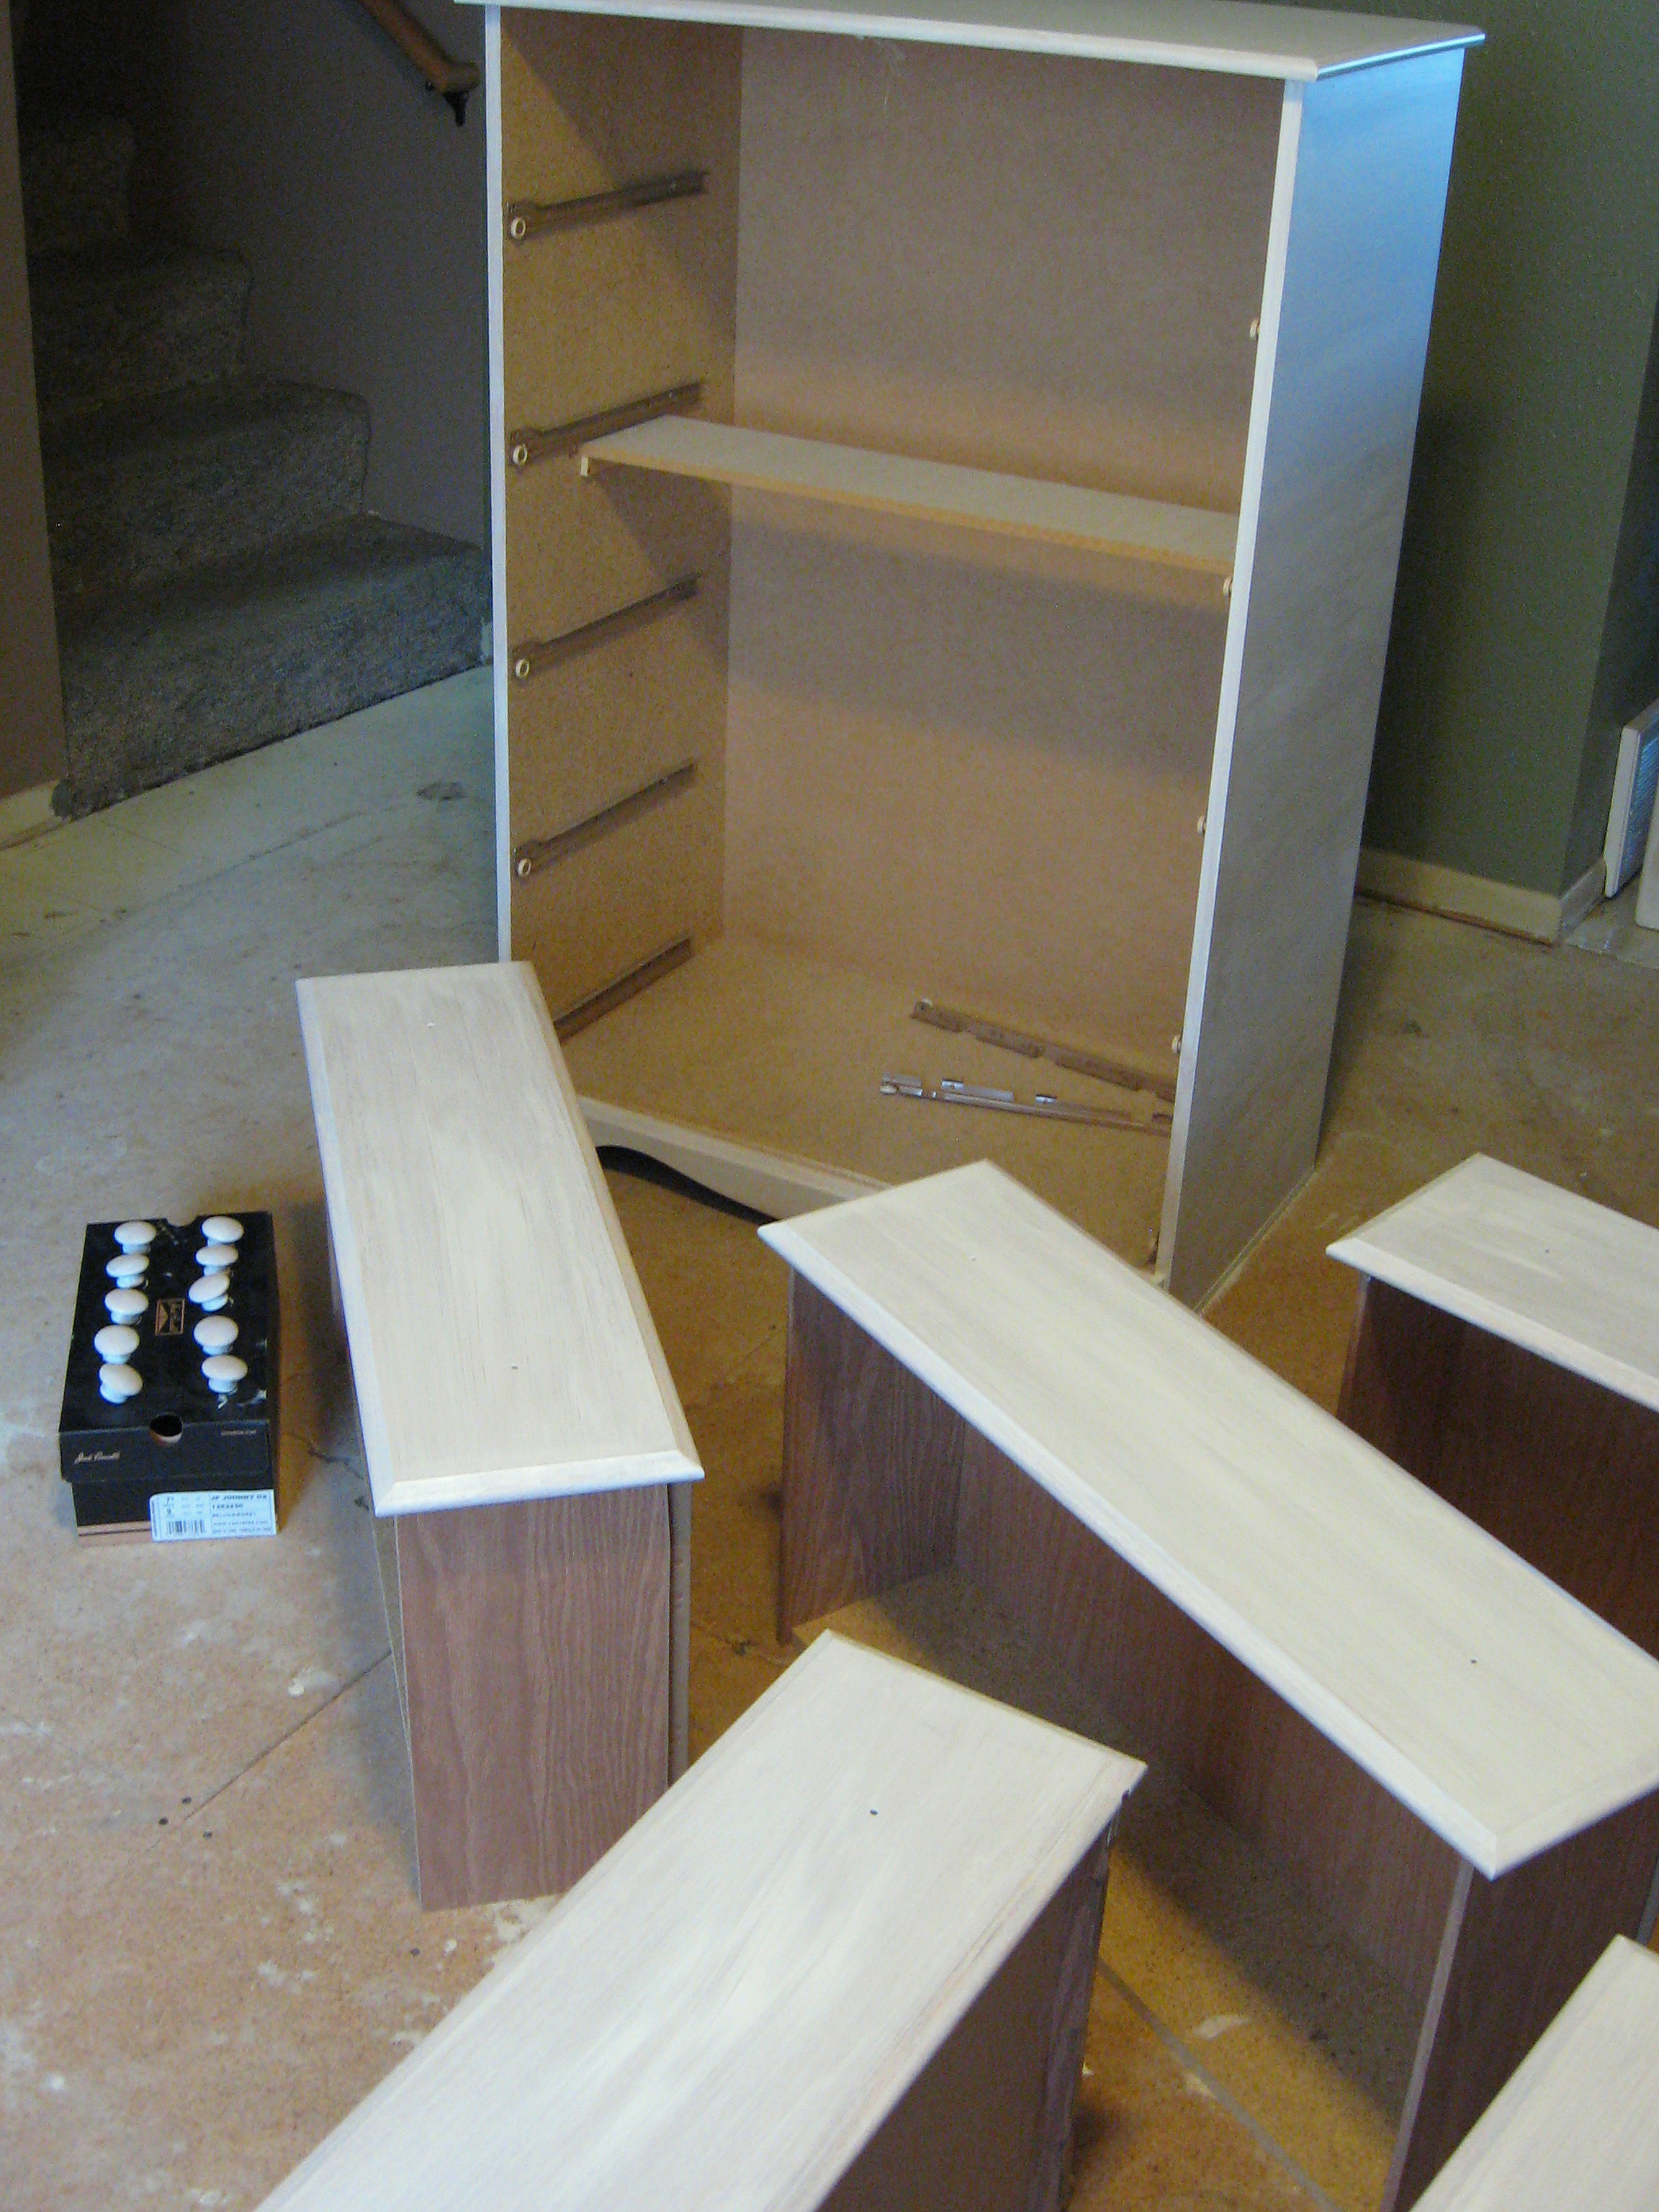
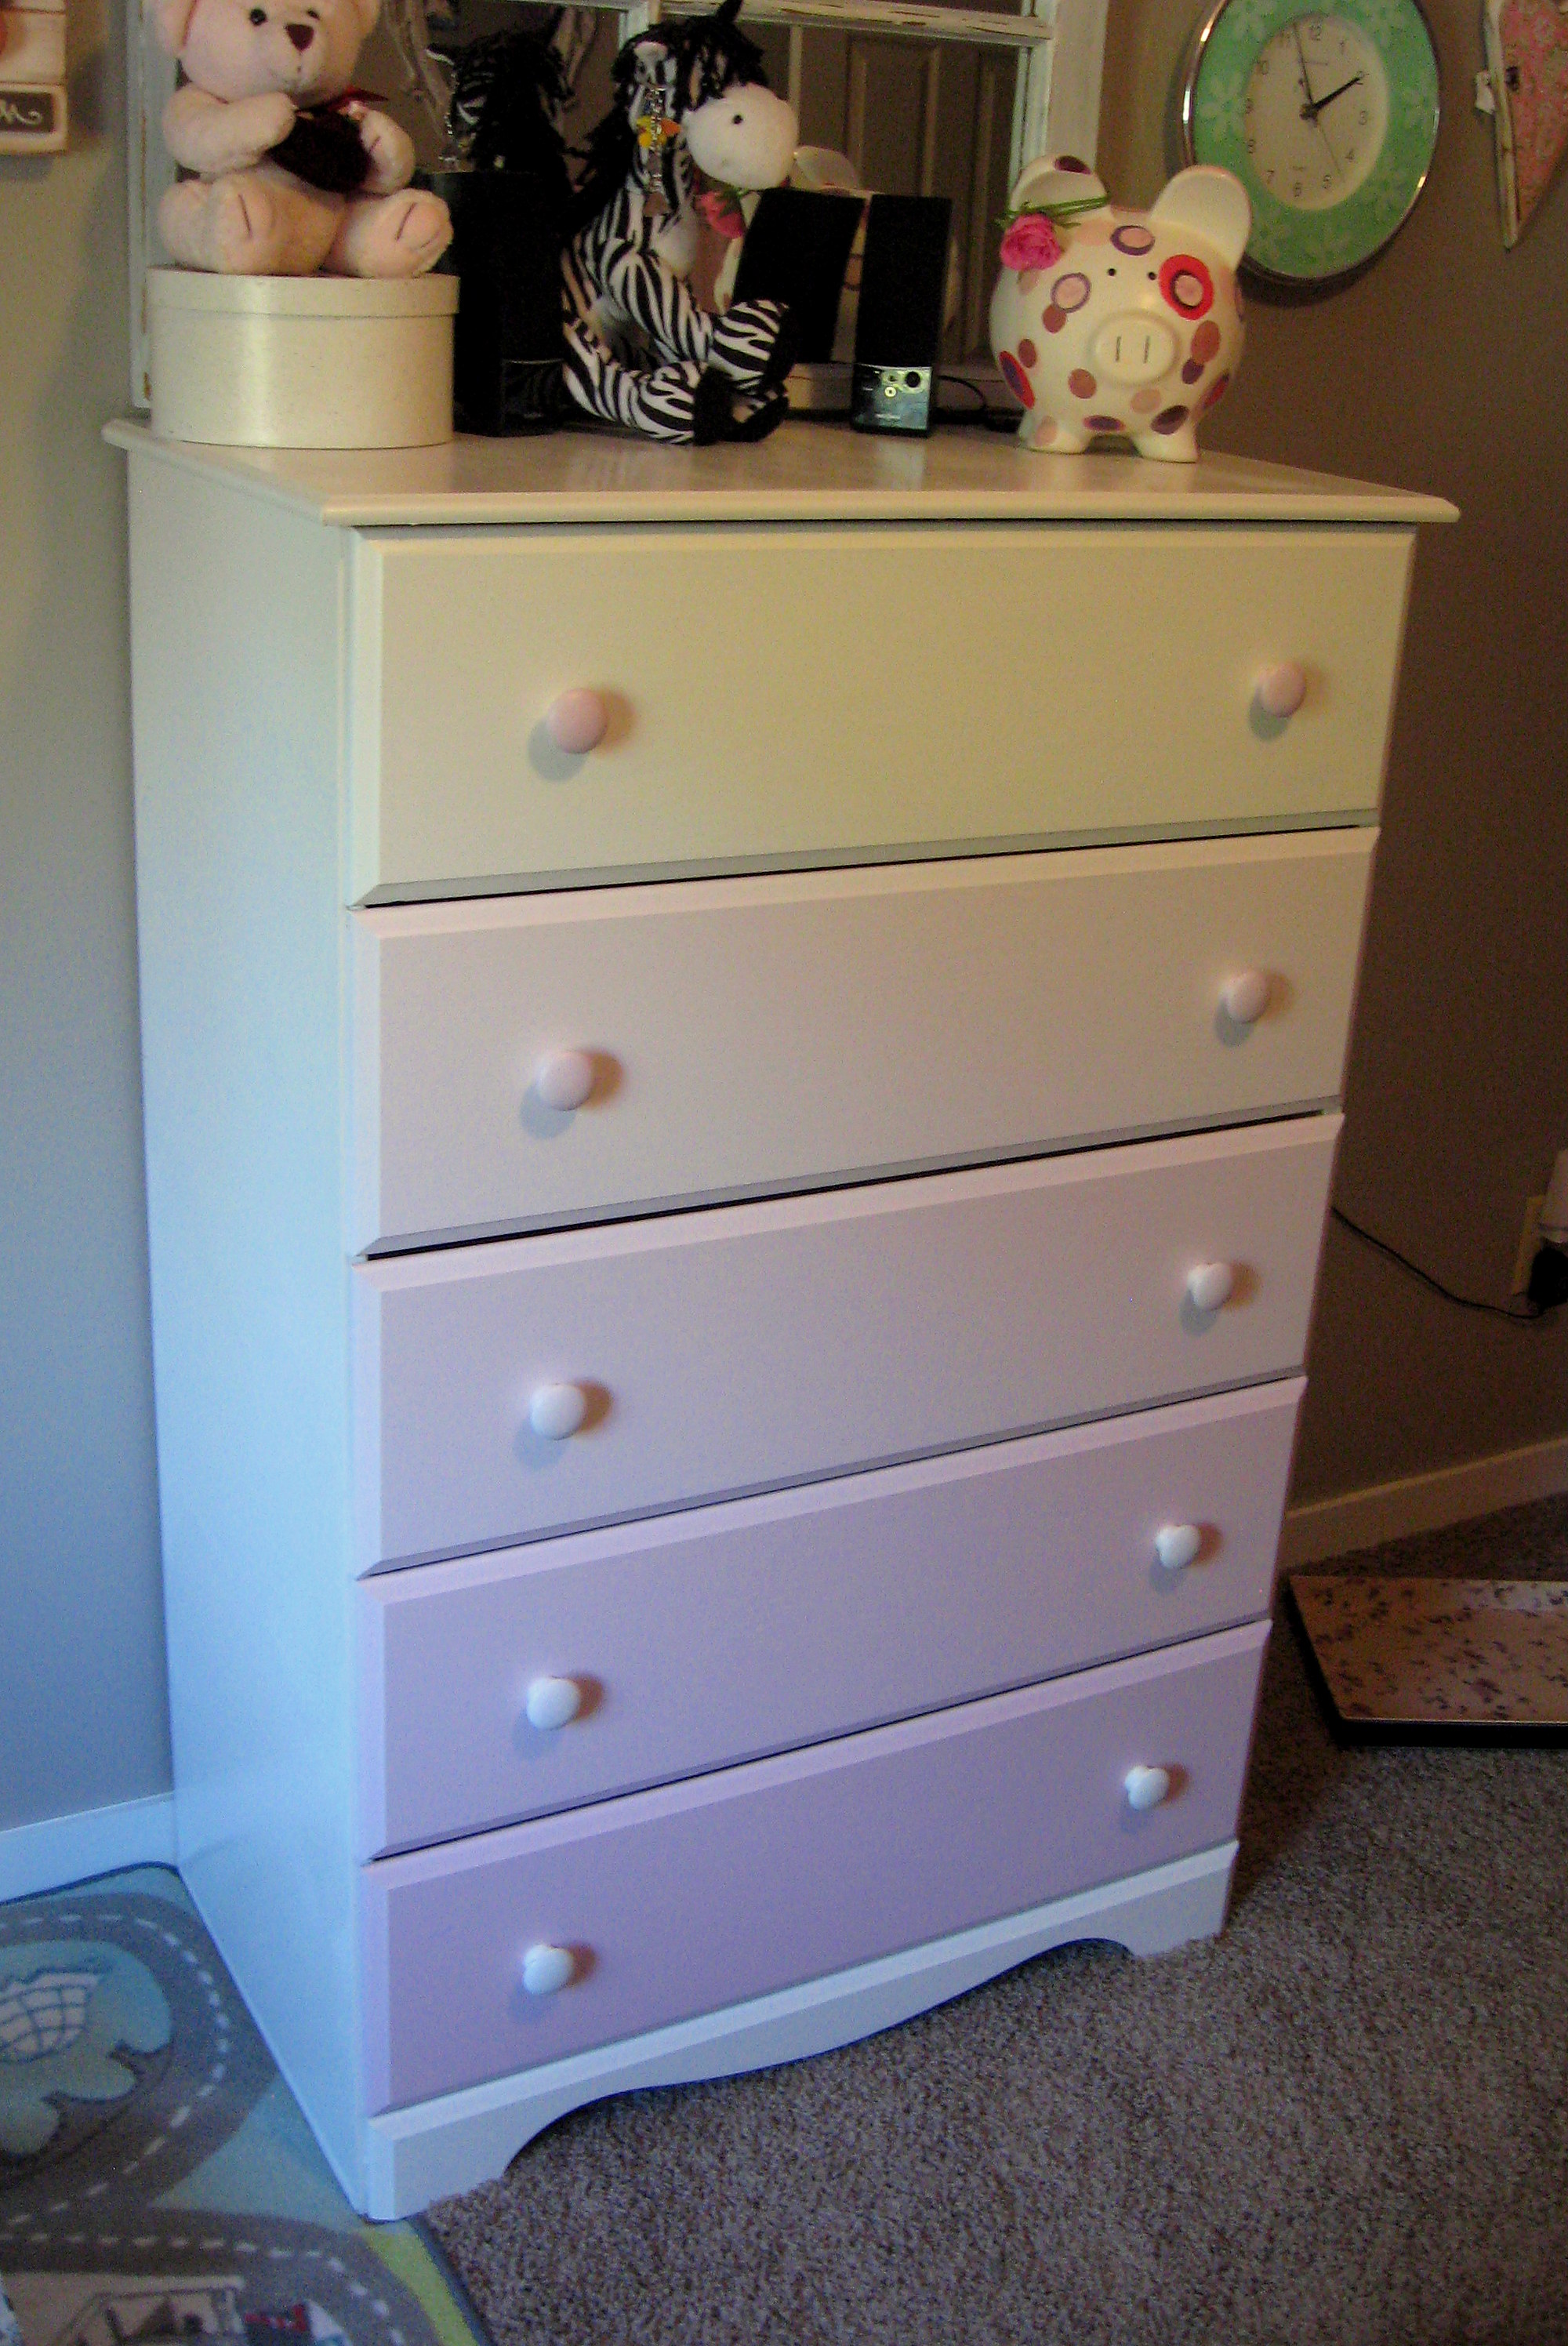
I started with the dresser that’s been in my daughter’s room. I didn’t get a picture of it before I took the drawers out (what is with me and before pictures!?!) but it is your basic inexpensive laminate furniture store dresser.

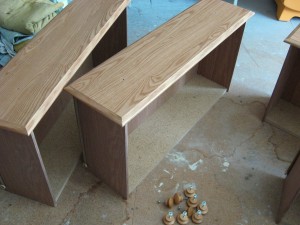
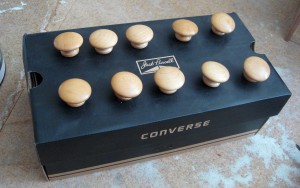
Start by taking the drawers out and removing all the knobs. I stick the screw part of the knob through a box like this to hold them while they dry.
 Give everything two smooth coats of a good gripping primer (if you’re unfamiliar with painting laminate furniture, read this post first.) and let it dry. I chose for this project to paint the body of the cabinet white, so I did that next and set it aside to dry while I worked on the drawers.
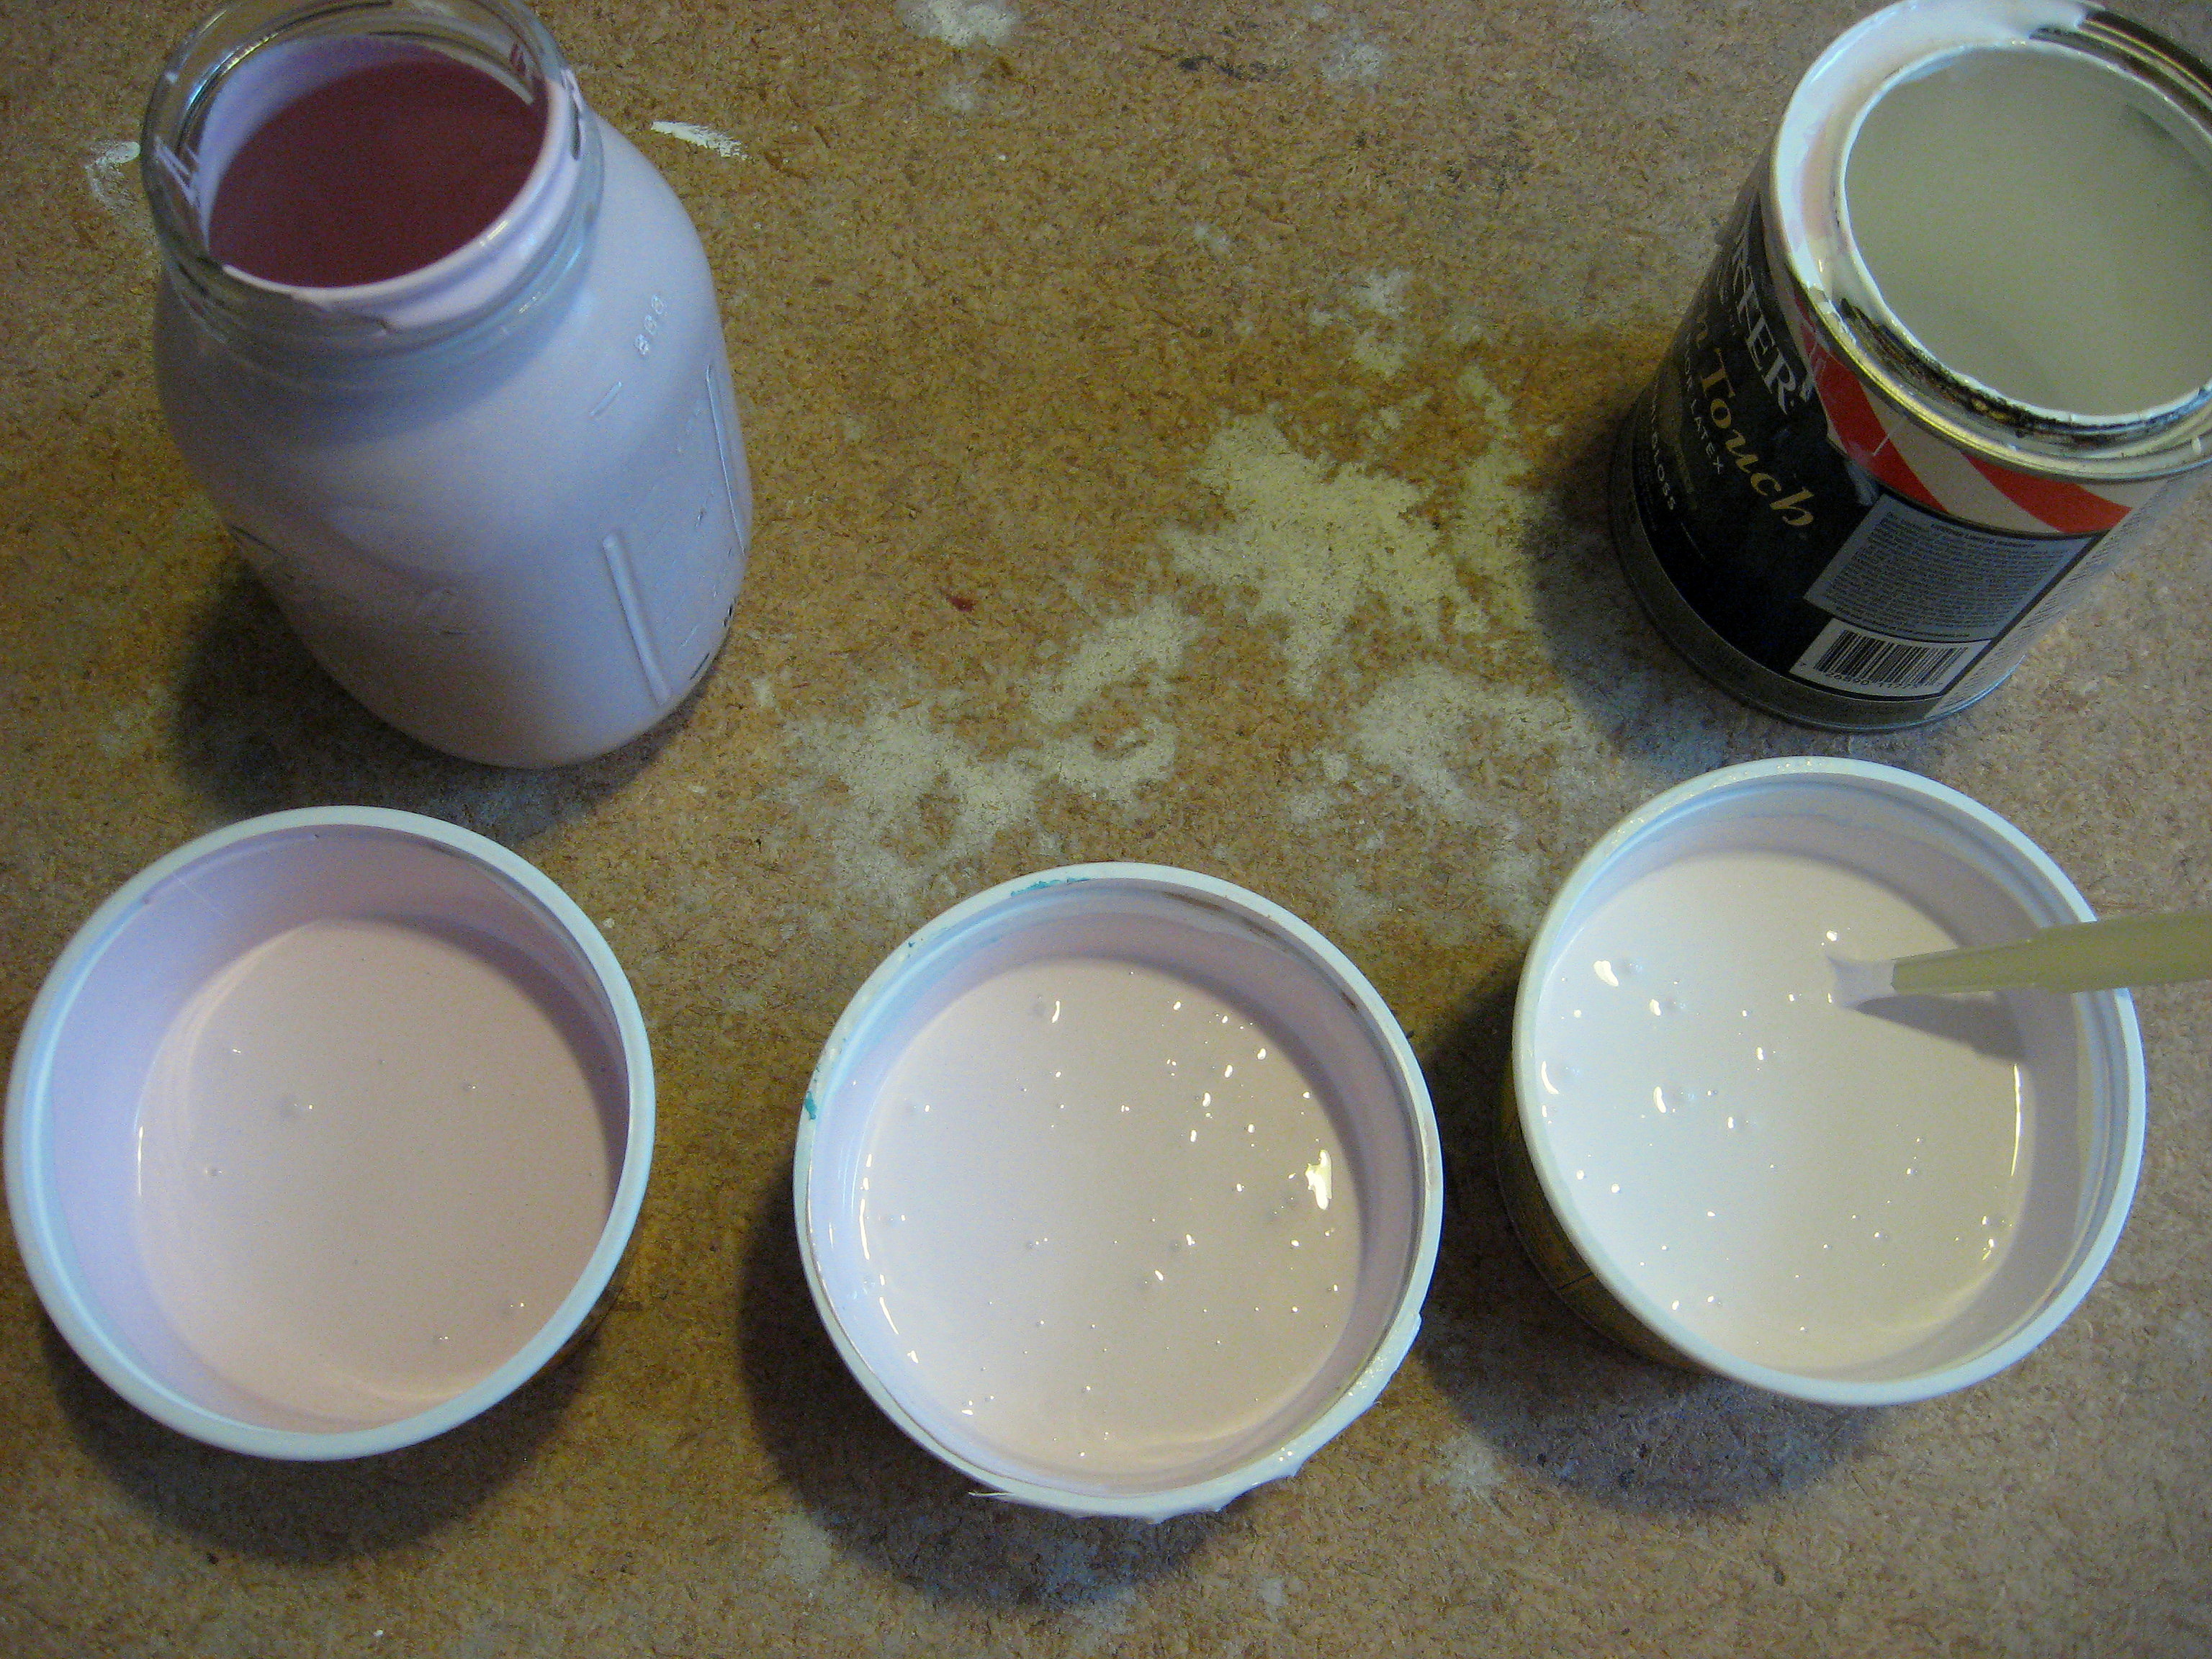
First up, mixing the paint for the ombre effect. This dresser has 5 drawers, so I needed 5 different colors. I started with the top drawer being white and the bottom drawer being the same color of pink that I painted her bedroom ceiling.
I poured an equal amount of pink and white into one container (the middle one), then about the same amount of paint into another container, but this time more pink than white (the lefthand one) and then the same thing in reverse in a third container – more white than pink (the righthand one).
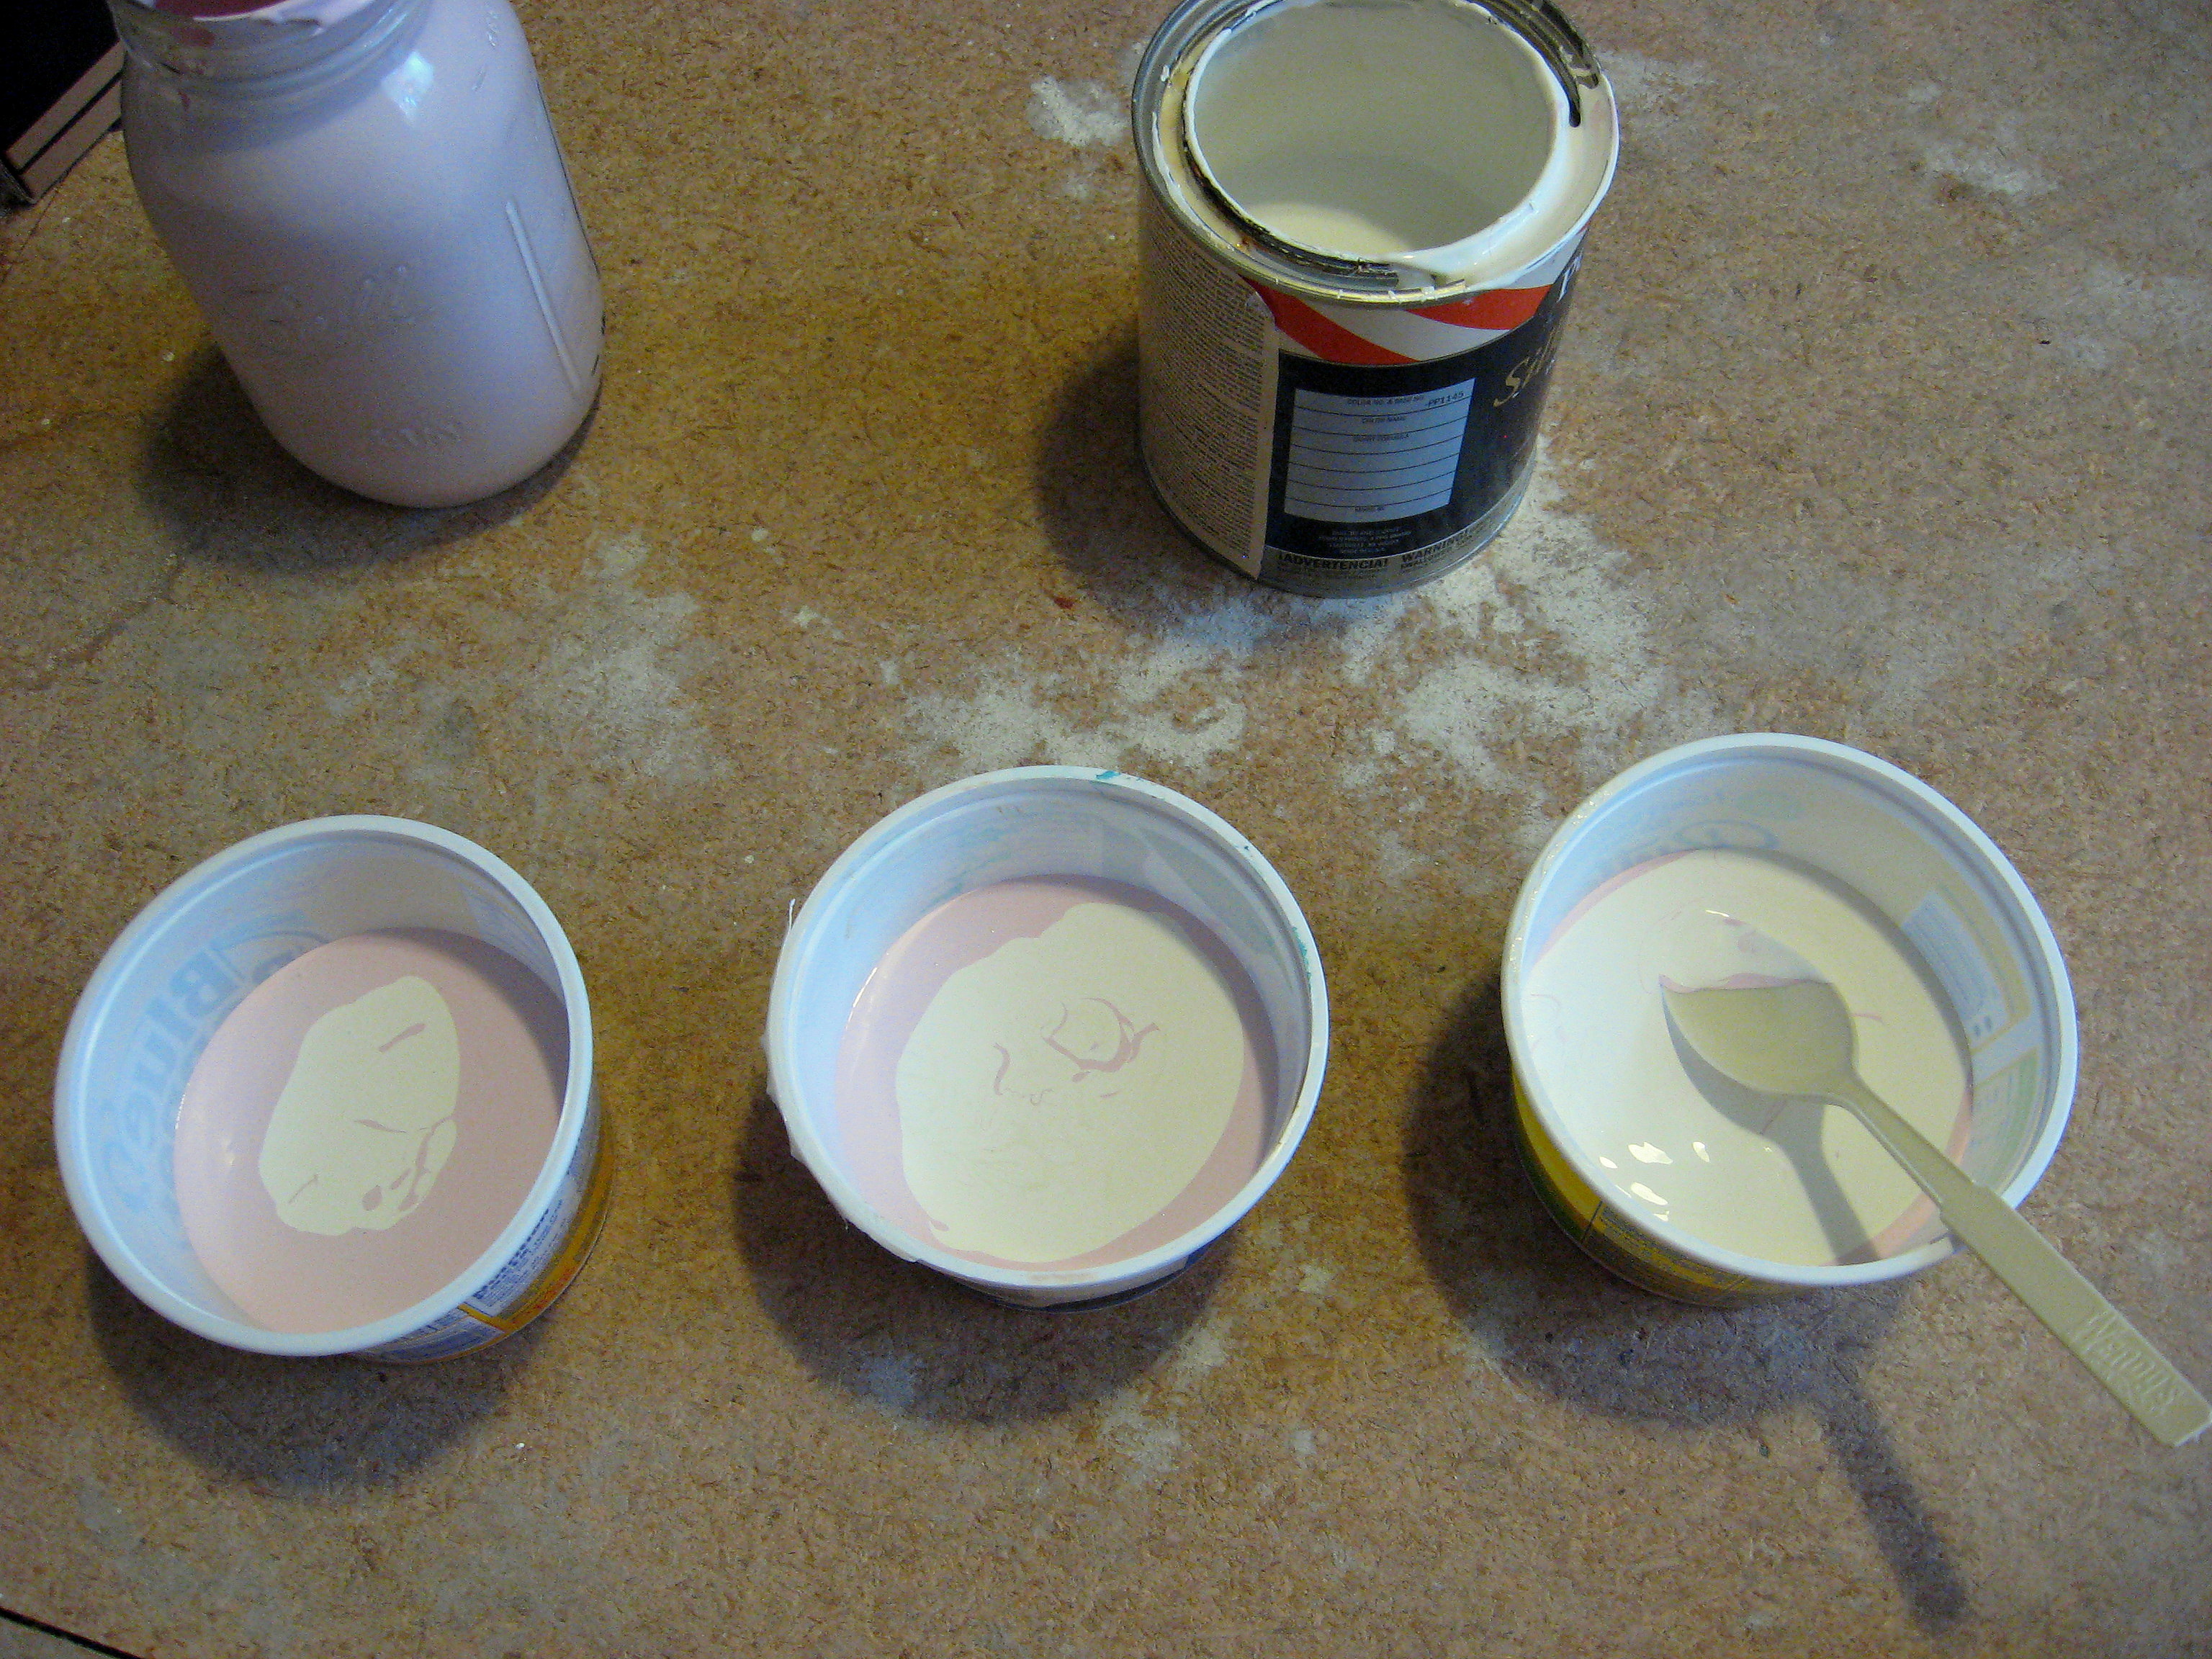
Mix them all well and line them up with the plain pink and plain white to see if you like the color values. Add more pink and/or white as needed to achieve the color gradation you are happy with.
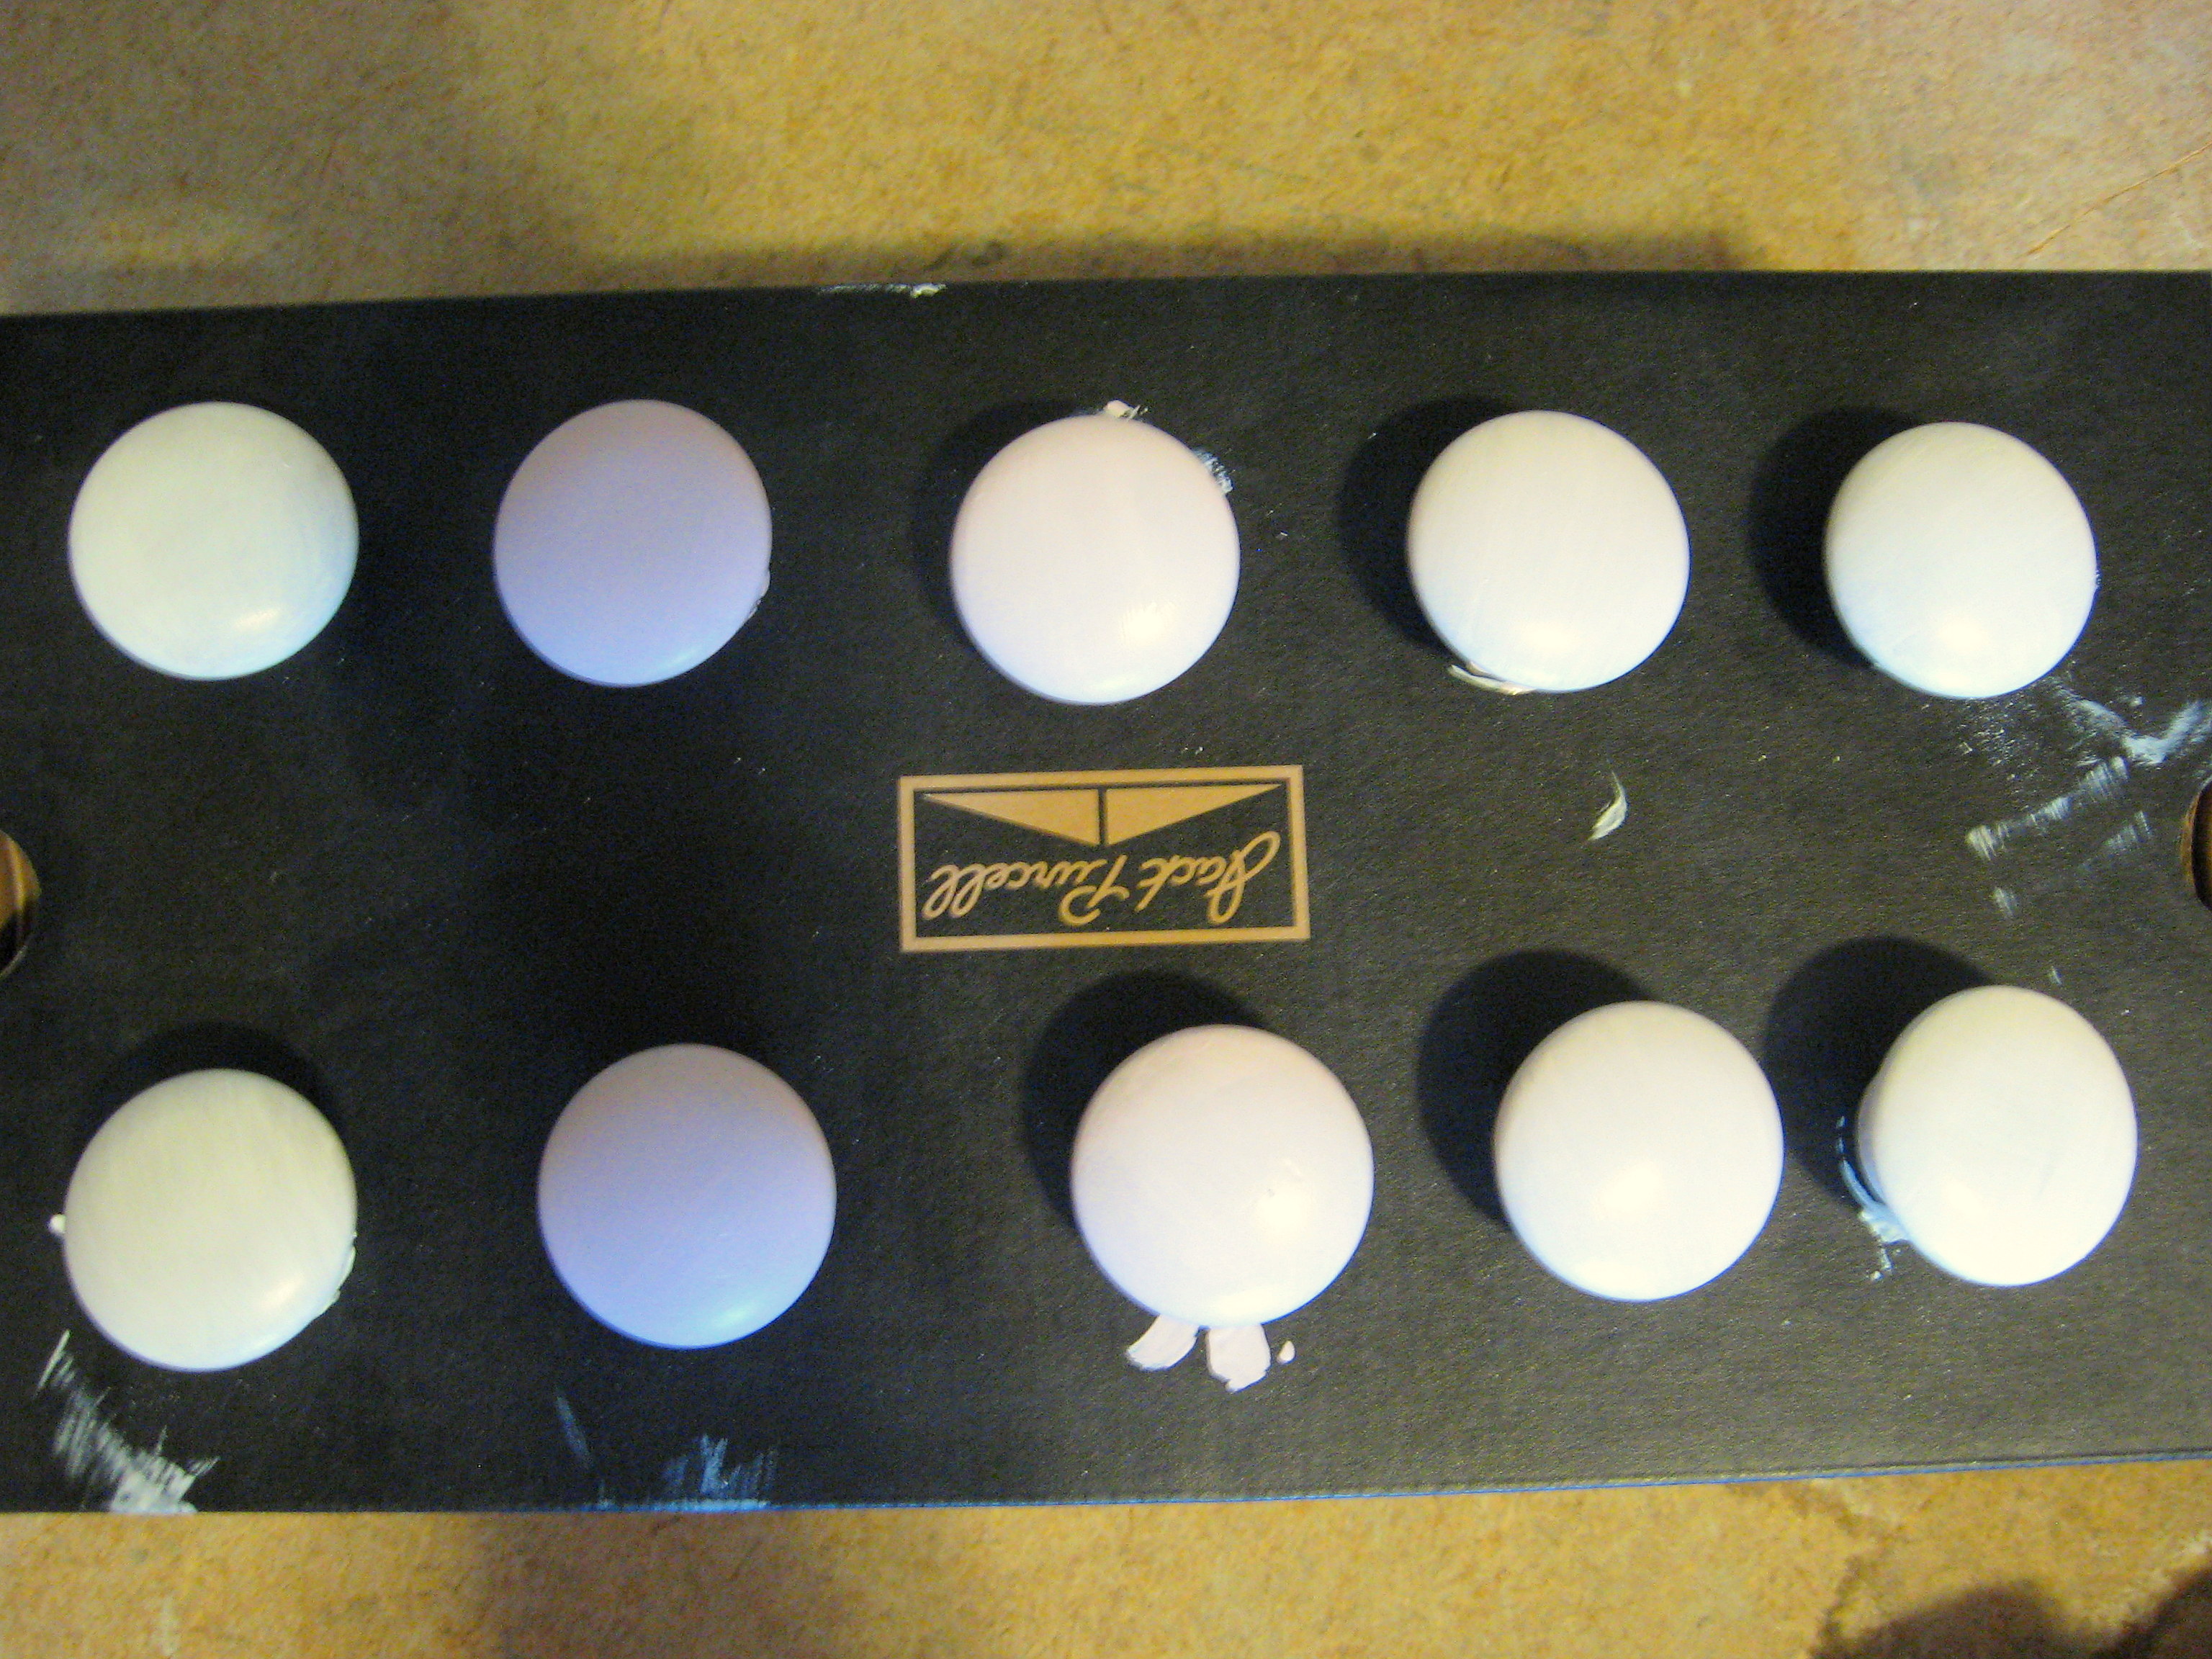
Don’t forget about the knobs! This is the world’s worst picture to show what I actually did – sorry – but I painted each set of 2 knobs one of the five colors.
Once everything has received 2 coats and is very dry (wait at least overnight – the longer you let this cure the sturdier the paint will be!) reassemble the drawers. I reversed the knobs, so that the darkest pink ones are on the white drawer and vice versa.
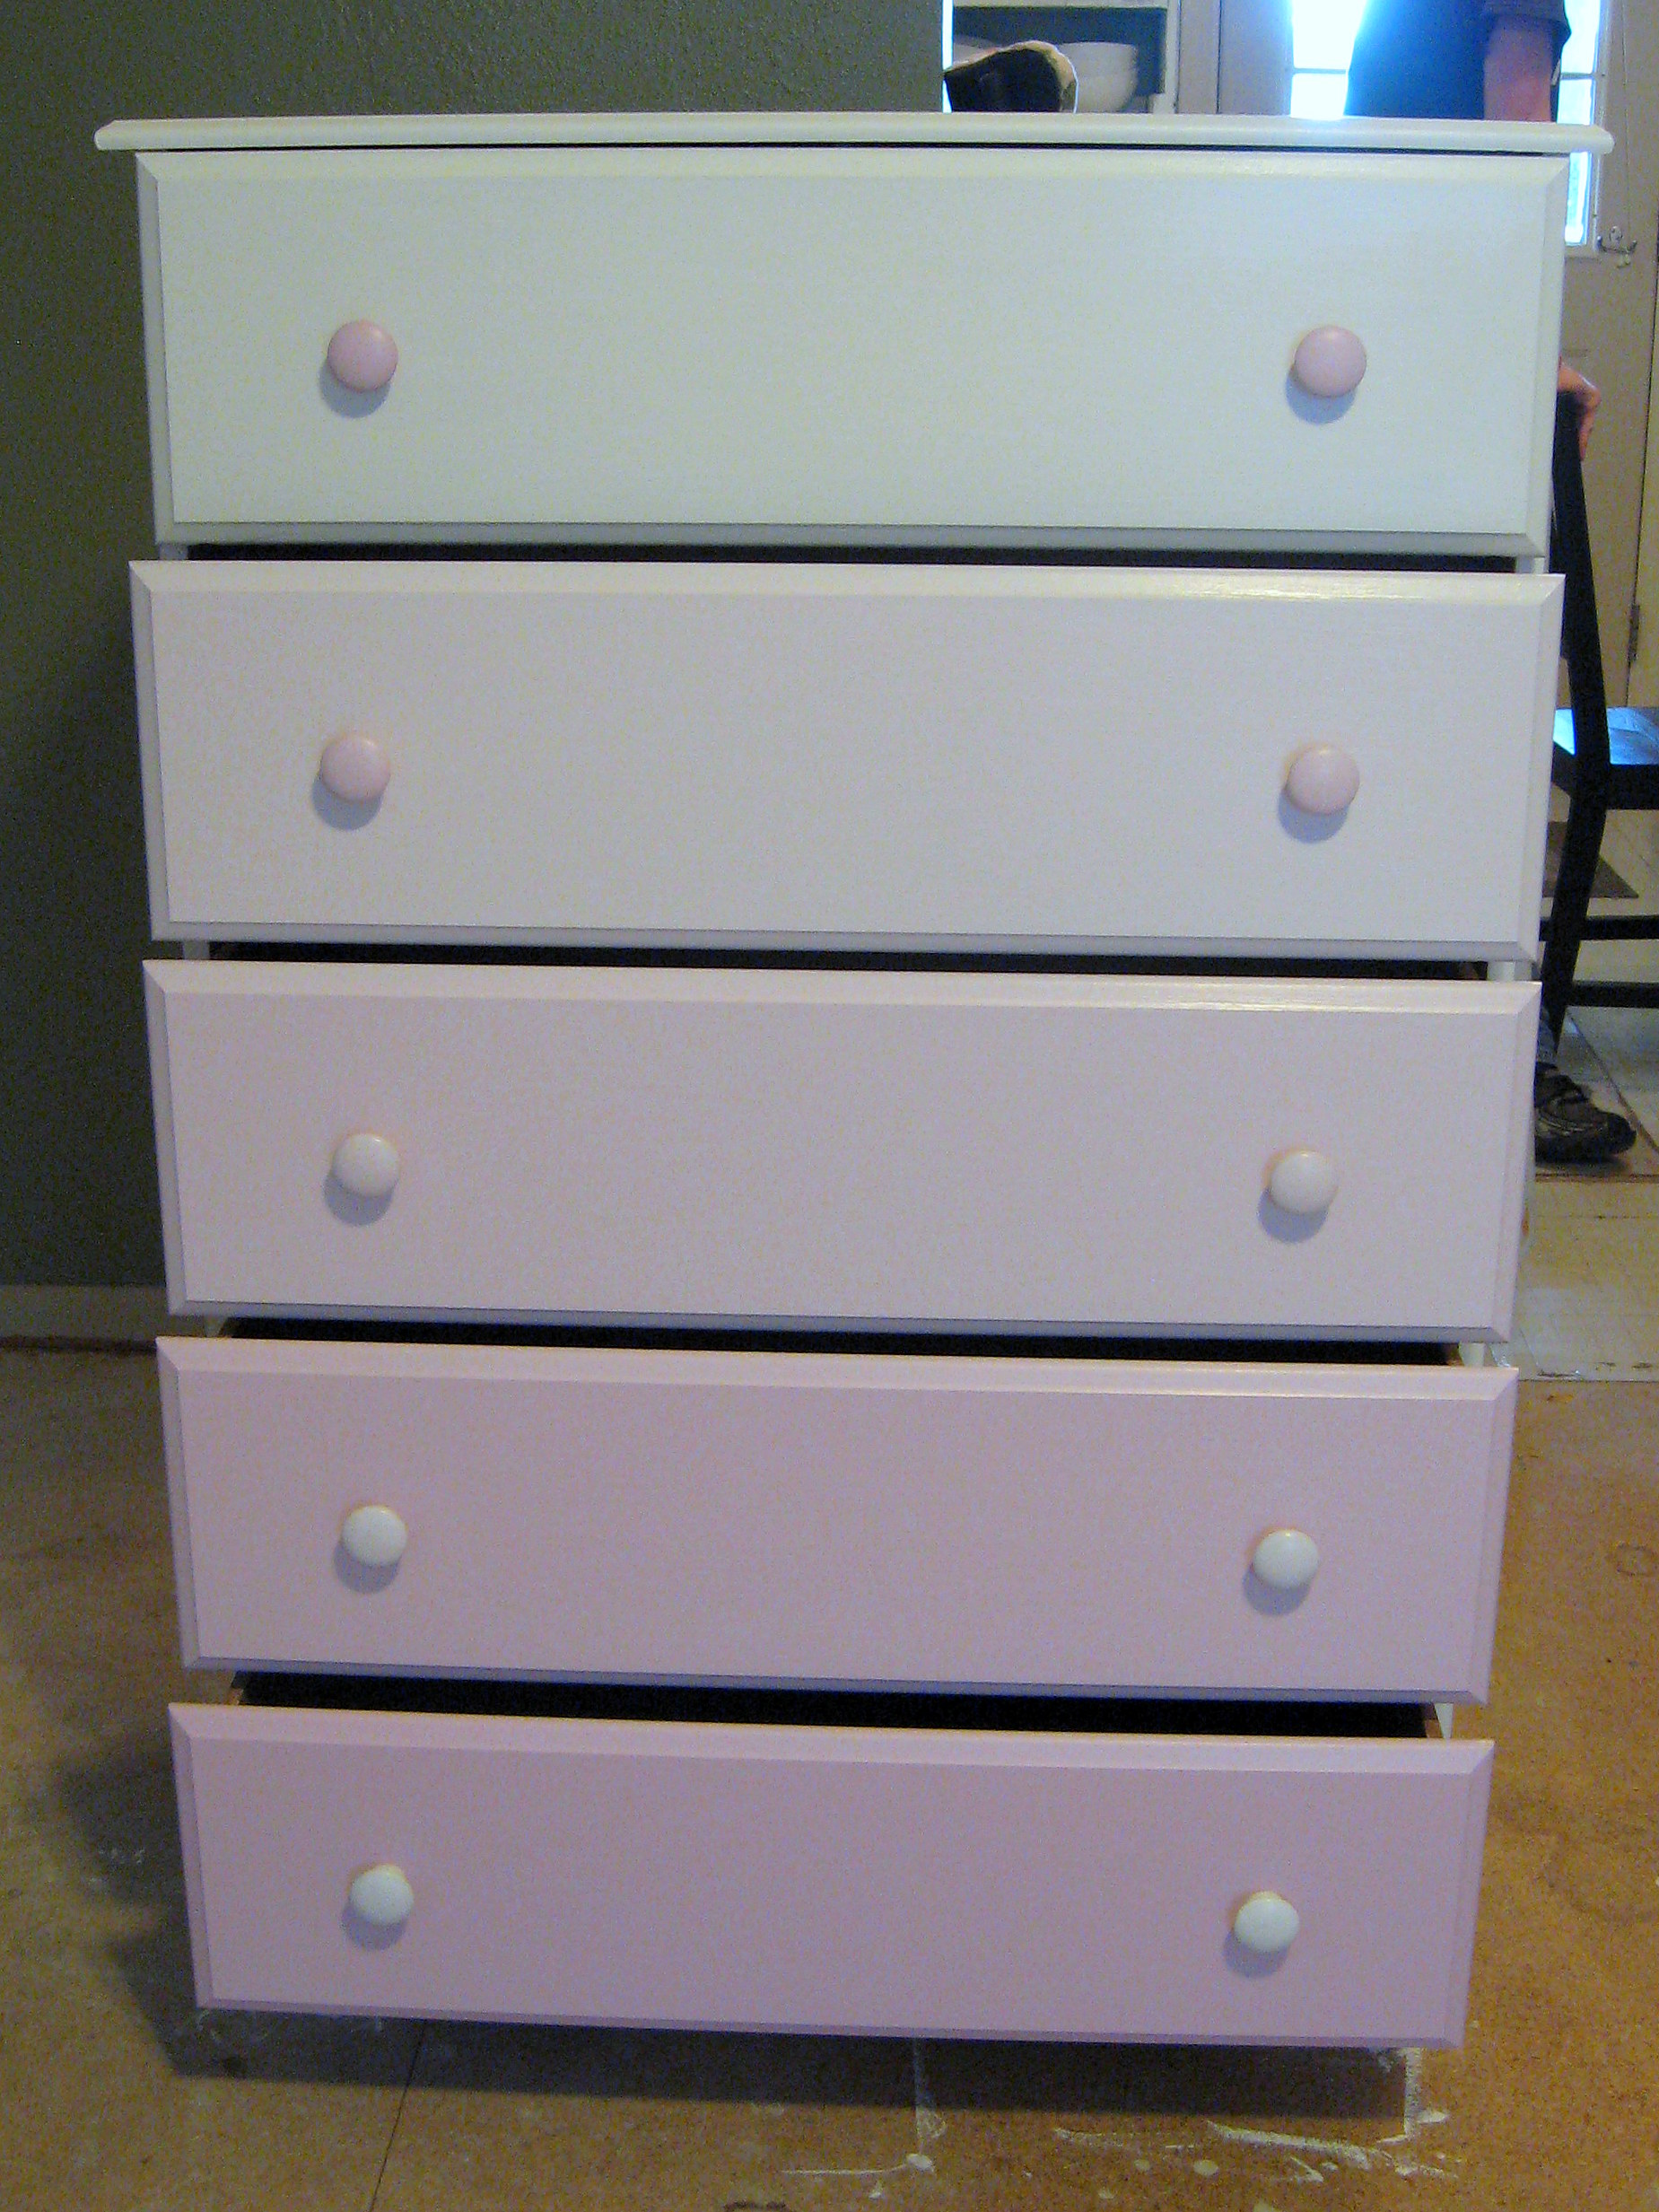
Love how this ombre turned out, and not any harder than just painting it plain!
PickYourPlum! Chicken Wire Baskets! Small Shoulder Bags! Metal House Numbers!


Don’t Be Chicken – Chicken Wire Baskets
Chick these out!
Starting at $1.99 (80% off) Retail: $9.99
Carry-ed Away – Small Shoulder Bags
Are you ready to be ‘carry-ed’ away?
Starting at $4.99 (75% off) Retail: $19.99
Your Number is Up – House Numbers
When it’s punched out of metal, there’s no such thing as a wrong number.
Starting at $16.99 (66% off) Retail: $49.99
Plus lots more CUTE deals!
LOTS of cute deals! Inexpensive shipping!
Elastic by the YARD, Popsicle Molds, $8 Girls Leggings, Burlap Ribbon & LOTS More!


More cute stuff available today! Low shipping prices!
New at Zulily! Lucky Brand — up to 50% off!

Lucky Brand — up to 50% off
Staying true to the heritage and all-American spirit of California, the LA-based Lucky Brand began crafting denim and separates in 1990. Made for the free-thinker, their wares are inspired by everything from the outlooks of Big Sur to the tattoo parlors of Venice Beach. Indulge in true Americana with a piece from this collection.
A PYP Best Blog! Making a Polymer Bouncing Ball!
Just in case you missed this article on making a polymer bouncing ball the first time we shared it a couple of years ago, we are republishing it. After Sharon wrote this blog originally, we got an awesome response. This is one of the PYP Best Blogs!
 I saw “recipes” all over Pinterest last summer for making your own bouncing ball. Since I have a daughter who is OBSESSED with them, I thought it would be a fun activity, and even went so far as to buy the ingredients – which then sat on my counter until now. I never really got around to reading the instructions and assumed that it would be complicated. Finally, I got tired of the stuff being in my way and made a few of them this afternoon.
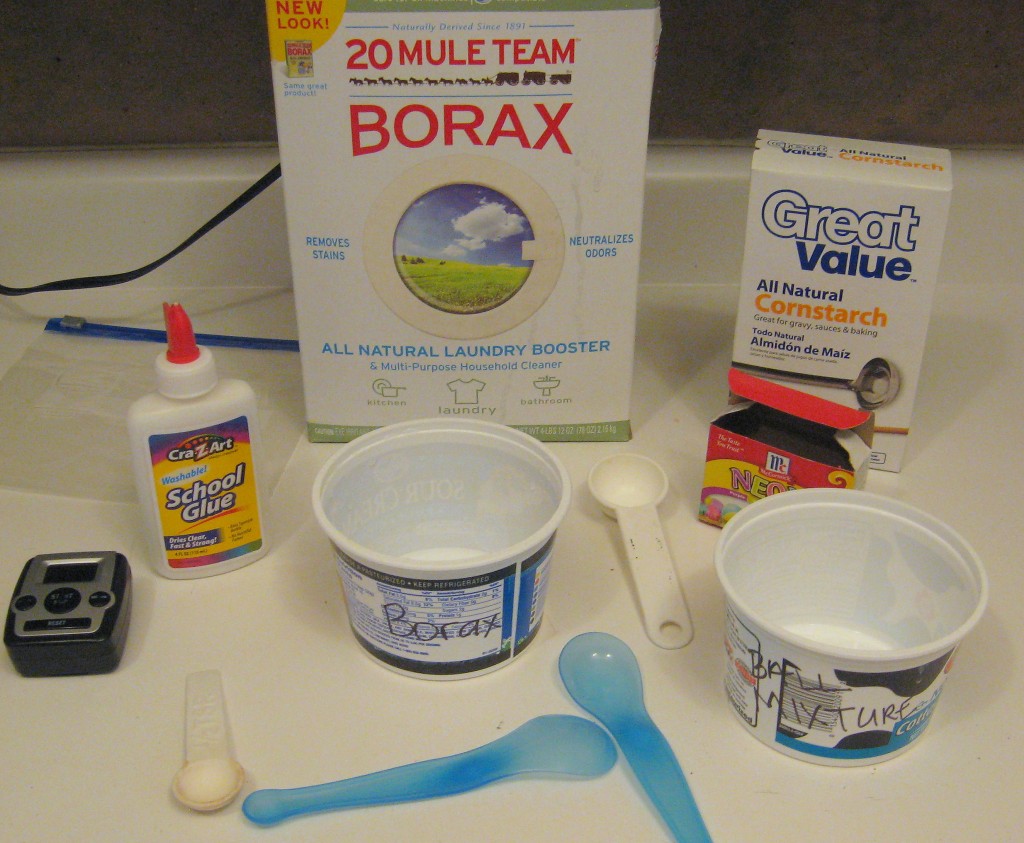
I used the recipe on this site:
https://chemistry.about.com/od/demonstrationsexperiments/ss/bounceball.htm
Here is what we thought:
- It was certainly NOT complicated. It was super easy and only took a few minutes to make. It probably took longer to read through the recipe than it did to make it.
- It also isn’t super messy. If you are doing it with very small children, you may want to put down newspaper or an old towel, but really, I did it right on my counter top using old butter tubs and plastic spoons. Once I threw those away, there was no other mess.
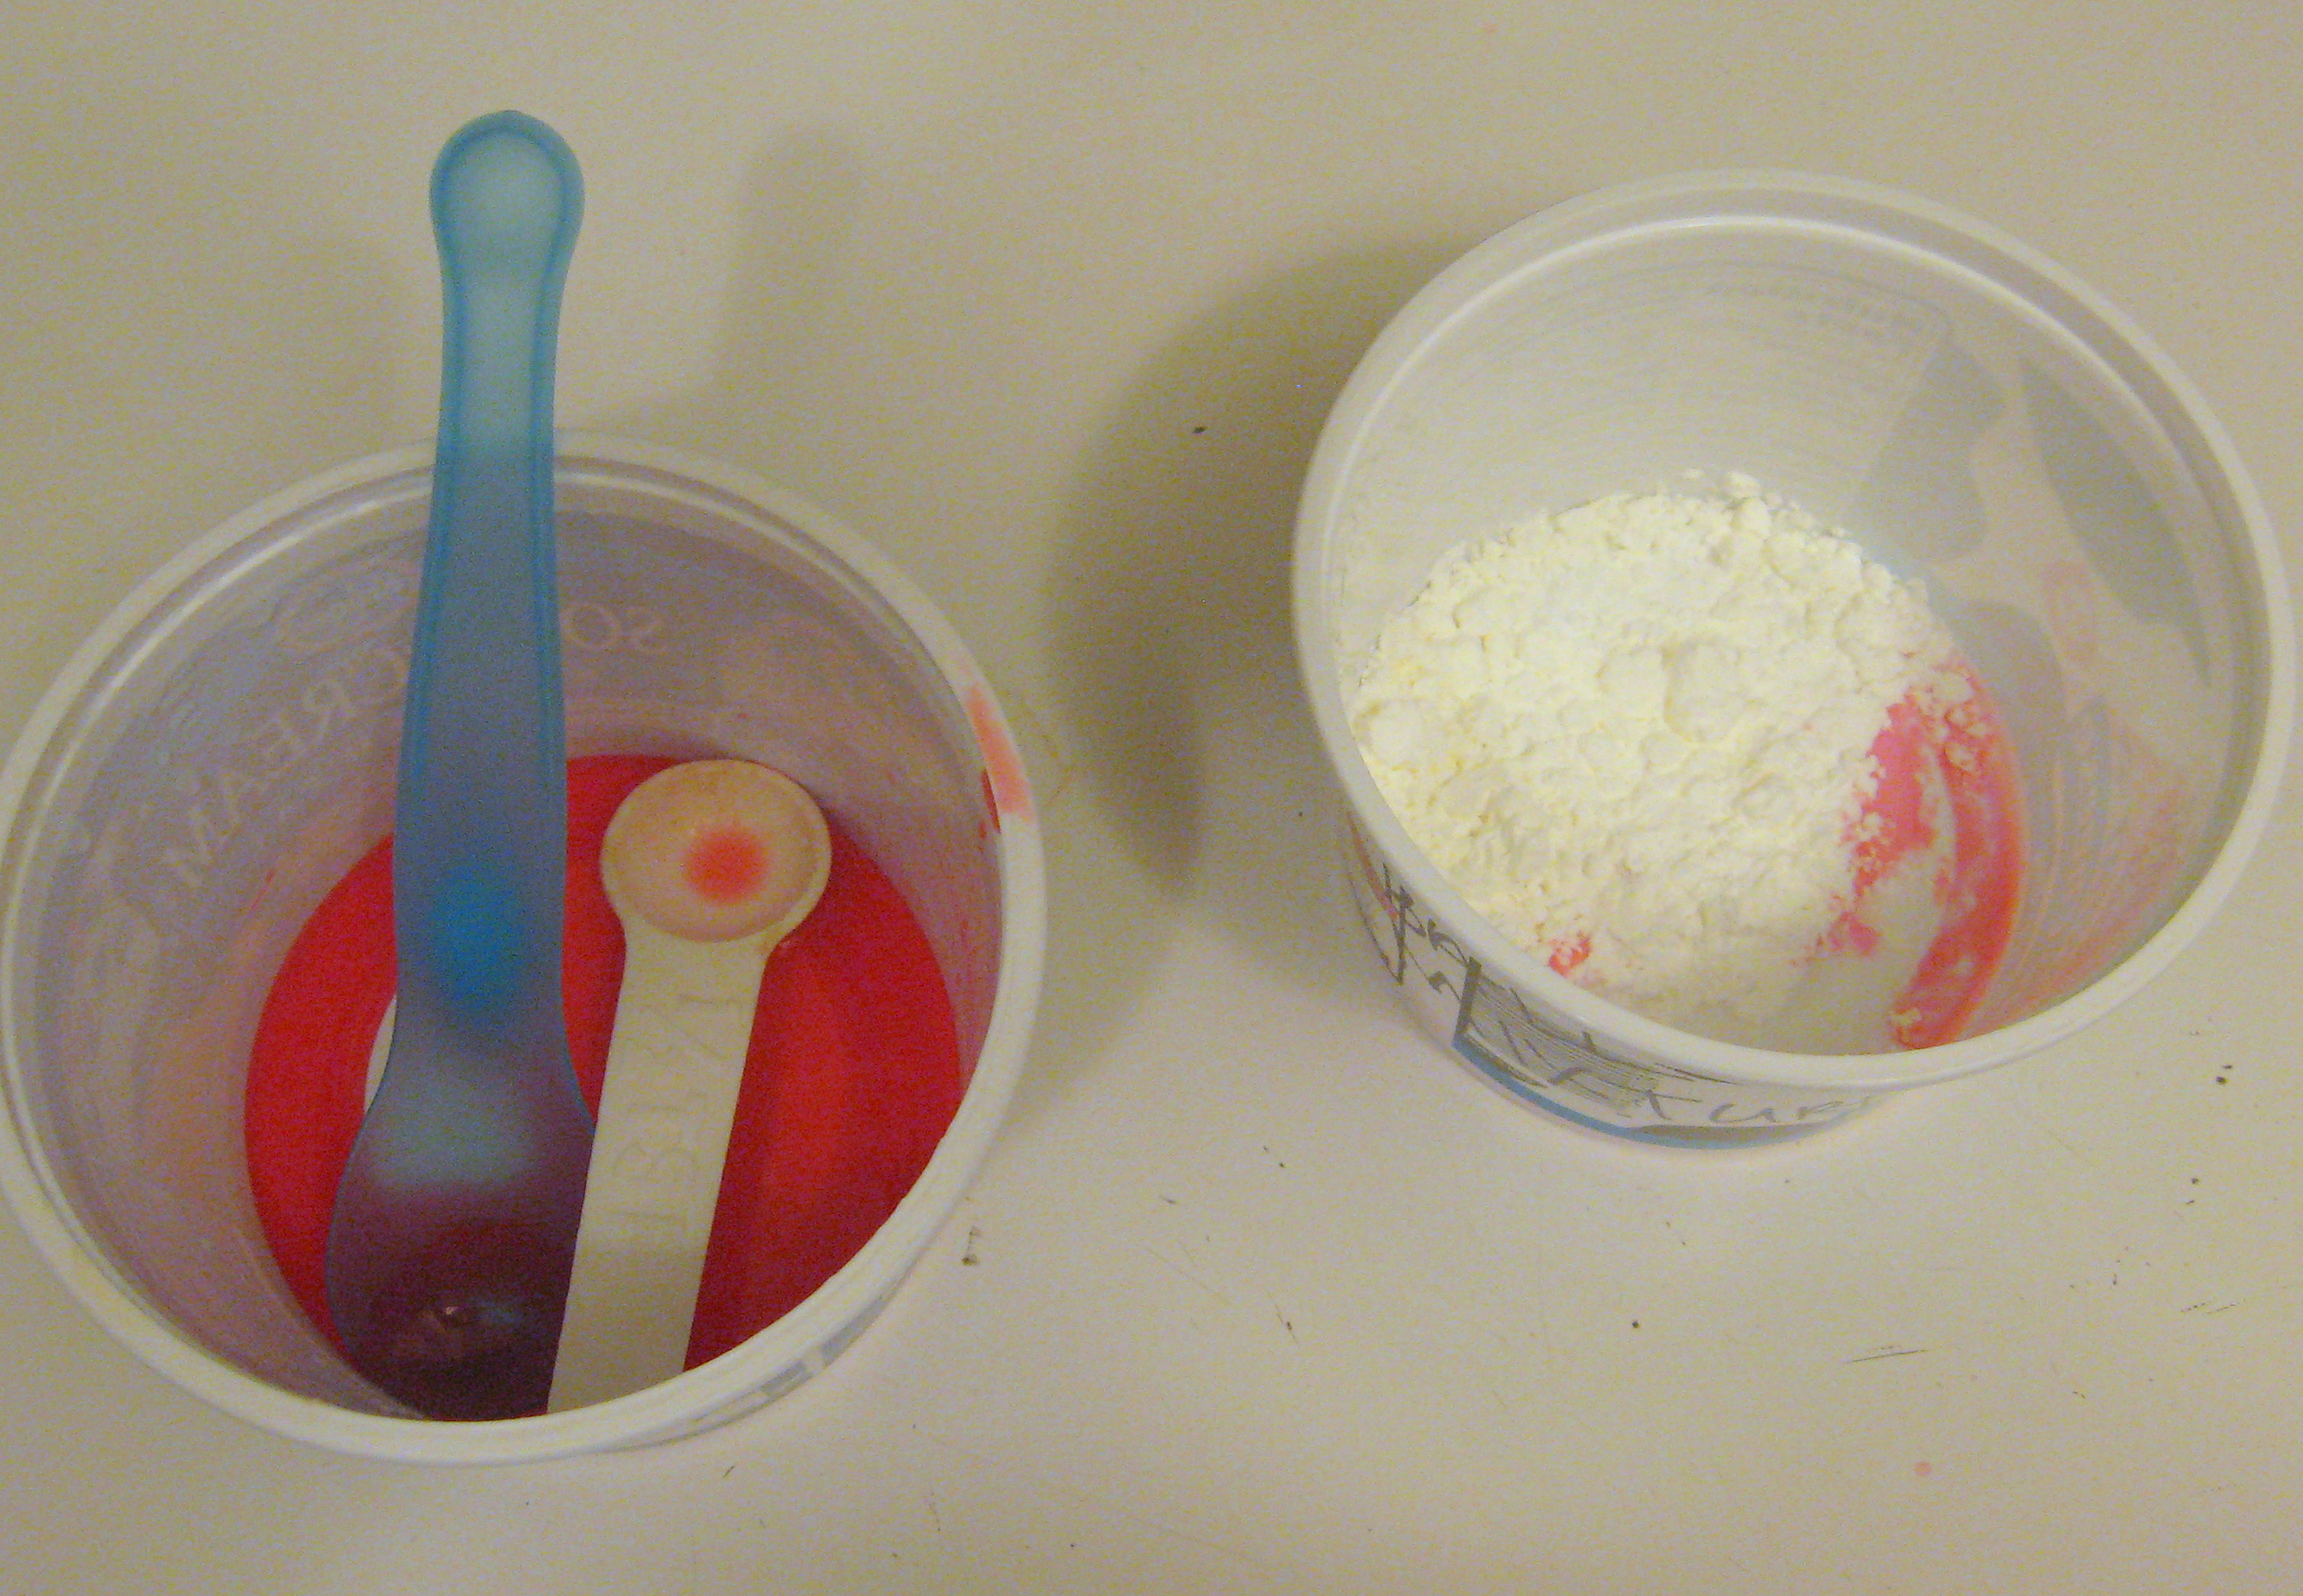
- I used white glue, but if I were to make this again, I would definitely use glitter glue or clear glue; I think it would look much cooler
- Our balls didn’t really bounce. They are super soft – basically like slightly more solid Gak. We all thought it was fun to play with it – like you would play dough or silly putty – but they definitely didn’t come out like a bouncing ball.

- The website explains the science behind how it works, but it is more on a level for middle school students, not little ones. My high schoolers understood it, but I didn’t!! so if you’re looking for a science lesson and – like me – haven’t taken chemistry since the 80’s, you may need to google for a simpler explanation. We did change up the ingredients on the second ball as per their suggestion (we added more cornstarch) but thought it was only barely different from the first one.
Final analysis? I think you should give it a try! It is easy and fast, and takes ingredients that you likely already have sitting around the house. It is fun to play with (it would make a great stress ball). If I had had more time, I think I would have gone ahead and made gak as well, so we could have talked about the differences (here’s a good gak recipe if you don’t know what I’m talking about: https://lilluna.com/homemade-gak-recipe/).
Charms for Rubberband Rainbow Loom Bracelets 30pcs – Just $6.40!
Such a fun thing for those popular bracelets!
 Charms for Rubberband Rainbow Loom Bracelets 30pcs
List Price: $14.99
You Save: $8.59 (57%)
Price: $6.40
Eligible for free shipping on $35+ orders or on ANY order with Amazon Prime.
Don’t have a Prime membership? Get a one month free trial! Click here for details!
PickYourPlum! Tear Drop Necklaces! Peek-A-Boo Socks! Shaving Foot Rest!


Make a Bold Statement – Tear Drop Necklaces
Be bold.
Starting at $4.99 (80% off) Retail: $24.99
Look Good from Head to Toe – Peek-A-Boo Socks
Dress up your shoes with fancy socks.
Starting at $1.49 (70% off) Retail: $4.99
That Was a Close Shave – Shaving Foot Rest
Give it a rest.
Starting at $8.99 (64% off) Retail: $24.99
Plus lots more CUTE deals!
LOTS of cute deals! Inexpensive shipping!
Crayola 50ct Washable Super Tips with Silly Scents – Just $6.26!
Another great deal for back to school!
 Crayola 50ct Washable Super Tips with Silly Scents
List Price: $12.99
You Save: $6.73 (52%)
Price: $6.26
Eligible for free shipping on $35+ orders or on ANY order with Amazon Prime.
Don’t have a Prime membership? Get a one month free trial! Click here for details!
Crayola 50ct Long Colored Pencils – Just $7.67!
Perfect for back to school!
 Crayola 50ct Long Colored Pencils
List Price: $12.99
You Save: $5.32 (41%)
Price: $7.67
Eligible for free shipping on $35+ orders or on ANY order with Amazon Prime.
Don’t have a Prime membership? Get a one month free trial! Click here for details!
PickYourPlum! ABC Stamp Sets! Waterproof Picnic Blankets! Cast Iron!


Stamp it Out – ABC Stamp Sets
We’ll spell it out for you.
Starting at $4.99 (61% off) Retail: $12.99
Make a Blanket Statement – Waterproof Picnic Blankets
The perfect outdoor accessory.
Starting at $12.99 (71% off) Retail: $44.99
Keep an Iron Grip – Cast Iron
Keep an iron grip, these will go fast.
Starting at $4.99 (75% off) Retail: $19.99
Plus lots more CUTE deals!
LOTS of cute deals! Inexpensive shipping!
A PYP Best Blog! An Ombre Lamp Makeover! Ombre with Spray Paint!
Just in case you missed this article on using spray paint to create an ombre effect on an old lamp the first time we shared it a couple of years ago, we are republishing it. After Sharon wrote this blog originally, we got an awesome response. This is one of the PYP Best Blogs!
This makeover tutorial is a perfect study in why it is important to be flexible when you DIY. This didn’t go AT ALL like I had planned it, but I kept going and I love the final result!
I came across this lamp as I was driving down the street one day past a house that had belonged to an elderly lady that had passed away. The family was cleaning out her garage, and there was a big pile of junk on the front lawn with a “FREE” sign. I asked them if the lamp worked, they said yes, and into my back seat it went.
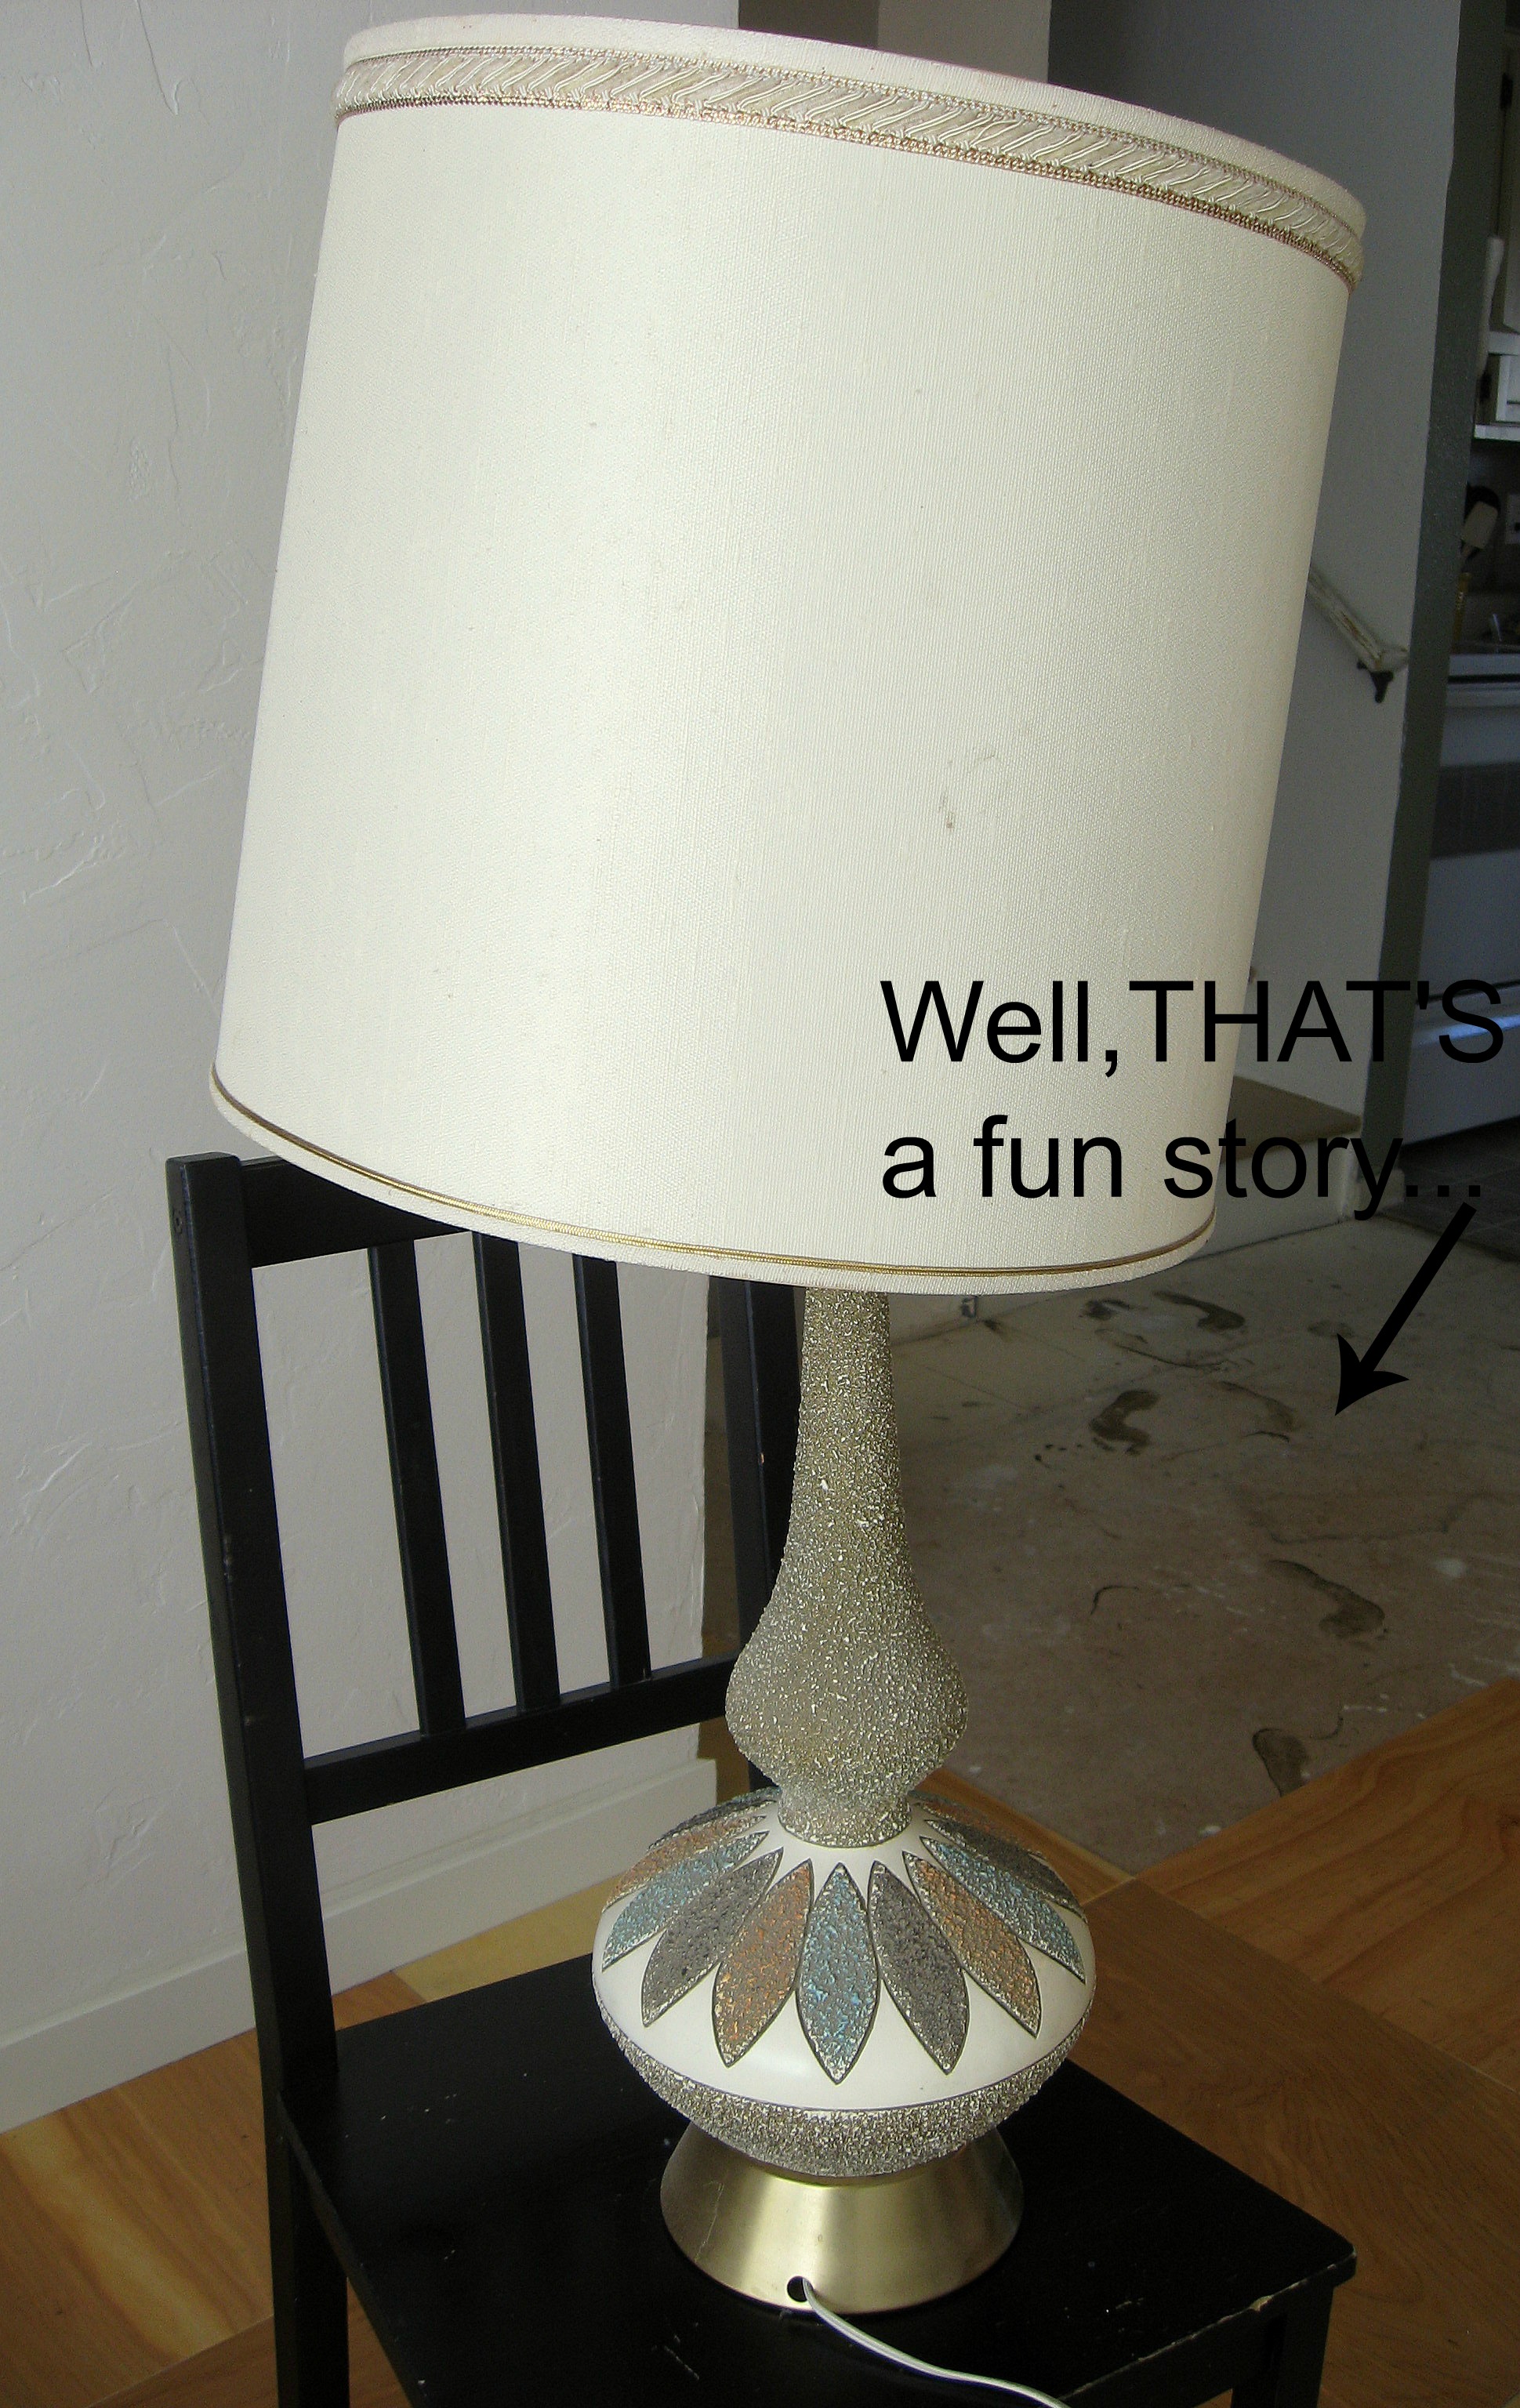
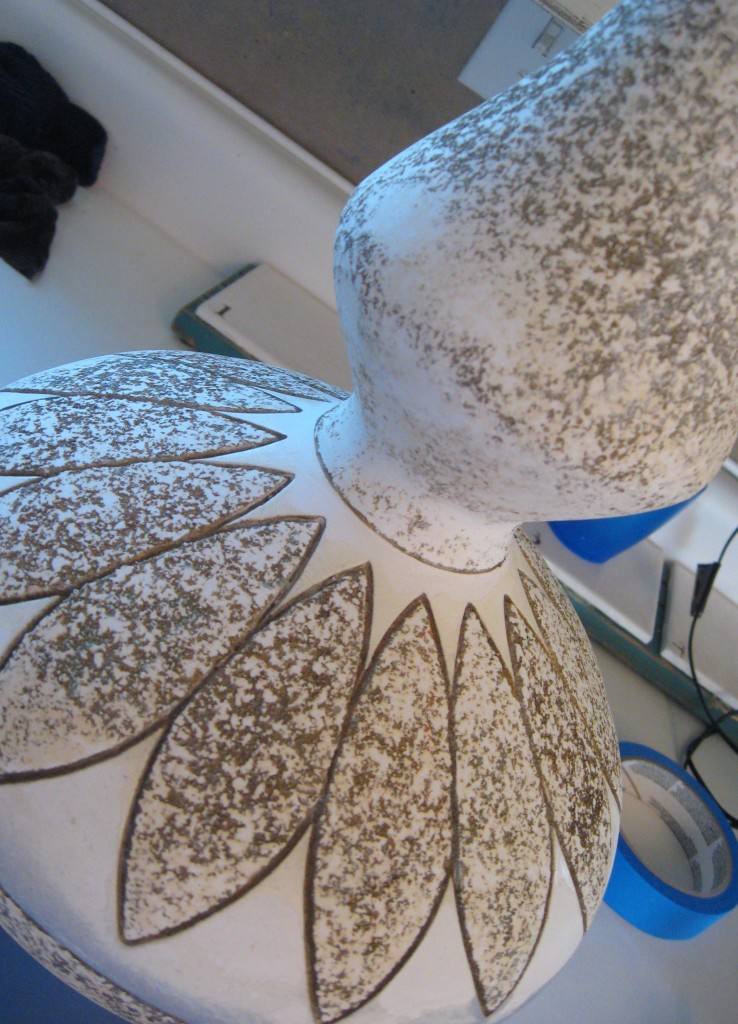
Here’s a close up shot of the funky texture.
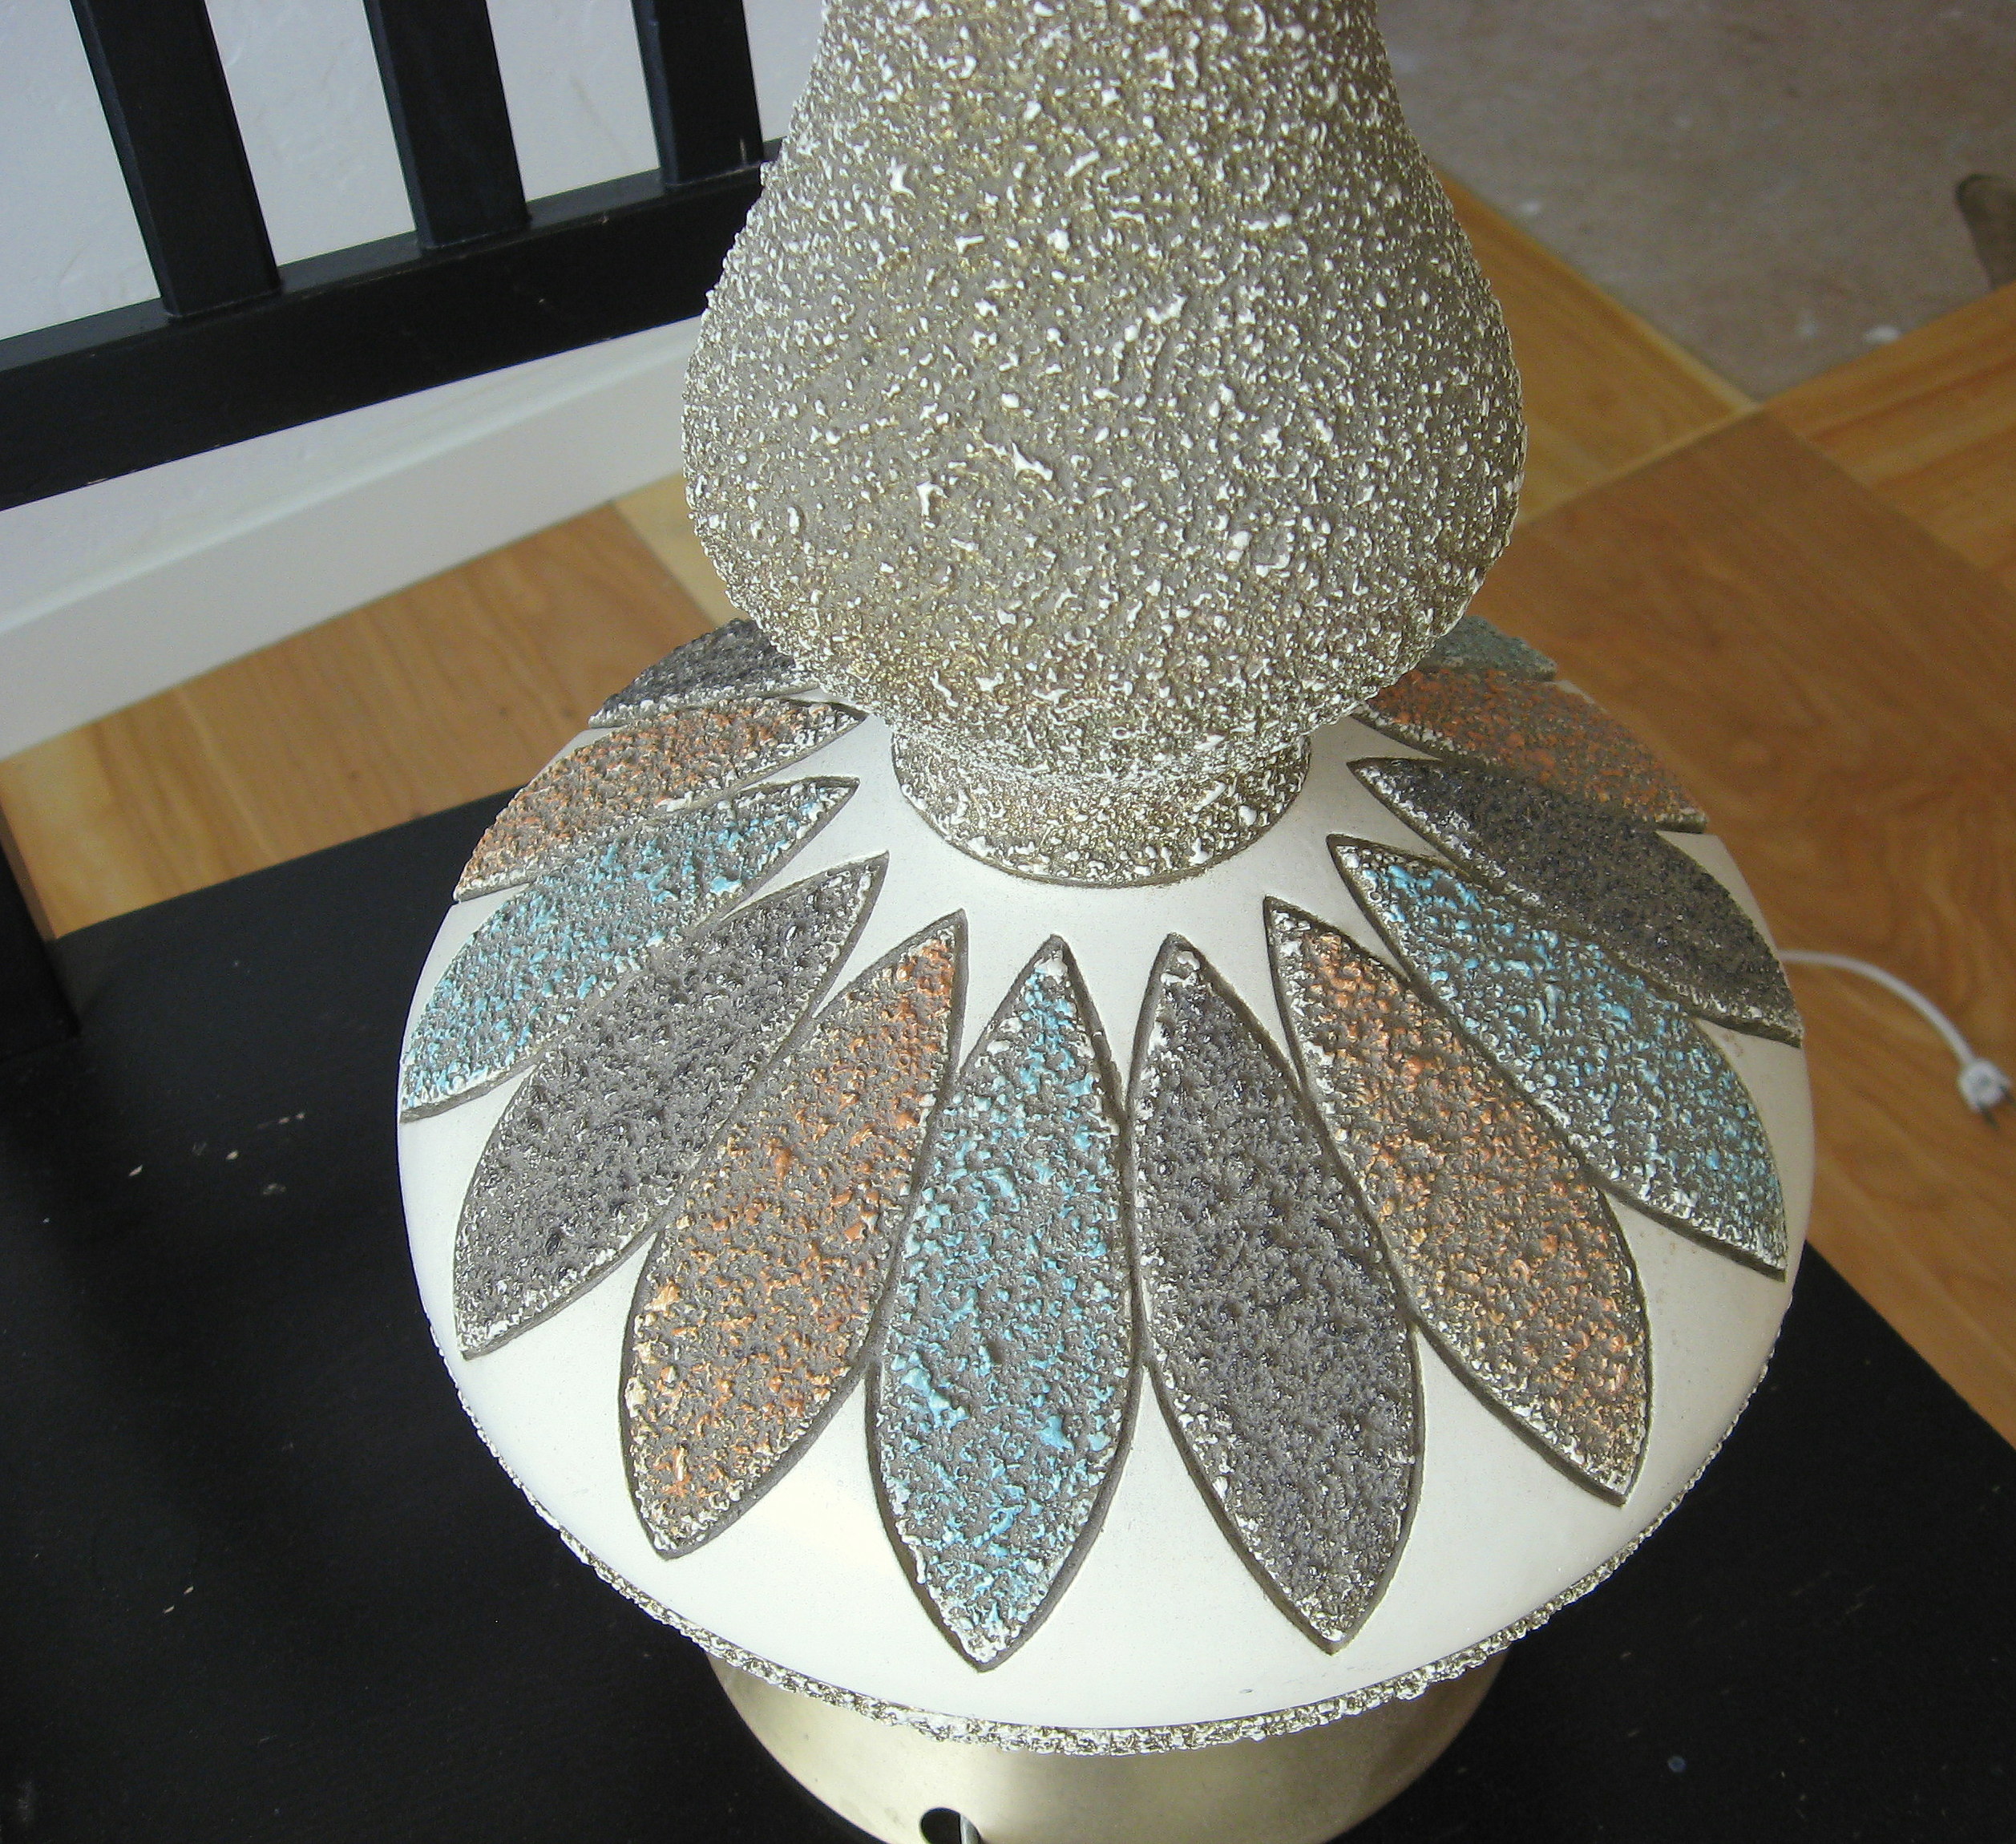
Check out that horrible 70’s awesomeness! The shade was pretty gross too, but structurally it was in perfect condition.
My first thought with this lamp was that I could just spray paint ombre over the texture, so I tried it! The best thing about items you get for free is that you can attack them with a “what have you got to lose” attitude. If it doesn’t work? You’re only out the price of the spray paint, right?
I pictured a faded ombre effect, starting with blue on the bottom and fading to a green on the top, so I grabbed the spray paint and went to work, taping off the cord and the light fixture at the top first.
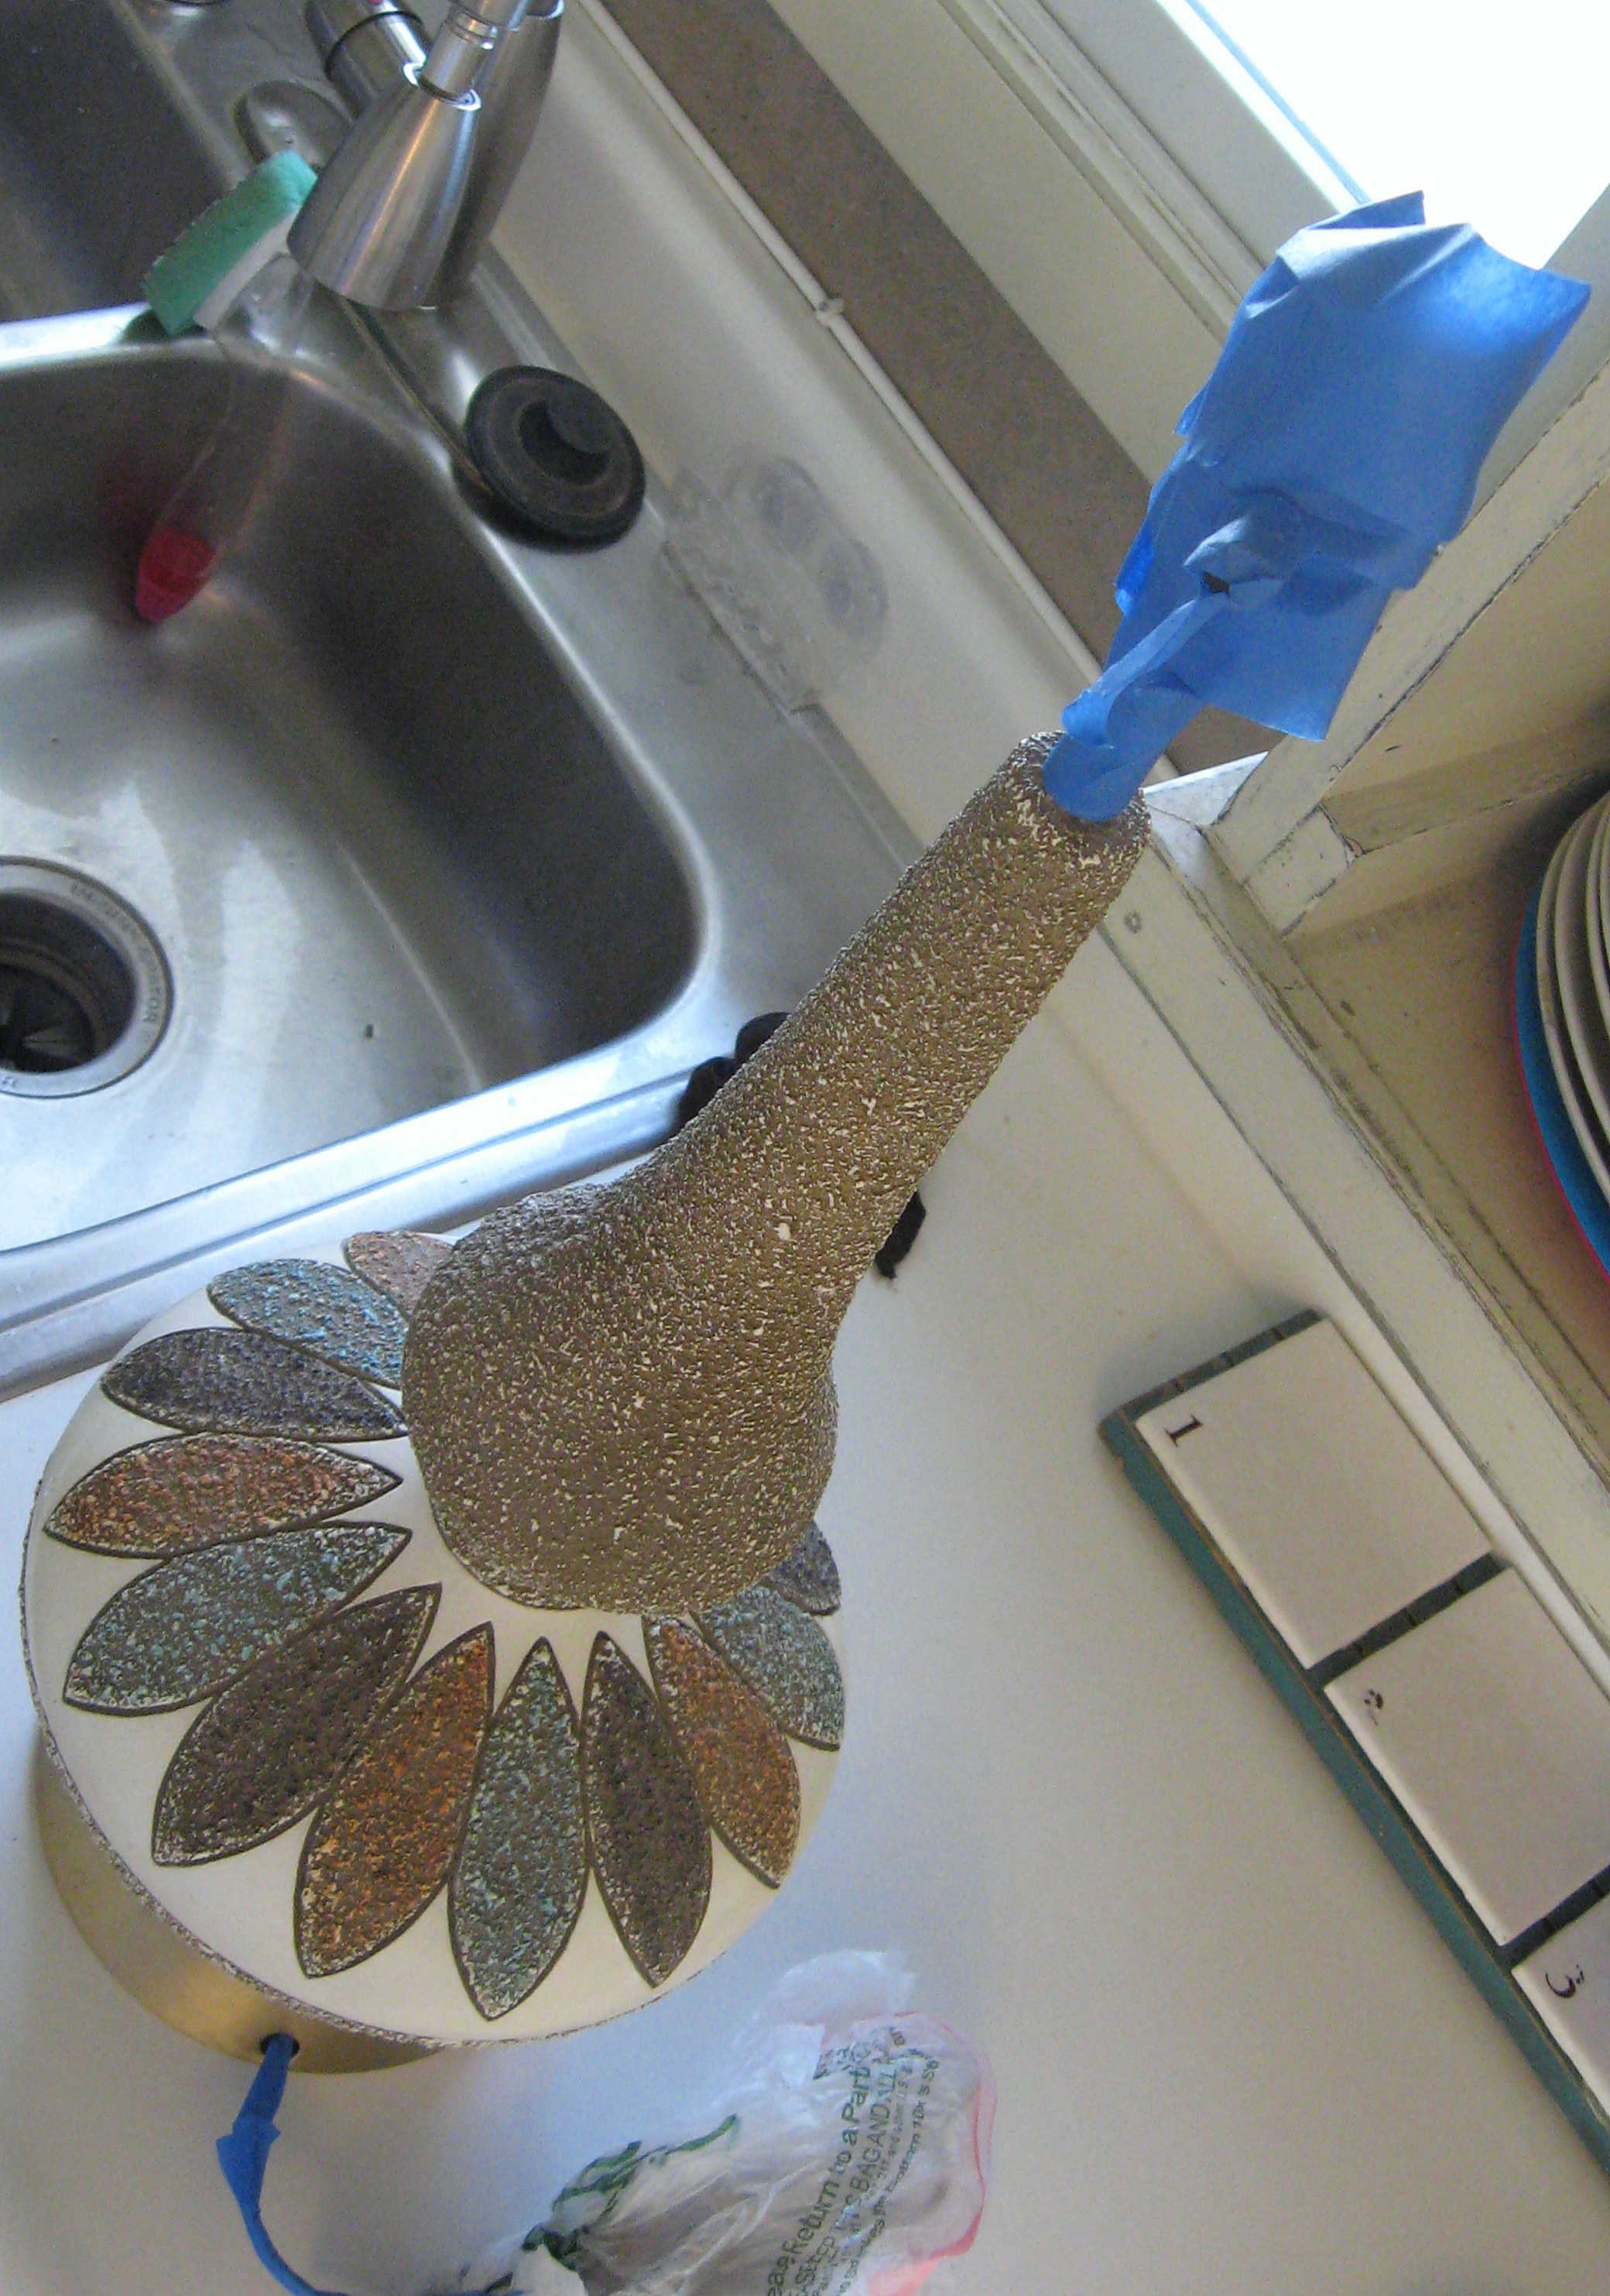
And I hated it. Really hated it. The texture was so thick that the spray paint was having a hard time covering it, and the finished effect just looked trashy. I wasn’t ready to give up yet – the lamp is the perfect size and shape for my living room – so I let the spray paint dry, then used my small detail sander on the textured parts to sand them smooth. It was MESSY and dusty and smelly, but relatively easy to do. Once the majority of the texture was flattened, I cleaned the surface well and tried again.
Getting an ombre effect with spray paint is pretty easy to do. I started at the bottom of the lamp with the blue and gave it several coats, each time going over what I’d already done, but going up just a little higher. I did the same thing with the green starting from the top. Once the top and bottom are solidly their respective colors, then spray each color in the middle – holding the can back a bit so that you get a misty-type spray that overlaps.
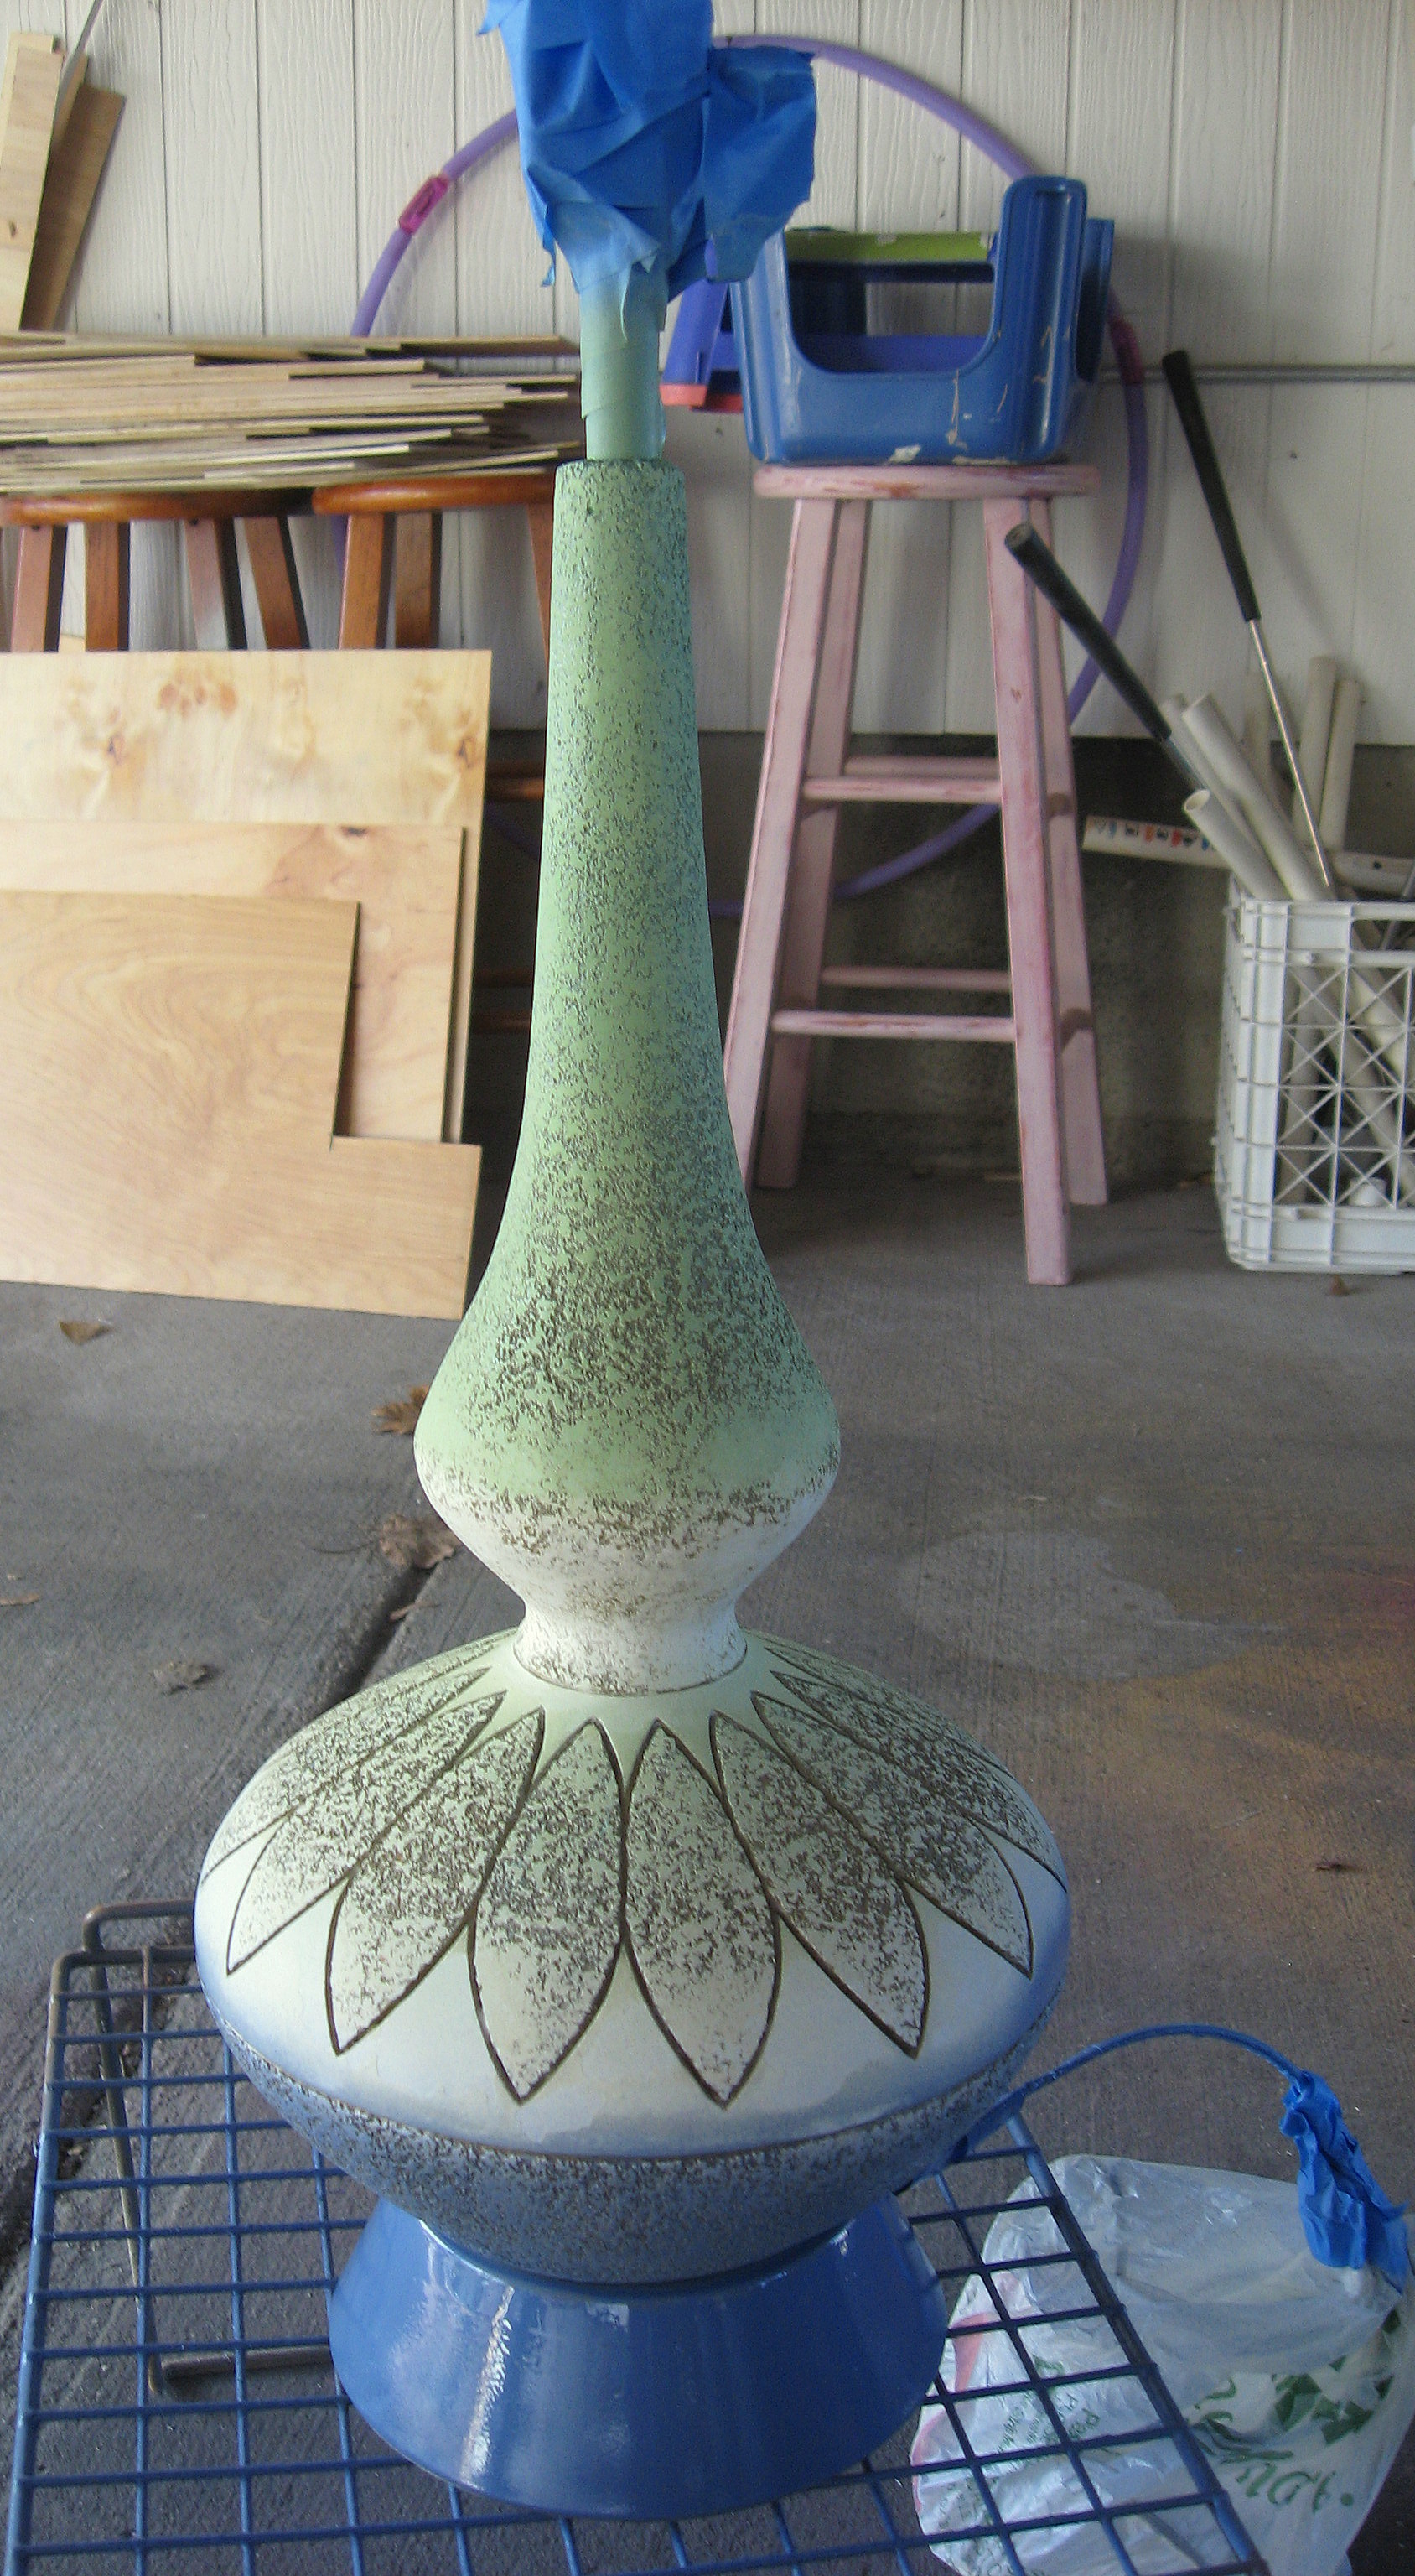
Problem #2 – I hated it again!! Before I had even finished , I knew that the blue/green ombre fade that looked so great in my head just did not look so great on the lamp. Still, I decided to have one more go at it before I gave up.
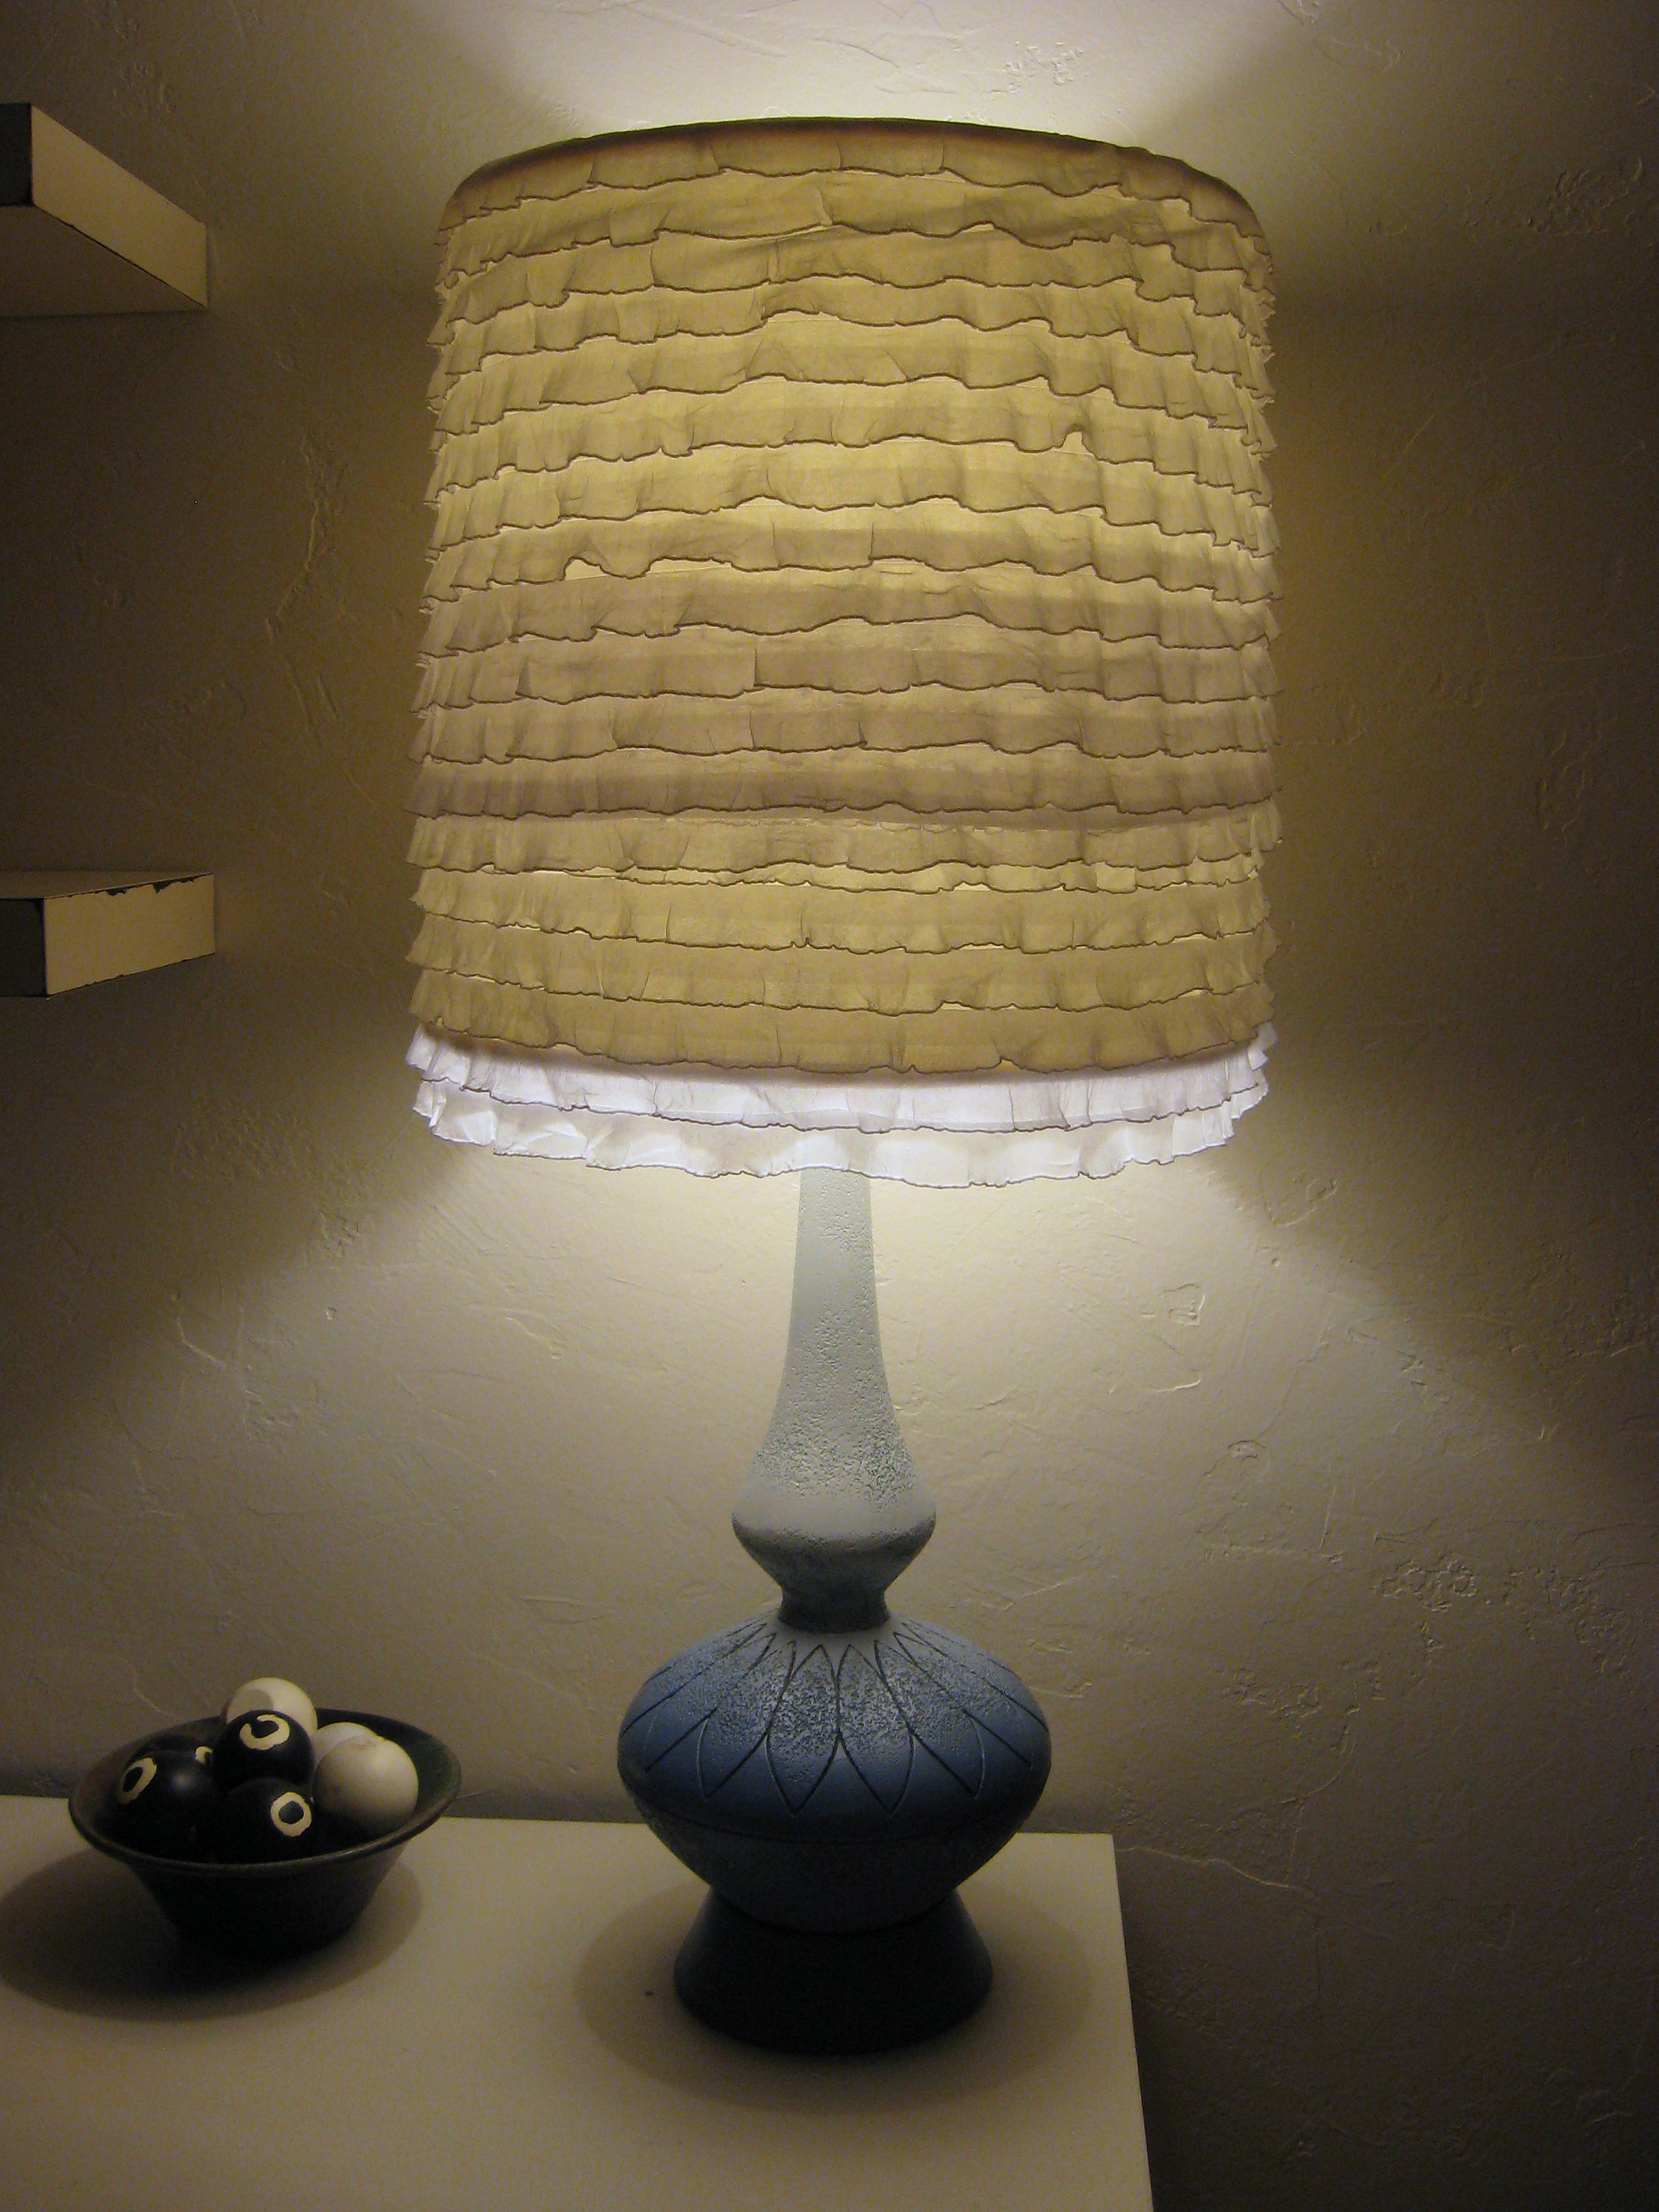
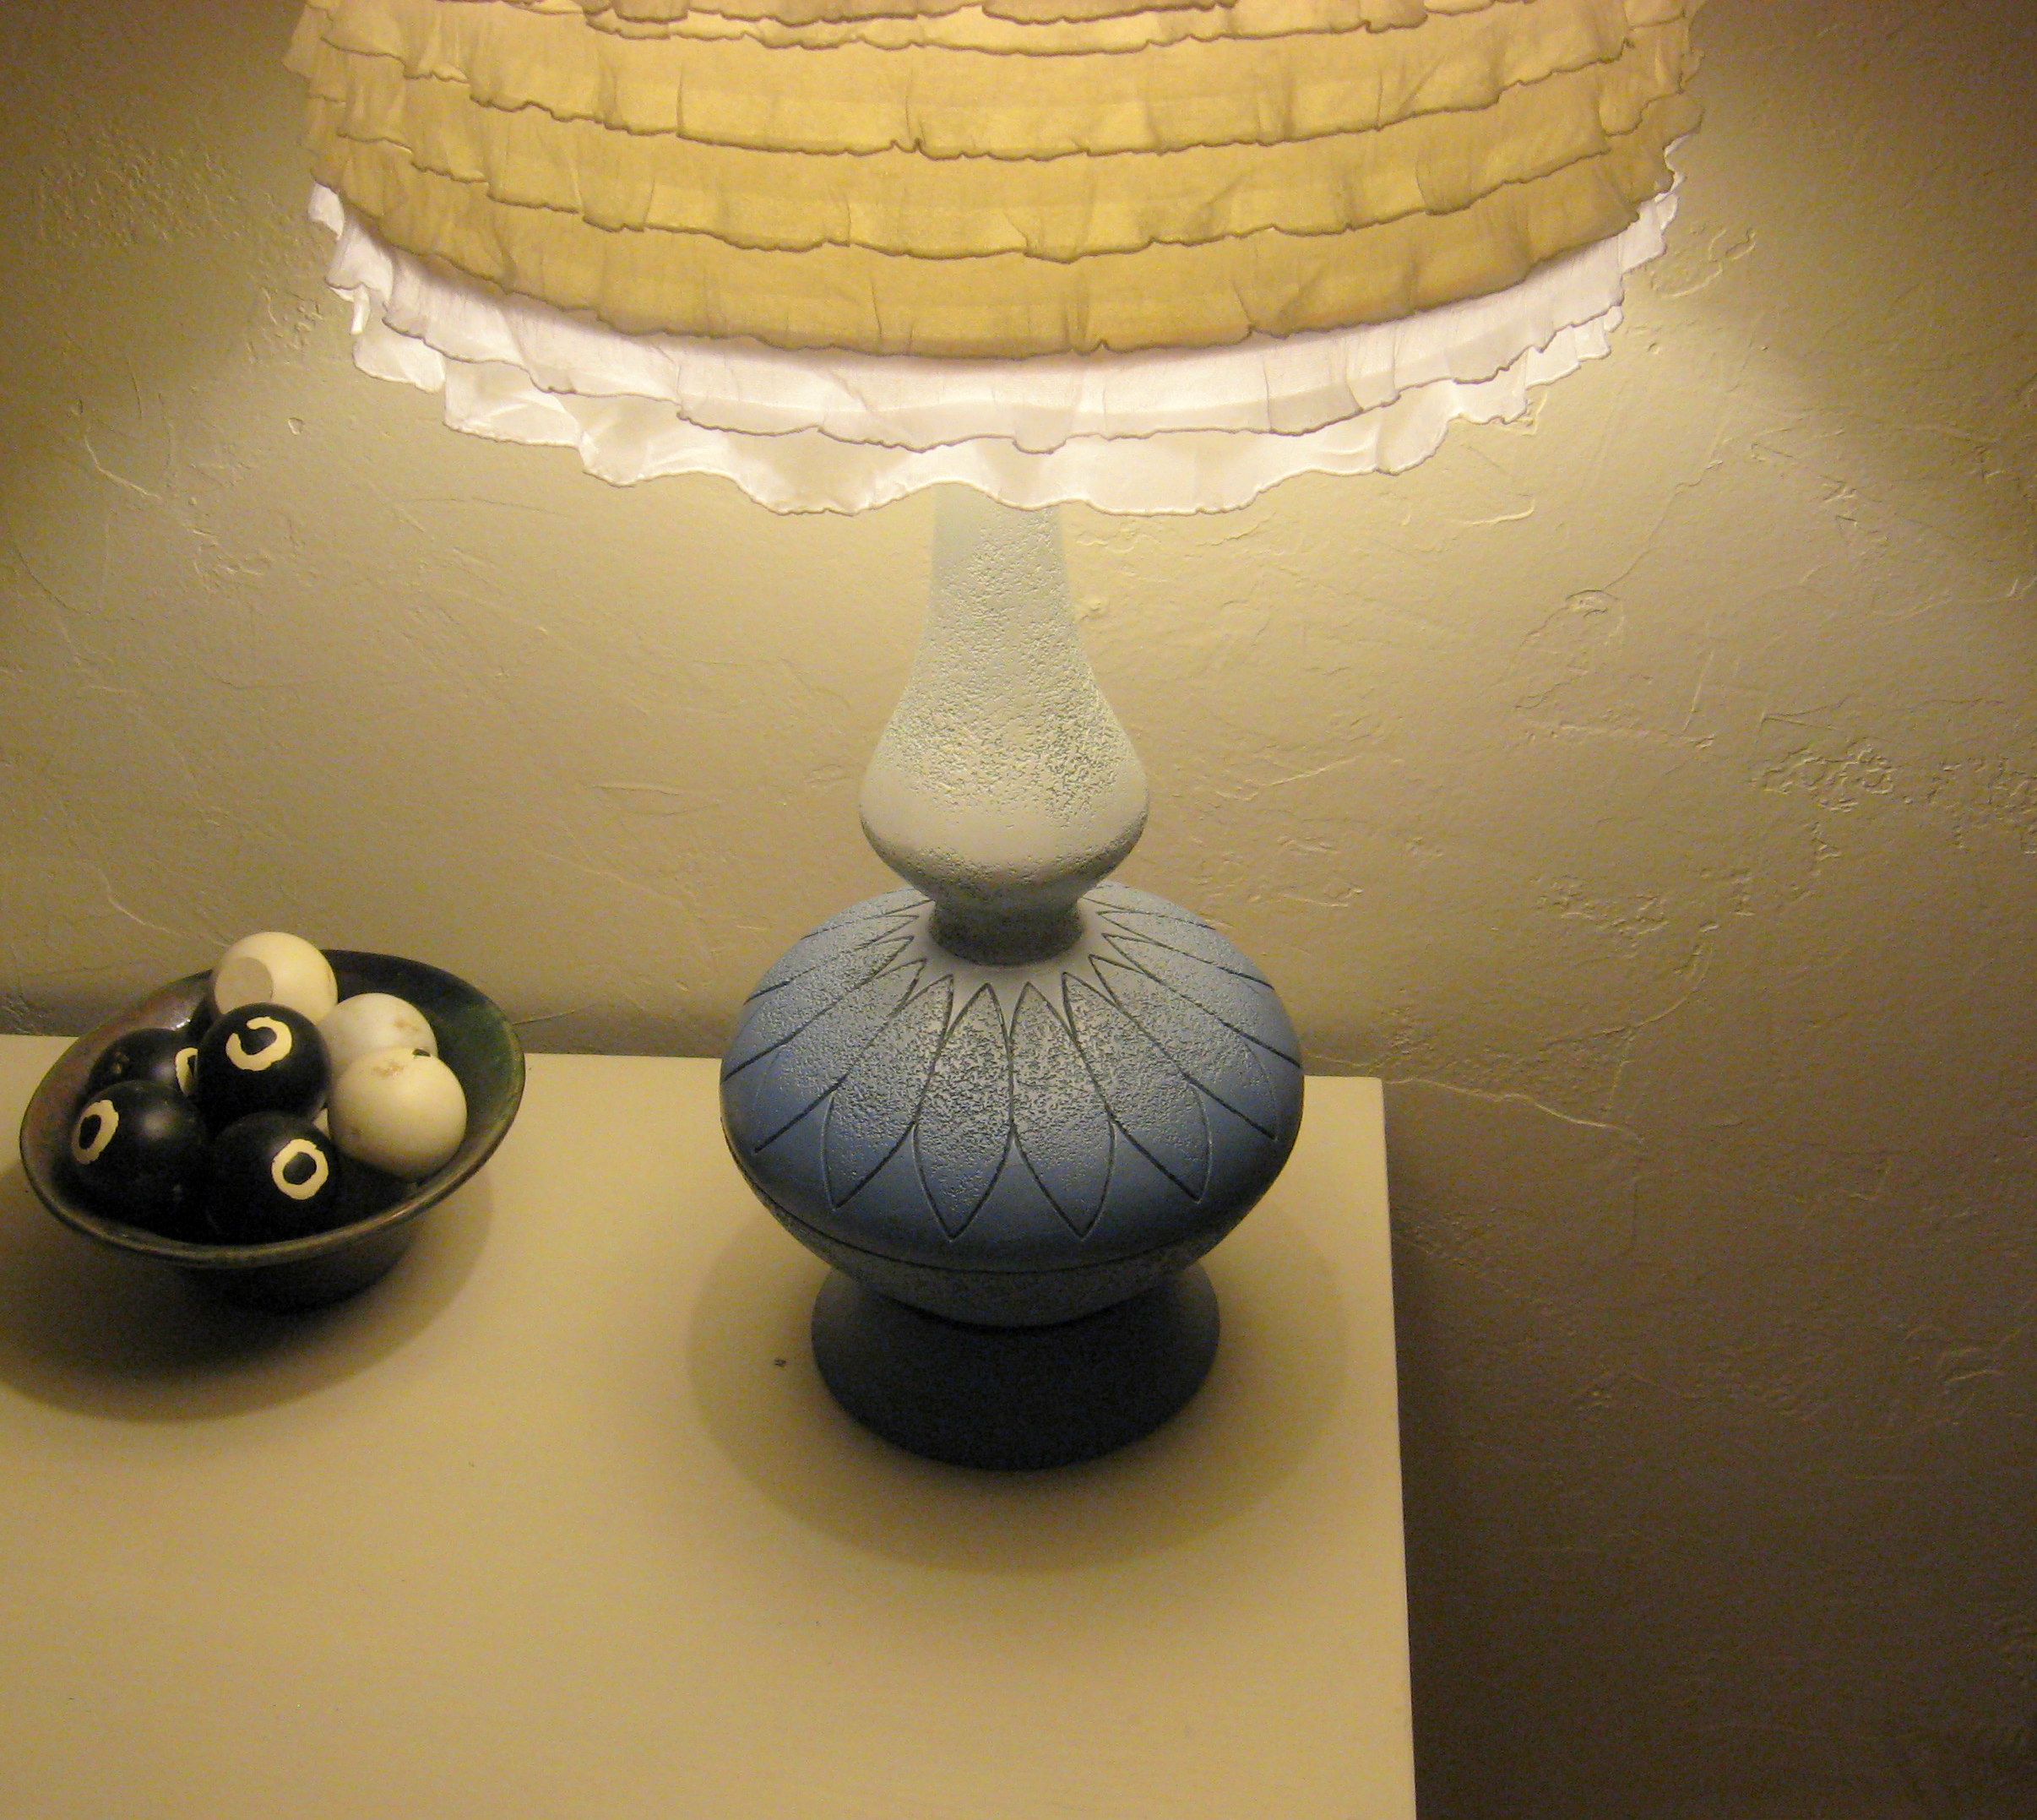
I grabbed a can of white spray paint and covered all the green, so now I had blue on the bottom, fading into white on the top. Perfect ombre! That was just what it needed.
As for the shade, I ripped off all the old fabric and trim (gag! Really should have been wearing a mask…) and cleaned the shade form underneath. Then I just purchased a half yard of white ruffled fabric and hot glued it on. SO easy and fast (and only $5 with my Hobby Lobby coupon!)
New at Zulily! SPANX by Sara Blakely – up to 60% off!

SPANX by Sara Blakely — up to 60% off
Sara Blakely had $5,000 and a genius idea: footless pantyhose! She persuaded a factory in North Carolina to make the prototype, wrote her own patent and the rest is history! Today, SPANX creates shapewear that delivers confidence and control to millions of women across the globe.
PickYourPlum! Layering Tee Shirts! Camo Onesie with Tutu! Mini 3 Tier Cake Pan set!


Tee Off – Layering Tee Shirts
Get yourself some basic tees.
$5.99 (60% off) Retail: $14.99
Calling All Troops – Camo Onesie with Tutu
Not all camo blends in.
$9.99 (50% off) Retail: $19.99
Cake, Baby – Mini 3 Tier Cake Pan set of 2
Have your cake and celebrate it too.
Starting at $9.99 (60% off) Retail: $24.99
Plus lots more CUTE deals!
LOTS of cute deals! Inexpensive shipping!
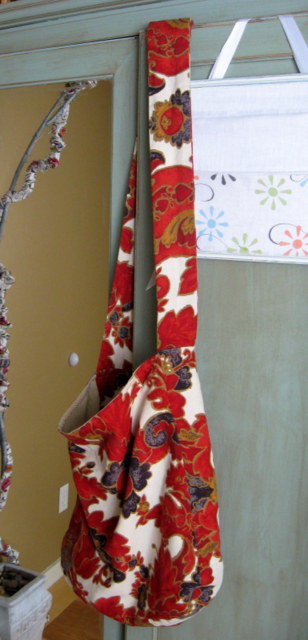
A PYP Best Blog: Making Custom Purses and Bags! One of my personal favorites!
Just in case you missed this article on making custom purses and bags the first time we shared it a couple of years ago, we are republishing it. After Sharon wrote this blog originally, we got an awesome response. This is one of the PYP Best Blogs!
I love purses. And bags. And totes. And purses. And bags. I may have a problem.
I am kind of picky about them though…if they don’t meet certain requirements, they find themselves on a one way trip to the local donation center sooner rather than later. For me, those criteria are that they:
- have to be roomy enough to throw in all the stuff required by a busy mom on the go (lotion, gloves, notebook, random medicine, books for waiting rooms, stuffties, snacks, kleenex…),
- have to have pockets to keep my keys and cell phone from joining the bottomless pit of aforementioned stuff,
- have a long enough shoulder strap to wear across my body,
- have to be washable,
- have to be affordable, and
- have to be cute.
That doesn’t seem like an unreasonable list to me, but I have found that it is difficult to find a purse that fits all of those criteria. Several years ago, I bought a pattern at the fabric store and decided to try my hand at making one on my own. Once I made that first one and saw how easy it was, I’ve been making my own bags ever since. I decide what I want and draw the basic pattern out on craft paper. I absolutely LOVE that they are endlessly customizable. My purses can all have pockets to fit exactly the things I need them to fit. Library bags don’t need pockets, but they do need to be sturdy, so I use a heavy fabric. A purse can get away with a less sturdy fabric, as long as it’s washable. I experiment with size, shape, inside and outside pockets, appliqued designs, flaps, closures, long straps, shorter straps – no two bags look the same and they all follow the same basic instructions and only a very beginning sewing ability. I now have a stack of patterns with different- and interchangeable – sizes and shapes of bodies and straps.
I will walk you through how I made my latest bag and then show you some examples of others to get your creative juices flowing. Once you understand the idea, you should be able to make a bag in a couple of hours. I didn’t use a pattern for this one, because I started with a skirt, but you will get the idea, and if you have any questions, ask!
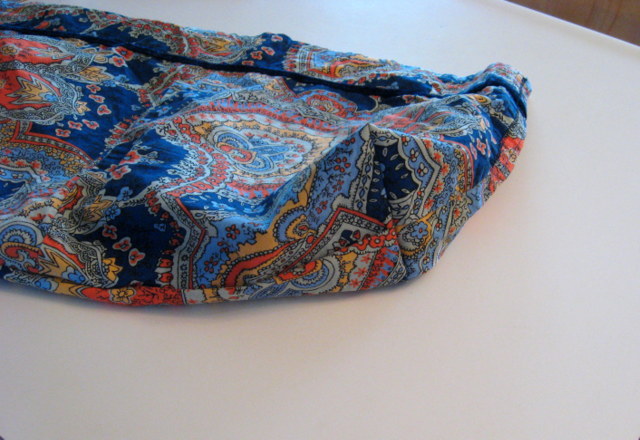
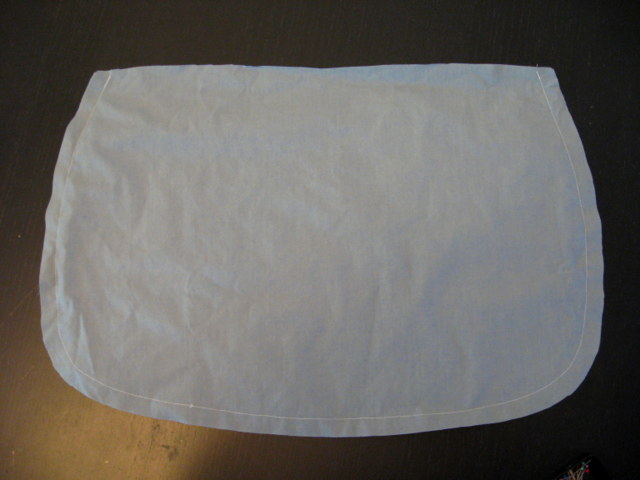
I started with this skirt that I picked up at a thrift store:
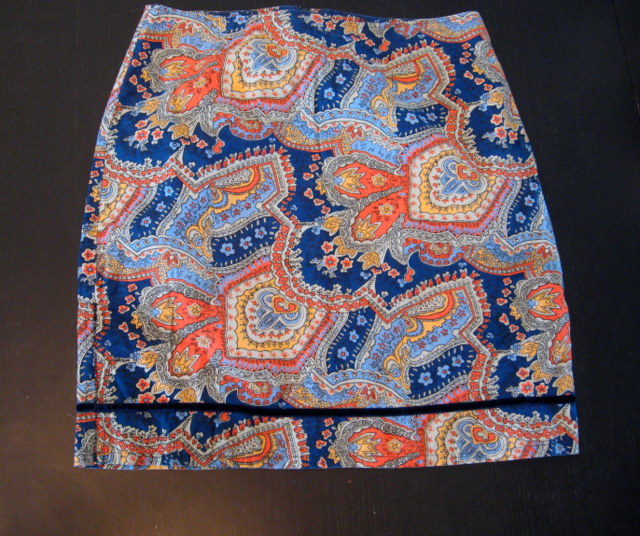
Much too small for me – and too short even if it did fit – but I just fell in love with the fabric. I toyed with the idea of making it into a pillow, but then decided it would be better as a purse.
I turned it inside out and lined up a straight edge along the width of it, just under the zipper. Draw a line and cut – making sure that you keep the bottom hem even and straight. I discarded the top part, but you could use that fabric to make pockets.
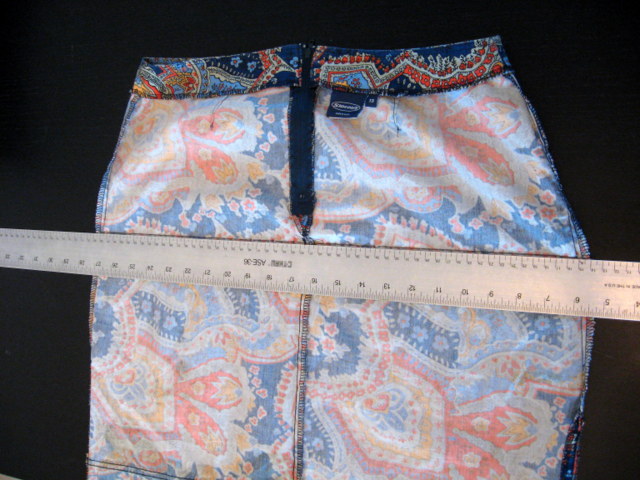
Sew straight across the newly cut edge, forming the bottom seam of your bag. I like to sew this seam twice, just to make sure it is strong.
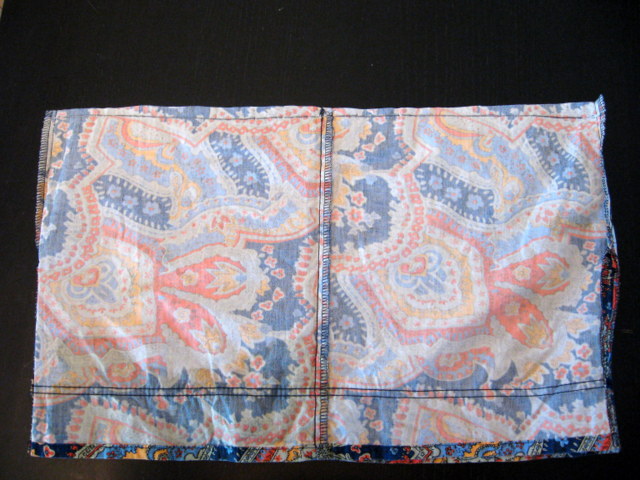
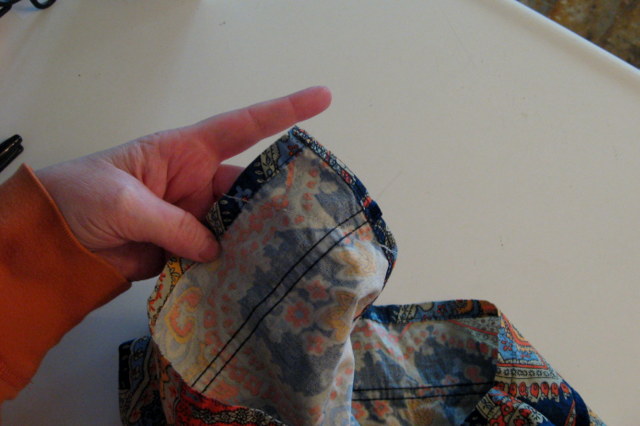
You can leave it like this if you want, but I like to sew across the corners to give the bag a little shape. Take one bottom corner and pinch it together then lay it out flat, being sure to line up the bottom seam and the side seam. Measure in from the point (I did 2 inches, but experiment with making it smaller or larger to change the look of the bag) and draw a line across it. Pin it in place, then sew along the line. Do this on both corners.

That leaves you with these little floppy ‘ears’
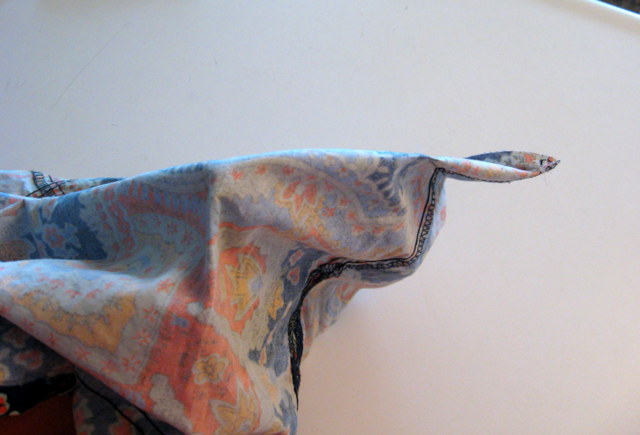
that make a nice, neat bottom when turned right side out.
Again, you could stop here if you like the shape, but I thought it was too wide at the top, so I measured down the top inside seams a few inches on both sides and sewed a triangle to taper the top sides in a little, like this:
There; I like that shape better.
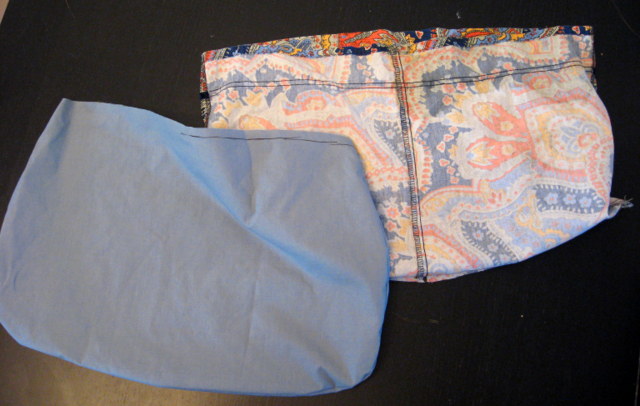
Now, if you don’t want your bag to be lined, you can stop there and add straps. I will leave the inside unfinished occasionally on tote bags or shopping bags, but generally, I prefer my bags to be lined and it really is quite simple!
I folded my bag in half and layed it out on the fold of my lining fabric, then I drew around the shape of the bag and cut out two.
**If you are making your bag from scratch from flat fabric, then just cut out all four of these shapes at the beginning – 2 outside pieces and 2 inside pieces, all the same size.
Sew the two lining pieces together, all the way around, but leaving the top open. Make sure you have right sides together!
Now you have two fabric pouches that we will stitch together once we make the straps and pockets…
For my pockets, I like to make two; one big one on one side, to catch the random small stuff that tends to get lost in the bottom of my purse, and one on the other side, split into two pockets for my keys and phone. Decide how big you want your pockets to be, and cut the squares out of fabric – about an inch or so bigger than you want the finished pocket.
Press down a small seam on the top and stitch across it.
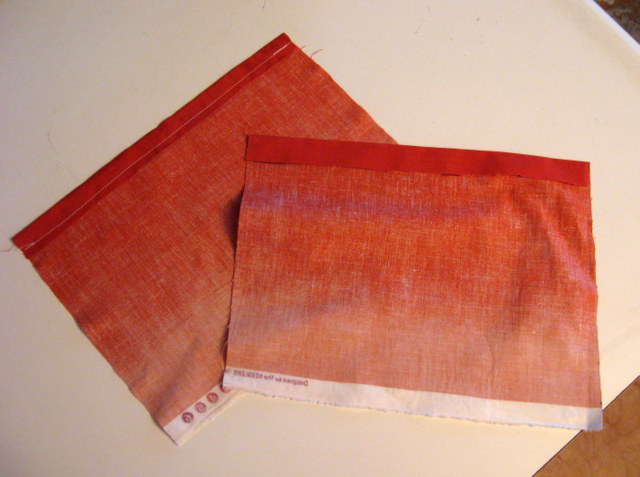
Then you will press a seam allowance on both sides and the bottom, but don’t sew it.

Pin the pocket centered in place on lining of the bag – make sure that the “up” side of the pocket is facing the “up” side of the bag. Also, don’t put it up too high…you will lose a little at the top of the bag when you sew the lining to the outside.
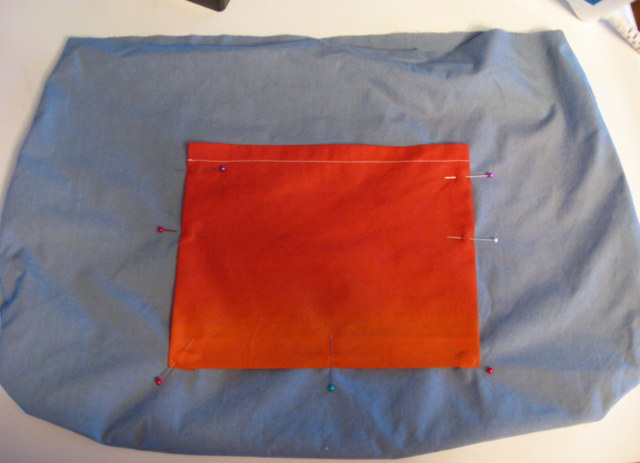
Sew the pocket onto the lining along the three edges, leaving the top open.
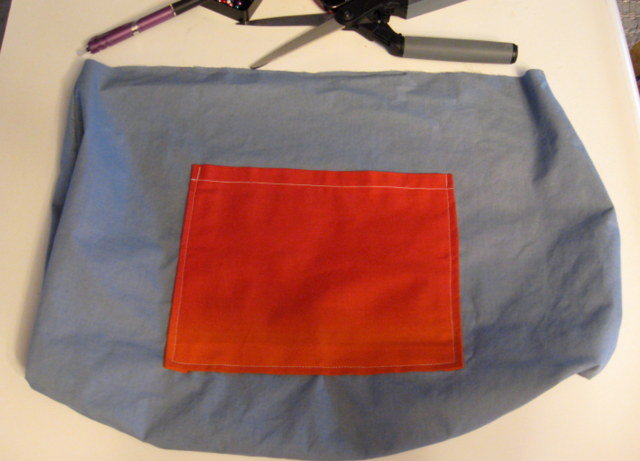
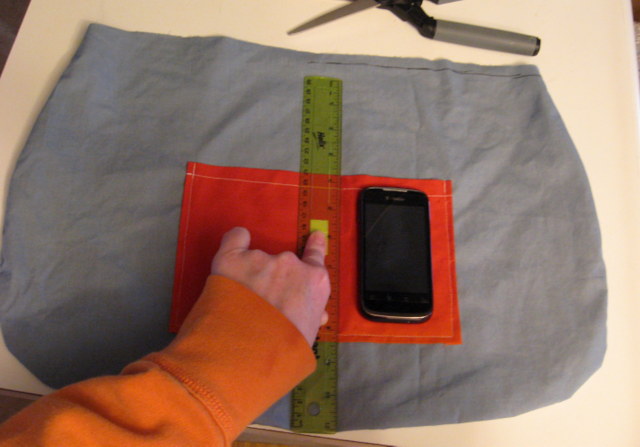
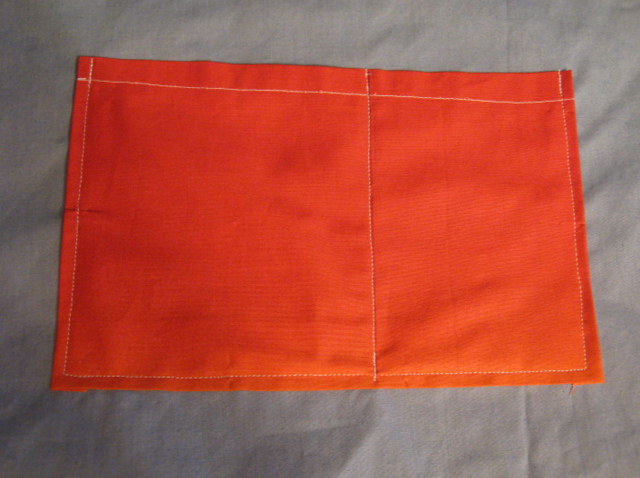
Now repeat with the pocket on the other side. Once it’s attached, you can just sew a line right down the middle to separate it into two pockets. I used my phone to decide exactly how big I needed it to be, since that is what will go in there!
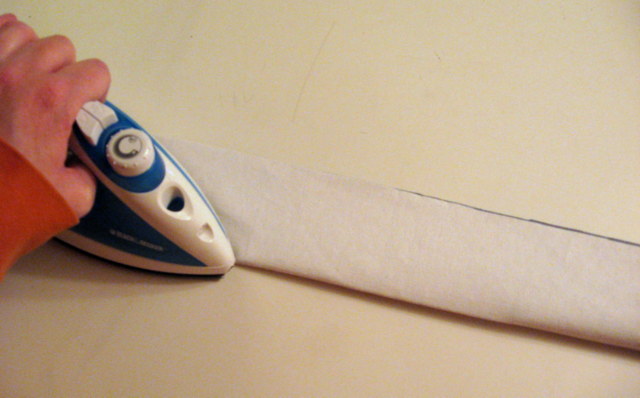
Now for the strap. Determine how long of a strap you would like. The first couple of times might take some trial and error until you find exactly what you love. Use a bag you already have or have someone help you with a measuring tape to get a good measurement to start with. For me, I like a 42 inch strap – short enough to carry on my shoulder, but still long enough to sling across my body. I cut out a long rectangle of fabric about 4 inches longer than the finished size (so 46 inches long) and about 6 inches wide.
Again, depending on what you’re going for, you can decide how you want the finished strap to be. If it is a small or delicate bag, you might choose to use just one layer of fabric for the strap. If it is a heavy bag, you will want to make the strap heavier. You can do that by using iron on interfacing, or by just using two pieces of fabric, which is what I did here.
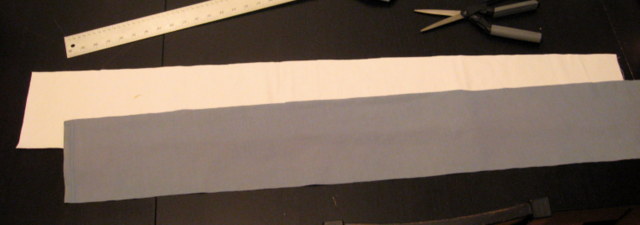
Lay them out on top of each other, and fold them in half lengthwise, with the right side of the outside fabric on the inside of the fold. Press it all flat, then sew up the long edge. Turn it all right side out, smooth it all flat and press it again.
Now, here comes the trickiest part – I still mess up on this part once in awhile if I’m not paying attention, so go slow, take a breath and think it through before you sew and you’ll be fine, I promise!
With the OUTSIDE pouch turned inside out, lay the strap along the bottom of the pouch and up the sides. Make sure that the strap isn’t twisted. Now check again. Really.
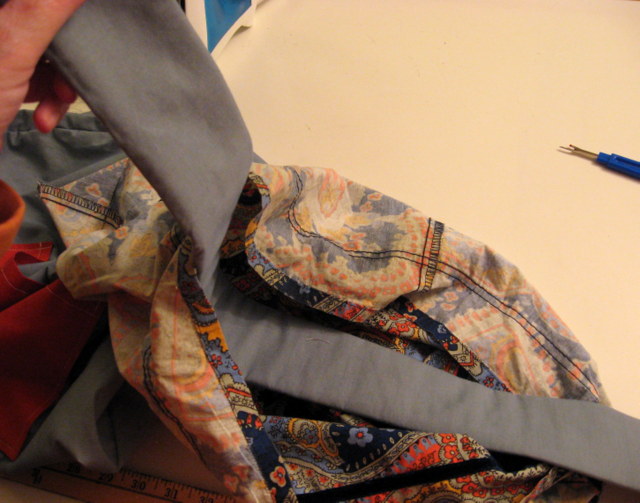
Center the strap with the side seam of the pouch and sticking up beyond the top about 2 inches and pin it. Now do the same on the other side. Now check again to make sure it isn’t twisted – just to be safe 🙂
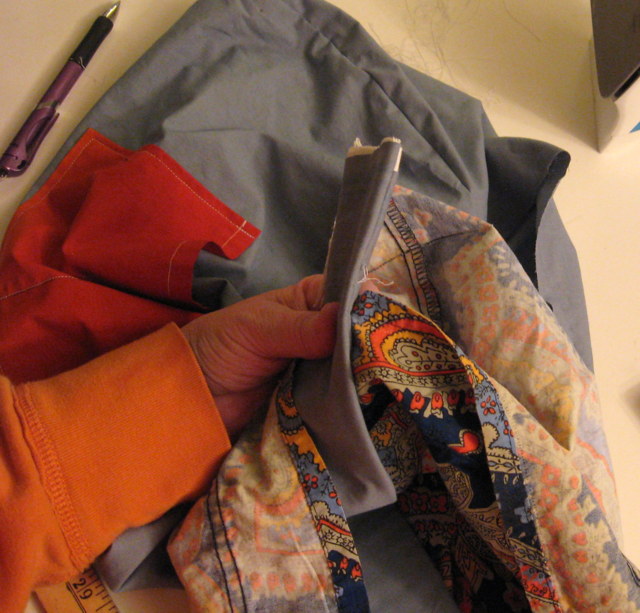
Now with the INSIDE pouch also turned inside out, put it down inside the outer pouch. So, you will have a “pouch sandwich” with the strap between them. Line up the side seams and the front and back centers and pin them together, stretching to ease in any excess fabric (you shouldn’t have a lot, but you will likely have a little). You will now sew around the whole top where you just pinned, but you will have to leave a space so that you can turn them inside out. The smaller the opening you leave, the harder it will be to get it turned, but the larger the opening, the more work you will have to do to close it up. I probably leave about 3 inches. I have been known to forget and just keep sewing, so when I pin, I will pin an X where I want to leave the opening just to remind myself.
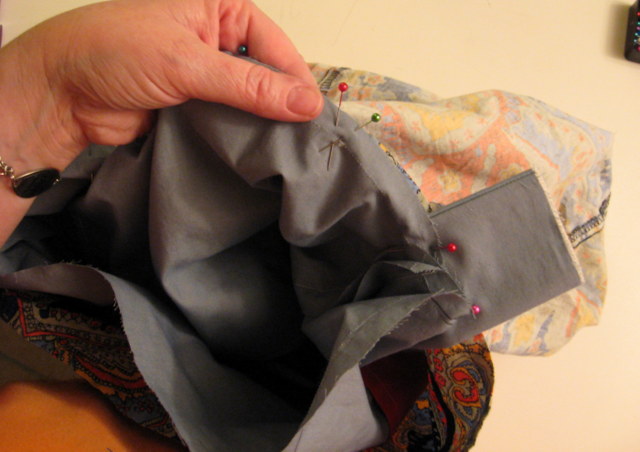
Take a minute to look at it and make sure you have everything assembled the way it should be; it should look like this:
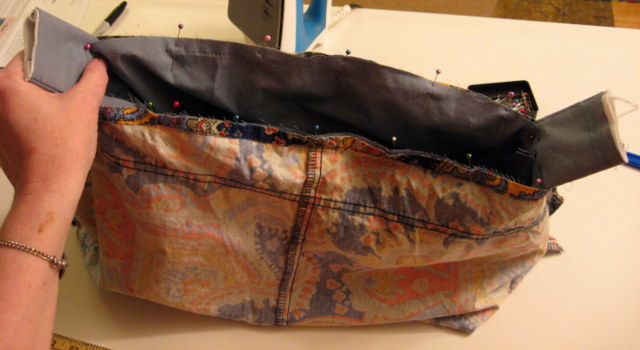
Then, sew around the top edge, backstitching at the beginning and end. Carefully reach into the opening that you left and pull out the strap, then work the rest of the purse through until the whole thing is turned right side out. Now press around the top where you just sewed, to make it look nice and neat, and press down the edges of the opening as you go. Slip stitch or blind stitch the opening closed by hand – or you can topstitch around the entire top edge, closing the opening in the process.
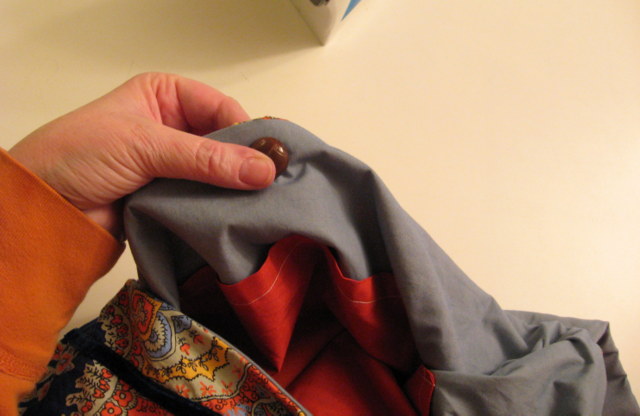
I chose to close this bag with a button, so I found the center of one side and attached a big vintage button, sewing it just to the lining so the stitches don’t show on the outside. Then I lined it up with the center on the other side of the bag and made a buttonhole.
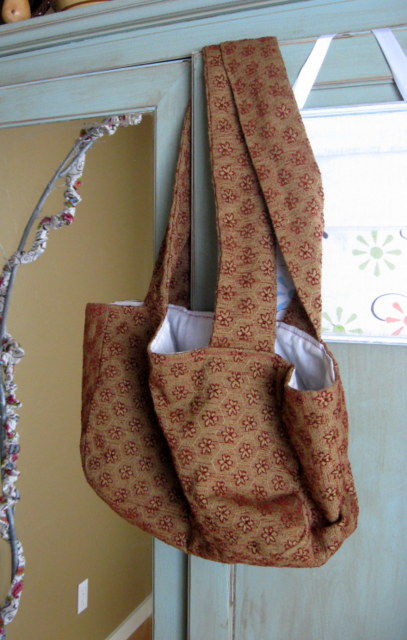
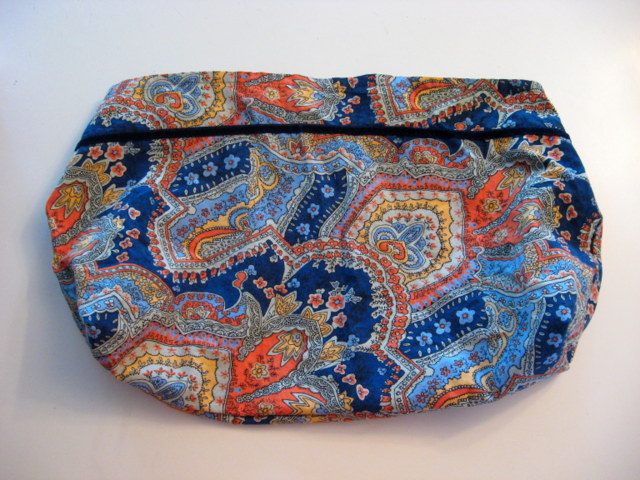
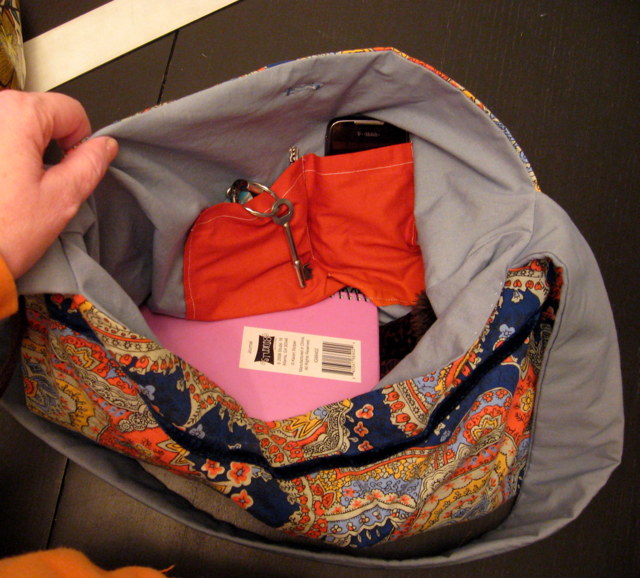
Here’s a shot of the inside of the finished bag:
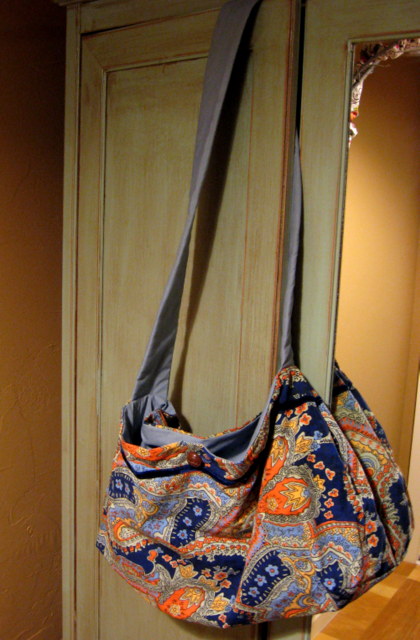
And the outside:
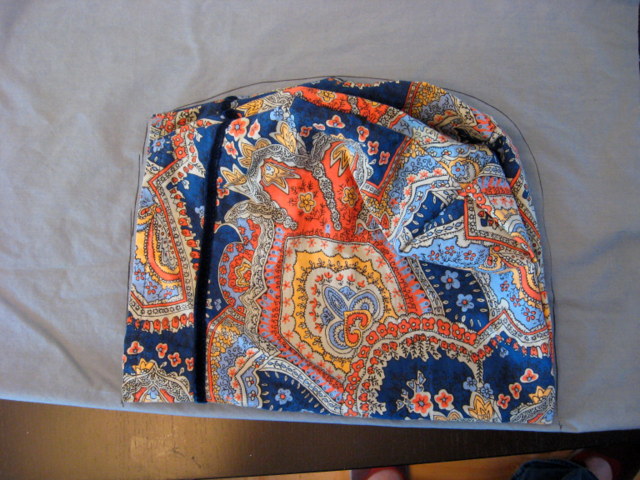
And a few of my other favorites…
My favorite overall tote bag, made from an old pair of curtains.
And a simple scripture bag: 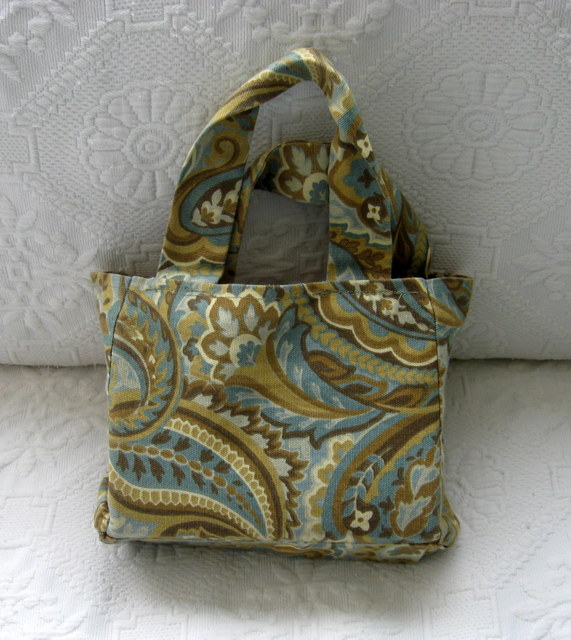
And my library bag – two straps instead of one – and made from a heavy duty upholstery fabric that I picked up for pennies on clearance.