
Teardrop Stone Beaded Necklace Set $16.99 + Free Shipping
 Teardrop Stone Beaded Necklace Set (more colors available)
$16.99 + Free Shipping
Stamp on Nail Art for Less!


I was at a photography convention and trade show in Las Vegas earlier this week and I was surprised that there were a couple of spa type booths at the expo. At one of these spa booths they were selling a stamp on nail art kit for over $150. I tried it on one finger nail and that nail is so pretty! I really wanted to buy the kit, but being the penny pincher that I am I knew that I could find them for much cheaper!
After a little searching I am so glad that I didn’t spend $150 there! I grabbed up a couple image plates and bottles of polish from Amazon. Looking forward to beautiful nails soon. The thing I like the most is that you can easily layer images and colors on your nails. The nail I did at the convention is done with a French tip in white and then a dark purple flower over the white.
Check them out…
Buy one China Glaze Gelaze Gel Polish and get one FREE

Buy one China Glaze Gelaze Gel Polish and get one FREE! Enter promo code 444870 at checkout. Hurry offer valid for a limited time only.SallyBeauty.com LINK
New $5 Off 2 Almay Coupon Available!
Hurry and print this new $5.00 off any two Almay Cosmetic Products coupon while it lasts!

It should make for some great deals or even some freebies! I’ll scout out some deals for you and report back!
Thomas the Train: TrackMaster Deluxe Starter Set – Just $13.19!
 Thomas the Train: TrackMaster Deluxe Starter Set
List Price: $20.99
You Save: $16.80
Price: $13.19
Eligible for free shipping on $35+ orders or on ANY order with Amazon Prime.
Don’t have a Prime membership? Get a one month free trial! Click here for details!
4 Money Saving Workout Tips

Do you like a good workout? Love going to the gym? Do you tend to spend too much money when it comes to working out? You know, on stuff like workout clothing, supplements, gym memberships, and special “diet” foods that go along with your workout? Well, anyone that has worked out has probably spent too much money on it. After all, it really shouldn’t cost a dime to work out but the gym is a good environment so people will pay for it.
Where most people over spend though is when they buy their gym membership, go once or twice, and then never go back. We’re assuming that isn’t you and that you make the most of your gym membership (or workouts at home). Below you will find 3 tips that will help you save money in the gym or for your workout efforts in general. We hope you enjoy!
Low Cost Protein
It’s pretty much a scientific fact that the world is now obsessed with protein intake especially when it comes to working out. Getting in a quality source of protein (we love whey protein but despise soy protein) is very important. Most people do this in the form of a protein shake. How can you save money on these? Shop around! Check venues online such as eBay, Amazon, etc. We were actually able to find Muscle Milk 4 Packs at Big Lots on sale for $2 each. They usually run around $8 each so those are some mega savings if you ask us!
Affordable Gym Attire
Unless you work out on a regular basis, you probably don’t have good workout clothes stuffed in your closet. So, you’ll have to go out and buy some shorts, yoga pants, whatever it is that you want to work out in, right? Of course you will! Now, how can you save money on them? Well, we’ll tell you the best and most efficient way to do this. Don’t pay attention to the brand. Who cares if it’s Under Armour? Who cares if it’s Nike? Get yourself a $30 pair of Champion shoes, a few pairs of off brand basketball shorts at $10 a pair, and get in the gym. We promise that it will be nothing close to a fashion contest in there.
Family Plans
Finally, it’s all about what type of gym membership you get. You may have to sign a contract (probably for a year) but you can get family plans at much better rates than individual plans. For example, a local gym we know of charges $30 a month for one person. However, if you sign a year contract with auto draft for their “couples” plan, you can get in for a grand total of $35 a month. That’s just $5 more for an extra gym membership!
So, hopefully these money saving tips will help you do what they’re supposed to. Save money! Working out doesn’t have to be an expensive hobby but so many people turn it into just that. An expensive hobby. Follow the guidelines above, look for the deals, and be smart about how you set up your membership. If you do this, you’ll definitely save money!
Children’s Place 25% off code! Beautiful Easter Dresses Just $20.97!
15% Off on Your Entire Purchase
Use coupon code BUYMORE3 – exp 3/10
Free shipping when you spend $75 or more, otherwise it’s $5 flat rate shipping.
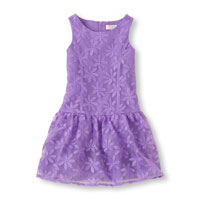
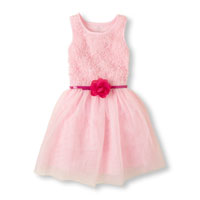
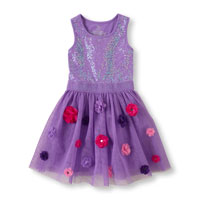
Beautiful Dresses for Easter!
Regularly: $39.95
$27.96
*$20.97 after 25% off code!
LOTS more!
Payless Clearance Sale! Fun Flip-flops for the kids – $5 or less!
Get 15% Off Regular Priced Merchandise use promo code ZZSAVE15 exp 4/1/2014
 Girls’ American Eagle Flower Flip Flop Reg. $9.99 $3.00 |
 Boys’ Cars McQueen EVA Sandal Reg. $12.99 $4.00 |
 Boys’ Slide Flip Flop Reg. $14.99 $5.00 |
Free ship to store! or Free shipping on $35 orders!
$30 off Tablets of $149 or more – Kindle Fire HD $119!
Use Coupon Code 58129. – exp 3/6
One example:

Reg $169.00
Sale $149.00
$119.00 with coupon!
Staples.com LINK
FREE Shipping to store!
Apples to Apples Junior – The Game of Crazy Combinations – $10.00!
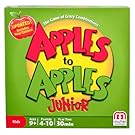 Apples to Apples Junior – The Game of Crazy Combinations
List Price: $21.99
You Save: $11.99 (55%)
Price: $10.00
Eligible for free shipping on $35+ orders or on ANY order with Amazon Prime.
Don’t have a Prime membership? Get a one month free trial! Click here for details!


Quitting Smoking And How Much You Can Save
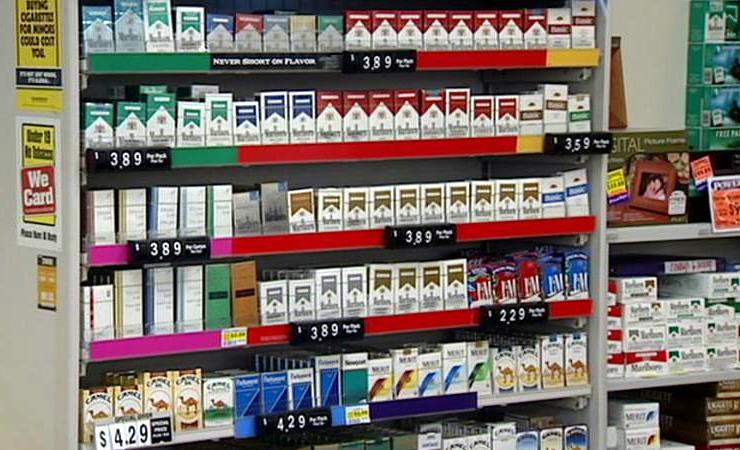
Learning how to quit smoking is a pretty tough task unless you look at it from the right perspective. Sure, it would be great if people thought about the health benefits of not smoking (and some do) but for the most part, people don’t do that. However, when you break down how much money you can save by not smoking, things tend to change. That’s what we’re about to do for you. We’re going to break down just how much money you can save by not smoking. It’s a pretty simple formula so rather than just telling you what the average person would save, we’ll translate that into what those savings could do for you.
So, how much money can you save by not smoking?
Going by current prices (which aren’t showcased in the image above), you could save roughly $1600 a year by not smoking. That’s a pretty big chunk of change, don’t you agree? That breaks down to about $133 a month. Doesn’t sound like much, does it? Well…
Think again!
That’s probably enough money to pay the average person’s cable/internet/TV bill. That’s probably enough to pay for your car insurance. It’s probably even enough to pay for nearly half of your typical person’s grocery bill for an entire month. It would probably even pay for the gas in the car that is sitting in your driveway right now for a whopping 30 days!
But that’s not all…
If you kept the money that you saved by quitting smoking until the end of the year, it’s like getting an extra income tax back. Every single year that you didn’t smoke a single pack of cigarettes, you could go out and buy one of the best TVs on the market, the newest video game console (with 20+ games), or even a used crotch rocket for your hubby to enjoy.
But what if you’re a guy?
Well, it doesn’t matter what gender you are. Quitting smoking is financially beneficial to anyone and everyone (even you six figure earners out there). You’re cutting costs on insurance, medical expenses, and putting money in your pocket. Who in the world would turn down an extra $65 or so on each of their paychecks? Well, by not quitting smoking, that’s essentially what you are doing. But the thing is, these are just average numbers.
Some of you aren’t average!
And no, that’s not an insult. Some of you pay even more for cigarettes than $4.25 a pack (which is the figure we used to come up with all of this). Some people are paying $9 and $10 for a single pack of cigarettes. That means that they could literally save more than double what you are saving. Think of what those numbers could do for them. Then….
Ask yourself one question.
Is it worth it to continue smoking? Not only for your health but for your wallet or purse. Don’t think too hard though because we have the answer for you right now. No! It’s not worth it at all and we hope that you’ll consider quitting smoking and doing something else with your money (and the money you save). You know, stuff like finding good deals!
Daily Deal Roundup For 3/5/14

Here are some of the deals, coupons, and freebies that you might have missed since yesterday’s deal roundup!
Ginsu International Traditions 14-Piece Knife Set with Block, Natural – $27.50!
 Ginsu 04817 International Traditions 14-Piece Knife Set with Block, Natural
List Price: $49.99
You Save: $22.49 (45%)
Price: $27.50
Eligible for free shipping on $35+ orders or on ANY order with Amazon Prime.
Don’t have a Prime membership? Get a one month free trial! Click here for details!
Canon PIXMA Inkjet All-in-One Printer w/ Bonus paper and $10 eGift Card – Just $39.00!
 Canon PIXMA MG2520 Inkjet All-in-One Printer w/ Bonus paper and $10 eGift Card Value Bundle
Was $56.00
Just $39.00
Comes with:
Canon PIXMA MG2520 Inkjet All-in-One Printer
Bonus $10 eGift Card, Bonus Hammermill Copy Paper (Offer On line Only)
WalMart.com LINK
Free in store pick up!