Carters Black Friday Offer Live NOW – 50% off Everything!
Carter’s Black Friday Offer – 50% off Everything! Offer ends 11/25!
Cap Sleeve Dress Set
Was: $38.00
Now: $19.00
Free Shipping on $50. No code required.
LeapFrog LeapPad1 Explorer Learning Tablet + Gel Skin $59.99 shipped!


LeapFrog LeapPad1 Explorer Learning Tablet
Was: $99.99
Now: $59.99 + Free Shipping
+ get a free gel skin in green or purple


Hot DVD Deals!
|
Horton Hears a Who (Single-Disc Edition) (2008)DVD $3.99 – Free super Saver Shipping! |
|
FREE One-Day Shipping if you purchase this item using your Discover Card or Cashback Bonus. Enter code DSCVRHSP at checkout. |
|
|
|
*FREE One-Day Shipping if you purchase this item using your Discover Card or Cashback Bonus�. Enter code DSCVRHSP at checkout. |
Today’s Freebie Roundup 11/19

- Play free games at ClubPenguin.com
- Play Disney Fairies Pixie Hollow Now, for Free!
- Checkout today’s FREE Android App of the Day from Amazon Today’s app is the F18 Carrier Landing game
- Set up your LeapPad1 or LeapPad2 early and get 2 FREE apps. Offer valid only for first-time setup thru 12/3/12.
- FREE Nothing But Hair Care Sample Pack
- FREE Pure Handmade Chocolate Samples
- FREE TUMS Freshers Heartburn Relief Sample
- FREE Airborne Product Samples (New Link!)
- FREE Aveeno Shampoo & Conditioner Sample
- 5 FREE 2012 Scripture Greeting Cards for Christmas
- FREE Workout Supplement Samples
- FREE Zest Car Shaped Soap Bar at Noon EST (11/16-21)
- Kroger, Fry’s, Smiths and King Soopers have 8.5oz bottles of Wolfgang Puck Iced Coffee for $1 each right now. Use this $1 off any (1) single bottle of Wolfgang Puck Iced Coffee print coupon to get it FREE after coupon
- FREE Nescafé Memento Coffee Sample
- 2 FREE Packs of Liquid Chopstixers – “LIKE” their Facebook page and sign up for their newsletter between 11/14/12 and 11/28/12. They’ll send you 2 packs of Liquid Chopstixers absolutely FREE!!!
- WIN a $25 Target Gift Card
- Starbucks: Buy 1 Get 1 FREE
- FREE Purina Cat Chow Healthy Weight 6 oz. Sample
- FREE 5-week Supply of Butter Shine Lipstick at Dillard’s
- Rosetta Stone – Free Demo – Select a Language and try a free demo of Rosetta Stone!
- New lenses every day, and refreshing comfort all day
long with every blink. Sign up for a 30-day Trial offer. - Free 11 Easy Christmas Crafts for Kids to Make eBook featuring 11 creative kids’ Christmas craft ideas from talented craft bloggers and parents.
- Free Trial – The Honest Company – Founded by Jessica Alba and Christopher Gavigan, the Honest Company was created to help moms and to give all children a better, safer start. Within the Honest Company, you will find Products that take care. Products that exceed expectations. Products guaranteed to not only satisfy, but also delight.
- FREE Buttons at JC Penney
- UPS My Choice – Sign up for Free! (This is great time of year to sign up for this with all of the packages you will be receiving via UPS)
- JOIN 2 GREAT PANELS IN 1 SIMPLE STEP! Earn rewards for sharing your opinion with leading companies. REWARDING: Take a survey, share your opinion, get paid.
- Free eCookbook: The Cheese Lover’s eCookbook: 34 Easy Recipes with Cheese features 34 pages of our favorite easy cheesy recipes + Mr. Food Recipe eNewsletter for FREE!
- FREE Airborne Product Samples
- Free eCookbook: A “Holiday How-To: Thanksgiving Crafts and Pumpkin Recipes” free eCookbook, featuring pages of pumpkin recipes and Thanksgiving crafts for your big feast + RecipeLion’s Quick and Easy Recipes newsletter for FREE!
- FREE Hot or Cold Beverage at Pilot and Flying J Locations
- Free Video Game Rentals from Redbox – Send text message: TRYGAMES ; TRYITOUT ; SCREEN ; or TRYREDBOX to 727272 on your cell phone. The codes you get expire on December 31, 2012. You can get 4 FREE rentals with these codes.
- Amazon: Artists on the Rise FREE MP3 Song Downloads (Thru 11/30)
- Shape FREE Workout Mix Music Downloads (October is still available)
- FREE Kids’ Hair Cuts on Sundays in November at JCPenney Salon
- FREE Sample of Mrs. Dash Seasoning! Choose from 4 different flavors! They will be giving away 20,000 free samples everyday, now through November 29th. Allow 6 to 8 weeks for delivery!
- FREE $2 Amazon MP3 Credit
- Audible.com – Free Audiobook Download 30-Day Trial!
- Start Your Hulu Plus Free Trial Now!
- Great Survey Sites that Pay Money & Rewards!
- See if you qualify for Free Magazines
- FREE Food at IKEA
- FREE 3 Month Amazon Mom Trial
- One Month Free from Netflix
Rod Works: Black Friday, Small Business Saturday and Cyber Monday Deals!!
 Rod Works has some awesome deals both on Black Friday and on Small Business Saturday (11/24)!!
~On Black Friday, Rod Works will open at 6 am and you will be able to receive 25% off one regular priced items (some exclusions, including furniture) !! In addition, there are some amazing doorbuster deals! I have the 3-tier glass cannister set and LOVE it! How cute are those ceramic measuring cups–those would make awesome gifts!!
~You can also purchase all the doorbusters online at www.rodworks.com (you will need to pay shipping)
~Small Business Saturday is the following day, the 24th.
(more info HERE…make sure your enroll NOW!!)
I participated last year at Rod Works– I got a beautiful wreath for less than $4!!! So I HIGHLY recommend hitting Rod Works this year. PLUS as an added bonus, each receipt on Saturday will have a Bounceback coupon for 35%!! That is one of the best coupons I have seen from Rod Works!!

For those of you who do not live close to Rod Works, on Cyber Monday they are offering FREE shipping!! LINK TO ROD WORKS
(NOTE: To see the ad in full size, simply click on the image)
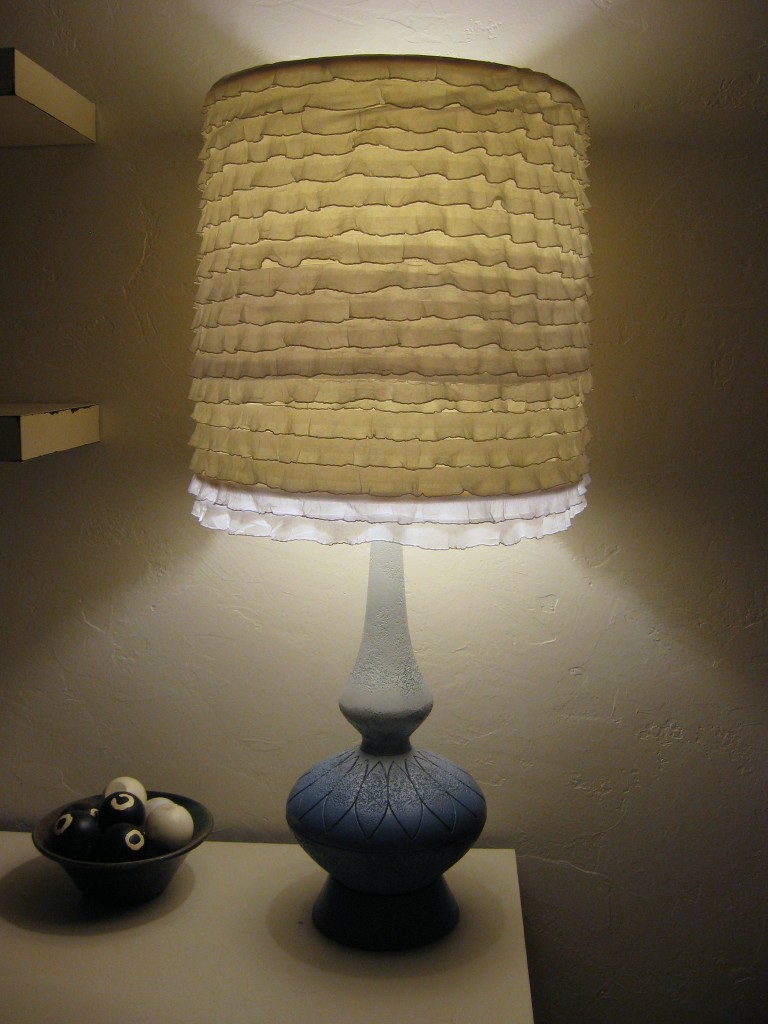
Ombre Lamp Makeover
This makeover tutorial is a perfect study in why it is important to be flexible when you DIY. This didn’t go AT ALL like I had planned it, but I kept going and I love the final result!
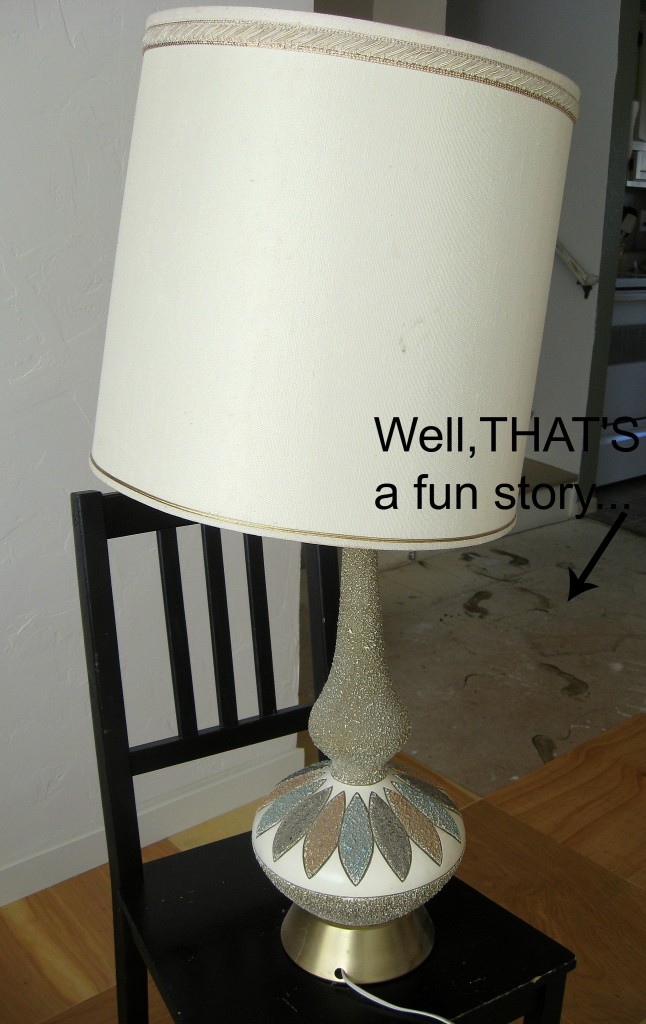
I came across this lamp as I was driving down the street one day past a house that had belonged to an elderly lady that had passed away. The family was cleaning out her garage, and there was a big pile of junk on the front lawn with a “FREE” sign. I asked them if the lamp worked, they said yes, and into my back seat it went.
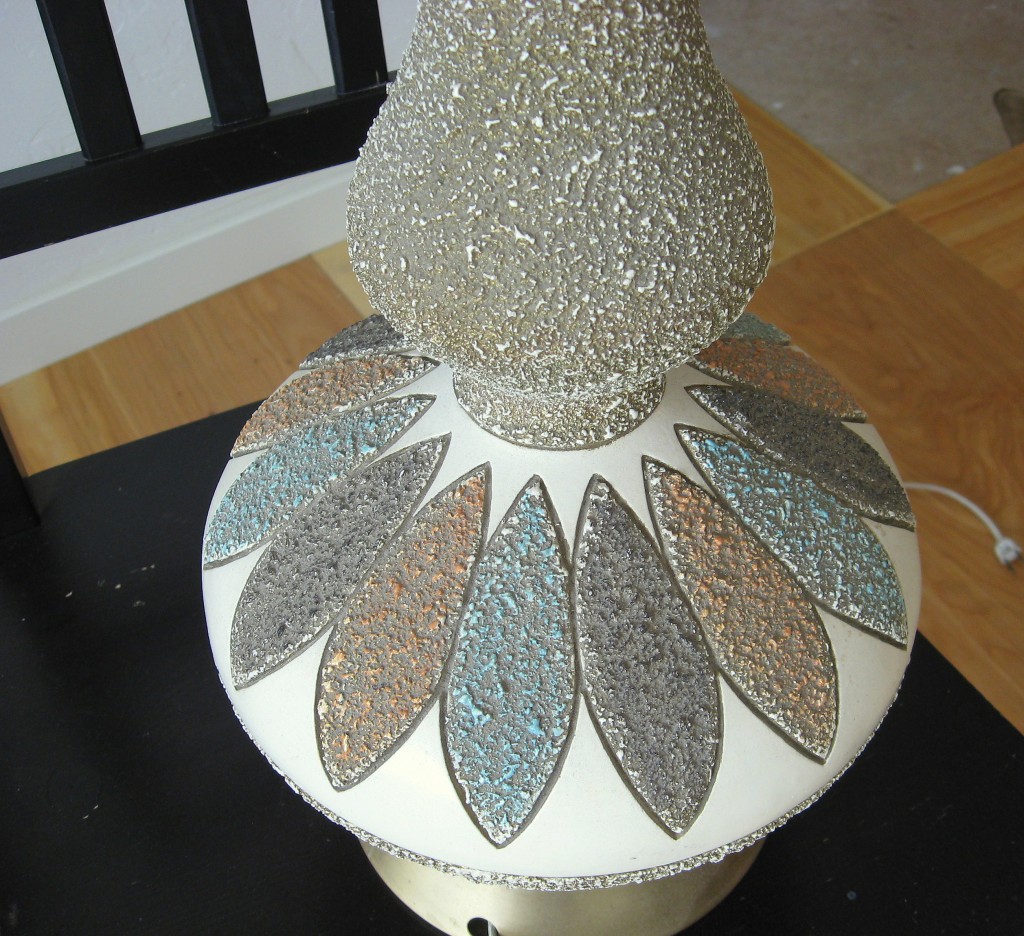
Here’s a close up shot of the funky texture.
Check out that horrible 70’s awesomeness! The shade was pretty gross too, but structurally it was in perfect condition.
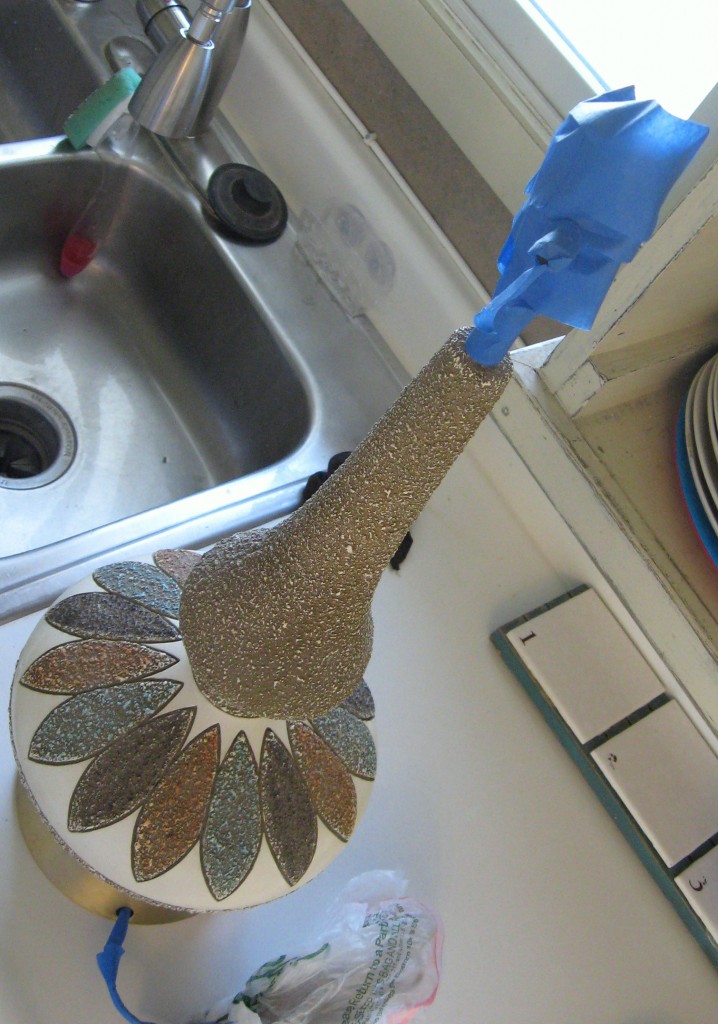
My first thought with this lamp was that I could just spray paint over the texture, so I tried it! The best thing about items you get for free is that you can attack them with a “what have you got to lose” attitude. If it doesn’t work? You’re only out the price of the spray paint, right?
I pictured a faded ombre effect, starting with blue on the bottom and fading to a green on the top, so I grabbed the spray paint and went to work, taping off the cord and the light fixture at the top first.
And I hated it. Really hated it. The texture was so thick that the spray paint was having a hard time covering it, and the finished effect just looked trashy. I wasn’t ready to give up yet – the lamp is the perfect size and shape for my living room – so I let the spray paint dry, then used my small detail sander on the textured parts to sand them smooth. It was MESSY and dusty and smelly, but relatively easy to do. Once the majority of the texture was flattened, I cleaned the surface well and tried again.
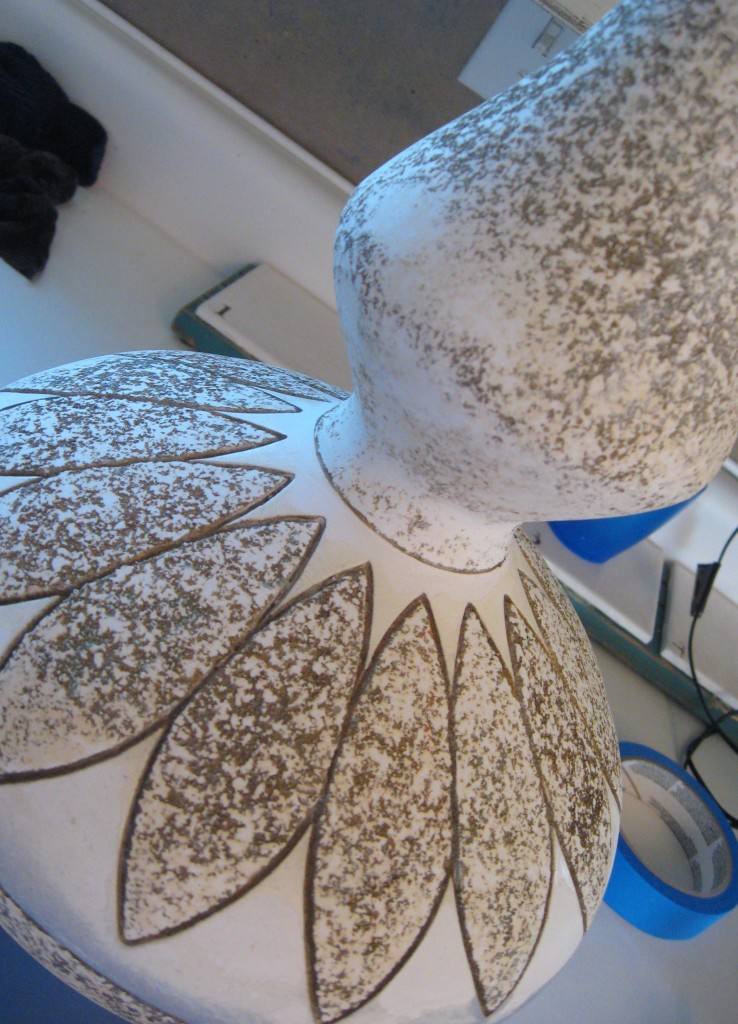
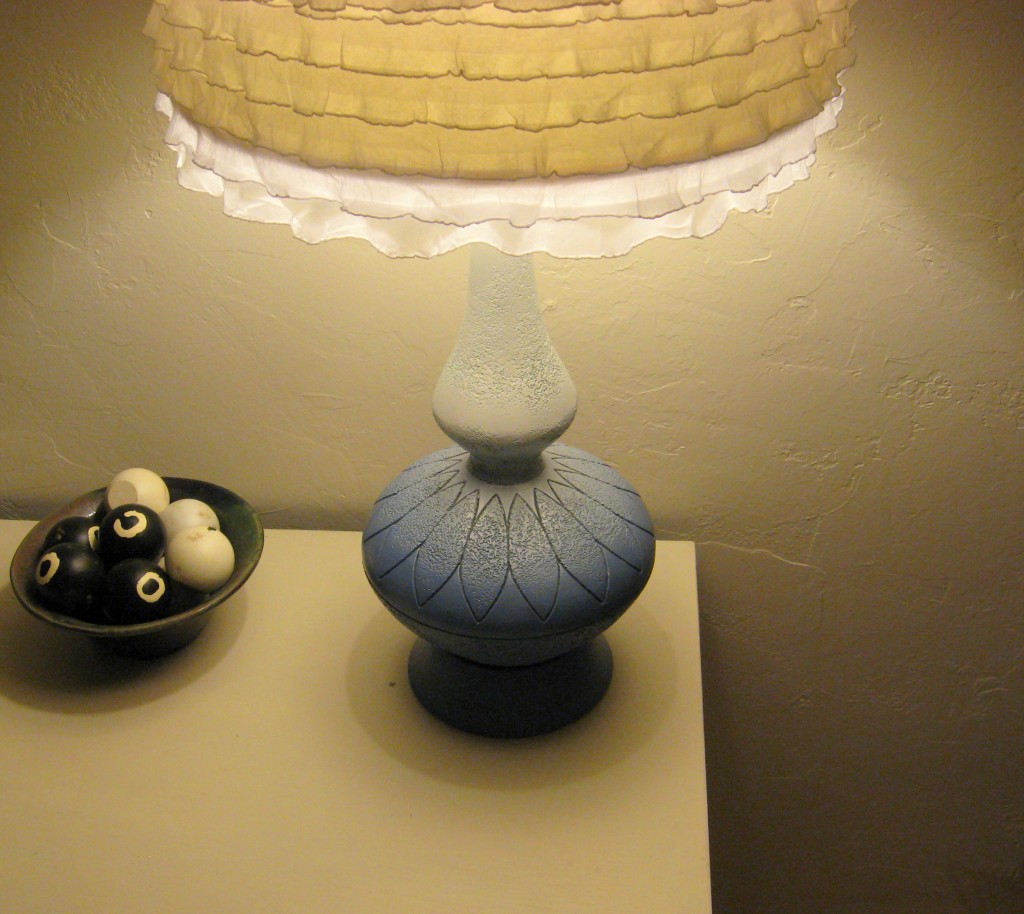
Getting an ombre effect with spray paint is pretty easy to do. I started at the bottom of the lamp with the blue and gave it several coats, each time going over what I’d already done, but going up just a little higher. I did the same thing with the green starting from the top. Once the top and bottom are solidly their respective colors, then spray each color in the middle – holding the can back a bit so that you get a misty-type spray that overlaps.
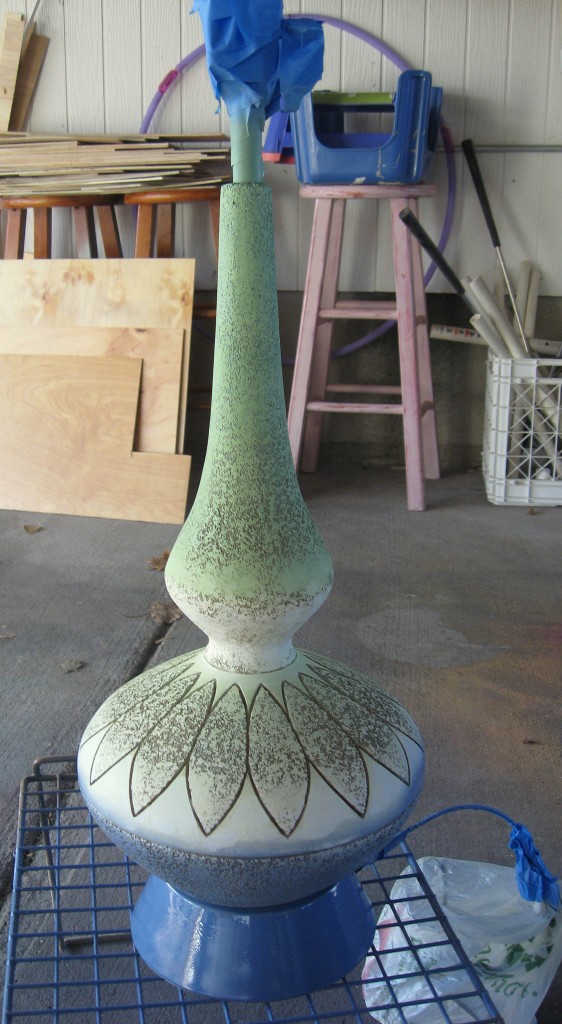
Problem #2 – I hated it again!! Before I had even finished , I knew that the blue/green fade that looked so great in my head just did not look so great on the lamp. Still, I decided to have one more go at it before I gave up.
I grabbed a can of white spray paint and covered all the green, so now I had blue on the bottom, fading into white on the top. Perfect! That was just what it needed.
As for the shade, I ripped off all the old fabric and trim (gag! Really should have been wearing a mask…) and cleaned the shade form underneath. Then I just purchased a half yard of white ruffled fabric and hot glued it on. SO easy and fast (and only $5 with my Hobby Lobby coupon!)
adidas Outdoor 30% off!

Are you ready to brave the great outdoors this winter? Stock up now on adidas Outdoor apparel while they are 30% off! Select Outdoor apparel will be 30% off from 11/18-11/23. Stock up on gifts for the whole family with this great outdoor deal. Get Shopping!
*HOT* Stride and Trident Buy 1 Get 1 FREE Printable Coupons!
 Print these coupons quickly, before they disappear.
–Stride Gum Single Pack 5 to 14 piece, Buy 1 Get 1 FREE up to $0.96
–Trident Gum Single Pack 9 to 18 piece, Buy 1 Get 1 FREE up to $0.96
These are great coupons, and will likely be gone quickly! Remember, you can print each coupon twice.
Shelf Reliance Black Friday Sale: Save up to 50% on THRIVE food storage, emergency supplies, and food rotation systems!

We wanted to give you a heads up about the INCREDIBLE Black Friday sale that Shelf Reliance will be having this weekend. Black Friday can be a busy time and we want to be sure you have a few days to plan your shopping instead of just surprising you on Friday morning! We will post quick reminders throughout the weekend, but wanted to make sure you had a bit of notice.
This sale is AMAZING!
- Every single THRIVE product is on sale.
- Cansolidators are 56% off, the Harvest is 46% off and
- There is a large selection of emergency supplies that would make great stocking stuffers!
A Few Important Notes:
- All of these sales are “while supplies last.” It is very likely that Shelf Reliance will sell out of some products before the end of the day on the 26th. So, we suggest getting your order in as soon as possible. In fact, you may even consider filling your shopping cart now (make sure you are logged in) and then just logging in to pay on Friday morning. The website will very likely be slow on Friday because of this sale.
- EVERY SINGLE THRIVE Food item is on sale for the lowest price all year! Make sure you browse around the site here, because EVERYTHING THRIVE is on sale!
View Everything On Sale By Clicking Here!
If you have any questions, email Misty at thrive@pinchingyourpennies.com
*HOT* EcoTools Products $1/1 Printable Coupon = Better than FREE at Walmart!
 Print this EcoTools Product $1/1 coupon quickly, before it disappears. My local Walmart has the Loofah Bath Sponge for $0.87 daily, so FREE after coupon! Walmart’s coupon states that you will receive the difference if the coupon value is more than the item value. Remember, you can print each coupon twice.
Credenza Makeover
We inherited this credenza from my husband’s grandparents several years ago. I absolutely fell in love with the shape of it, but the color wasn’t so great. I knew I wanted to paint it and finally this week I got around to getting it done.
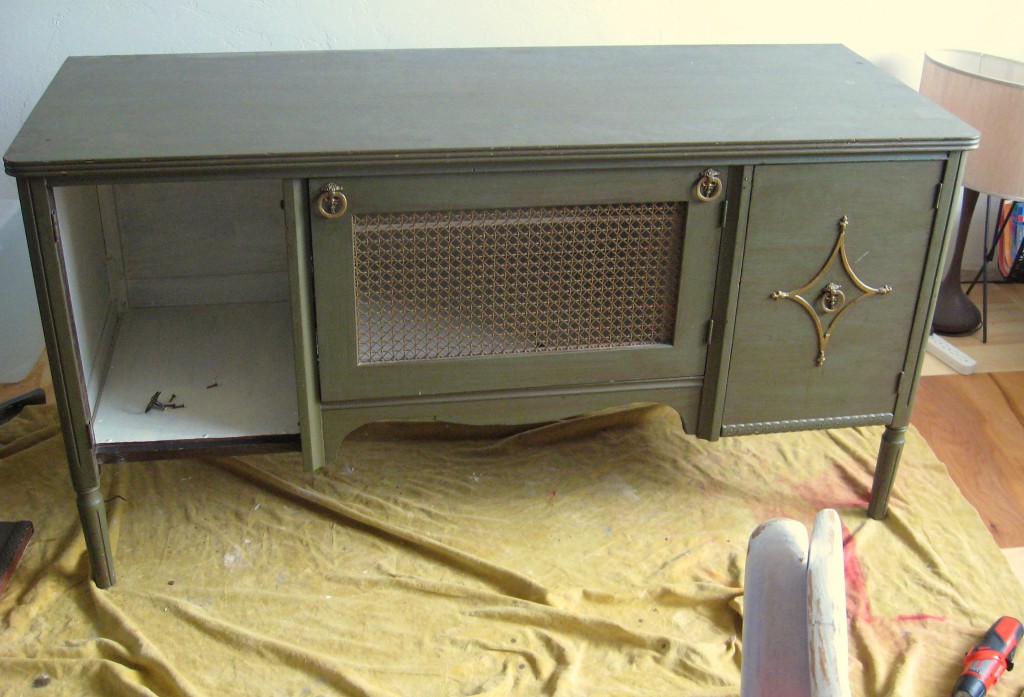
I need some sort of intervention to help me remember to take a proper before picture!! But, all I had done at this point is remove one of the doors. Note the diamond shape on the remaining door on the right – it was what drove the final finished design.
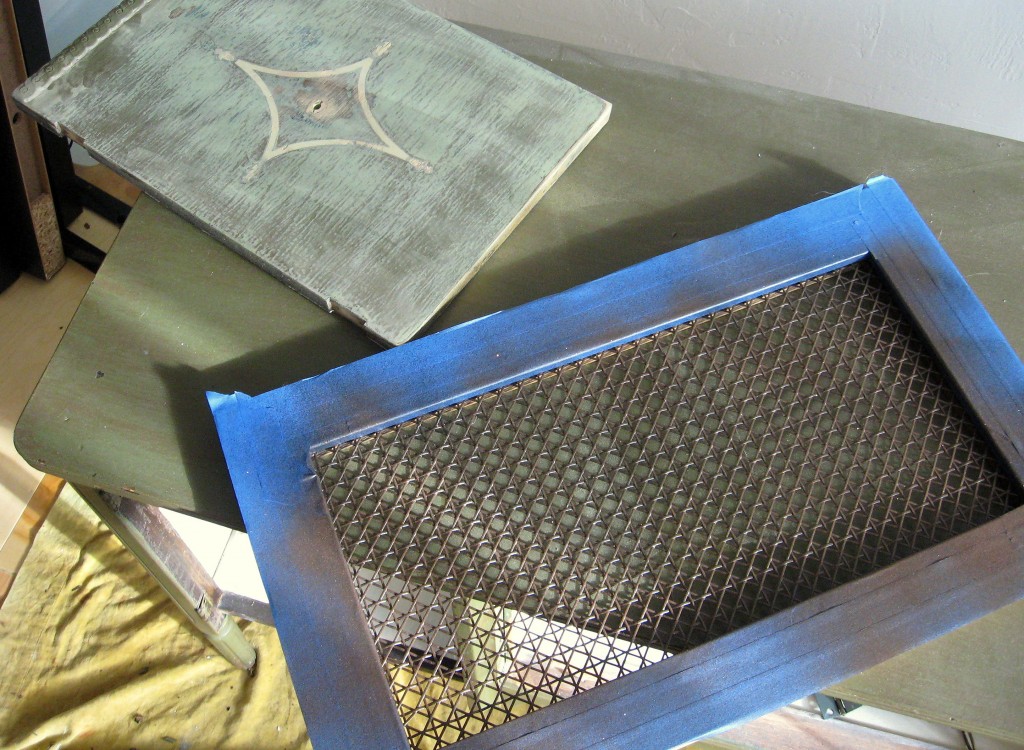
I removed all the doors and went over everything lightly with a sander. I knew I wanted the finished product to be pretty shabby, so I didn’t sand too much-just enough to roughen up the glossy surface. Then, I taped off the wood on the center door and spray painted the metal screen with black and copper. I also spray painted all of the original handles with black spray paint and rubbed them gently with a paper towel while they were still wet – just enough that they looked a little worn.
Next up was to try and figure out what to do with the diamond shape. Originally, I thought I could keep it and just paint around it so that it wasn’t gold. On closer inspection, I found that they had clearly been painted over numerous times and the paint was very thick and messy. There were also a couple of places where the diamond was chipped, so I decided to go ahead and just remove them – thinking that it was probably just a plastic embellishment. Wrong!
I tried to get a screwdriver under the diamond, expecting to pop it right off, but it turned out to be made of wood and VERY well attached to the door. I chipped it all off and sanded, but was still left with an impression of the diamond shape.
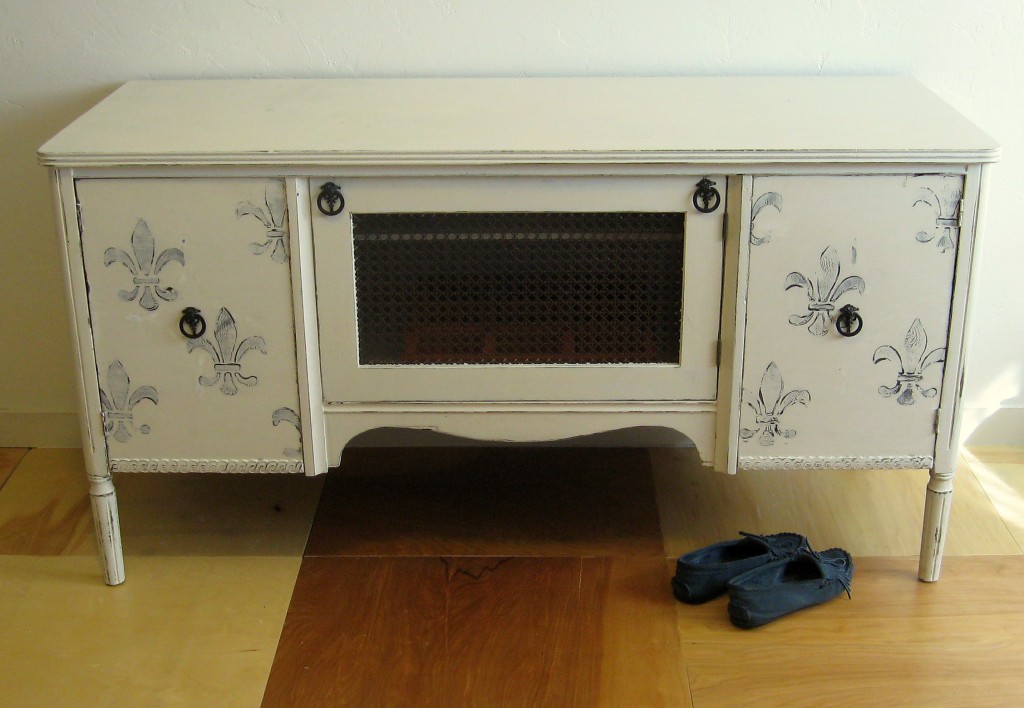
My original plan for the credenza was to paint everything white, then to stencil or paint a design on the top. Since I couldn’t get the diamonds to completely disappear, I decided to go for disguise and chose to put the design on the doors instead. I call this a happy accident because I just adore the way it turned out!
I painted everything with Gripper primer (see this post here if you’re not sure what that’s about). Once that was dry, I painted with two coats of matte white indoor house paint. Since the body of the credenza is pretty straightforward – just painted it with a brush – I’ll focus on what I did differently on the doors.
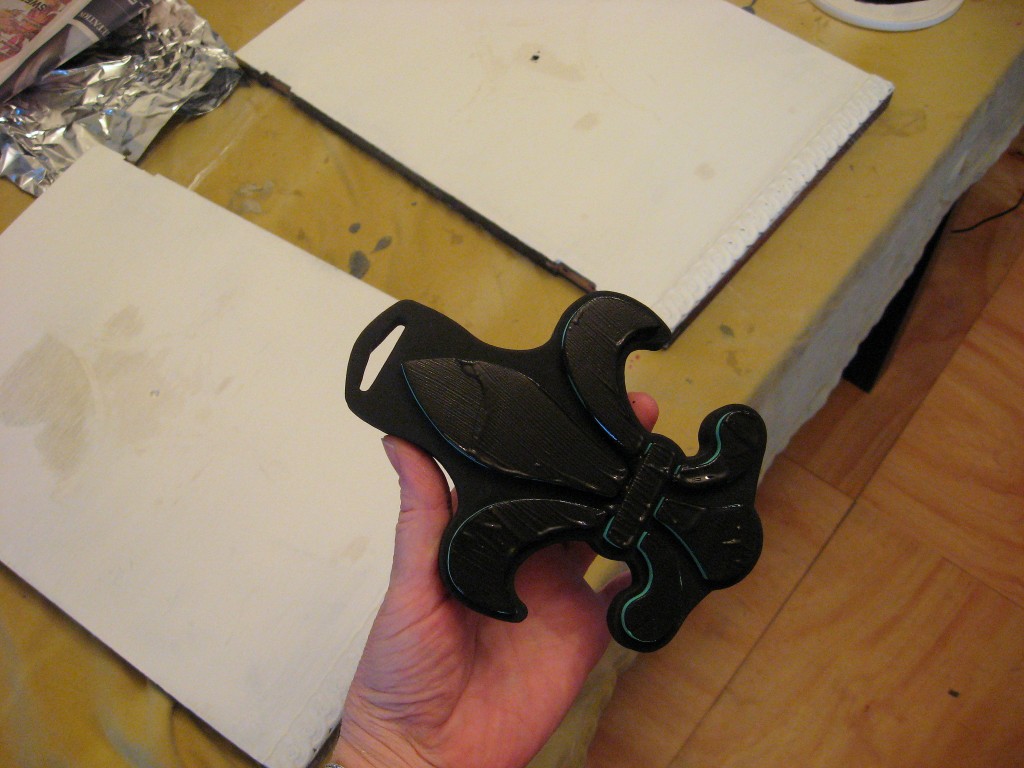
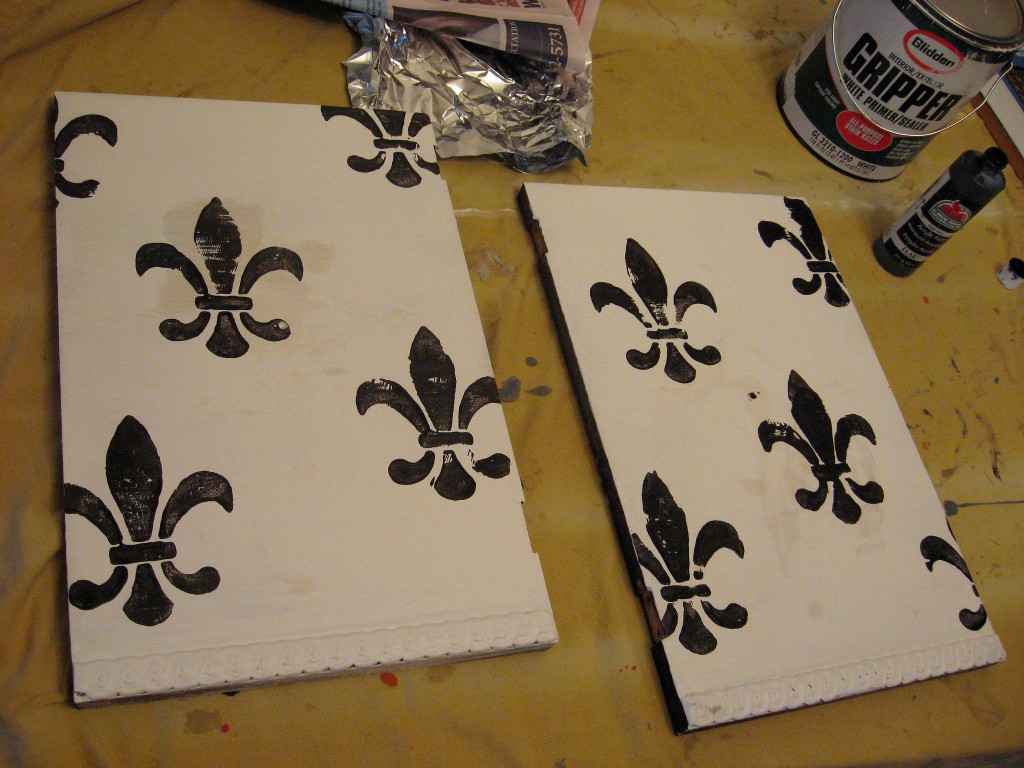
I painted the two outside doors with one coat of primer. Once that was dry, I used an inexpensive foam Fluer De Lis stamp and some black craft paint to stamp a design on the doors.
Let that dry THOROUGHLY, then paint over the whole thing with a coat of white paint.
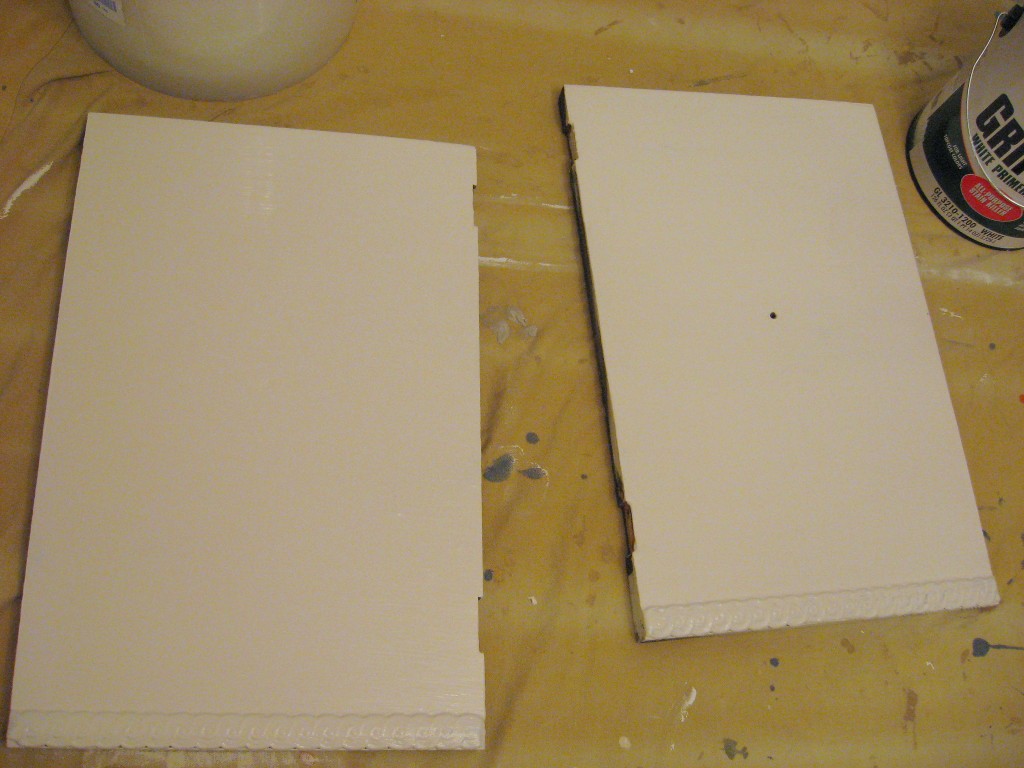
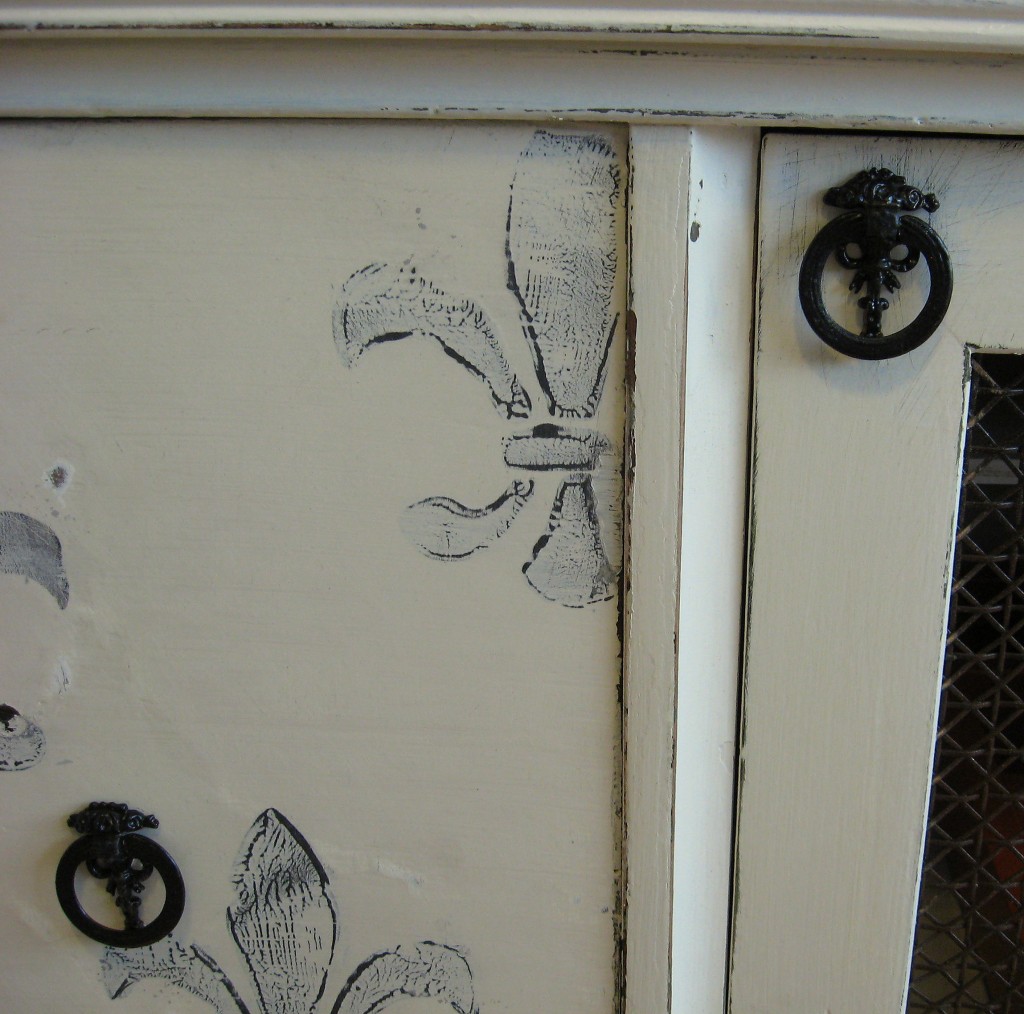
Once that is completely dry, start sanding the white paint back off, especially focusing on the areas where the black design is. I ended up doing this twice – sanded, re-stamped, re-painted with the white then sanded again – before I was happy with how it looked.
Give the rest of the piece a good, rough sanding as well, to make it look shabby and aged. Reassemble the doors.
If you are looking for it, you can still see the faint outline of the diamond on the left; you can’t see it at all on the right. But the fluer de lis design is what you notice first, so you no longer notice the flaw unless you are really trying to see it.
Razor Scooter: Wild Style Blue $20 Shipped at Target!!
 A Scooter Wild Style Blue
$30.00
Reg: $39.09
Free Shipping
Save an additional 5% when you use a Target REDcard
Use code TGVDZMMS to save $10
Colorbok Color Corrugated Cardboard Kitchen with Bonus Markers or Crayons $11!

Colorbok Color Corrugated Cardboard Kitchen with Bonus Markers or Crayons
From $10.00
.97c shipping
A Scooter Wild Style Blue $20 shipped! **HOT DEAL**

A Scooter Wild Style Blue
$30.00
Reg: $39.09
Free Shipping
Save an additional 5% when you use a Target REDcard
Use code TGVDZMMS to save $10
30% off Dinnerware + FREE Shipping from Sur la Table!
30% off Dinnerware @ Sur la Table
No code necessary!
Deals like:

Sur La Table® Porcelain 24-Piece Dinnerware Set
Was: $129.95
Now: $90.96 + Free Shipping


