
*HOT* Reach Total Care Floss $1/1 Printable Coupon = $0.49 at Kroger!
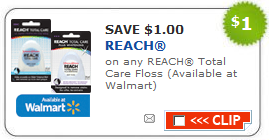 Print this Reach Total Care Floss $1/1 coupon quickly, before it disappears. These are part of the Mega Sale at Kroger stores for $1.49 after promo, so just $0.49 after coupon! Remember, you can print each coupon twice.
Planet Earth: The Complete BBC Series – 4-Disc Blu-Ray Set! $25 shipped!

Planet Earth: The Complete BBC Series – 4-Disc Blu-Ray Set!
List Price $99.99
Savings 81%
NOW $19.99
Shipping is $4.99
Quick Weekend Crafts & Organizing Projects
Here at Pinching Your Pennies we have posted over the past few years several fun crafts & organizing tips that help you have fun with your kids and organize your home, but while pinching those pennies! Here are some of the most popular. Choose one to complete this weekend!


Political/Election Shirts for just $8 Shipped! All other LOL Tees 50% off w/code!
LOLShirts.com LINK
Election Tees
$5.99 + $1.99 Shipping w/code: ELECTION
The code also takes 50% off all other tees (excluding clearance tees)!


LOLShirts.com LINK
Election Tees
$5.99 + $1.99 Shipping w/code: ELECTION
The code also takes 50% off all other tees (excluding clearance tees)!
Pumpkin Frozen Yogurt – Easy & Delicious!
 Pumpkin Pie Frozen Yogurt
.
Ingredients:
.
1 C Vanilla Yogurt
1 C Pumpkin (not pumpkin pie filling, just pumpkin purée)
1 C evaporated milk
1/2 C sweetened condensed milk
1 teaspoon pumpkin pie spice
.
Directions:
.
Combine all ingredients well and freeze according to ice cream freezer manufacturer instructions.
.
*My favorite ice cream freezer is THIS one. I own the SMALLER ONE. I have a small family.
.

Kohls Codes! Plus, small appliance deals!
Presto Cool Touch Electric Griddle
was $39.99
sale $19.99
*as low as $13.99 shipped after codes
Sunbeam Classic Iron
was $39.99
sale $19.99
*as low as $13.99 shipped after codes
Babycakes Cupcake Maker & Deluxe Decorating Kit
was $49.99
now $19.99
*as low as $13.99 shipped after codes
Babycakes Waffle Sticks Maker
was $29.99
now $19.99
*as low as $13.99 shipped after codes
Babycakes Donut Maker
was $29.99
now $19.99
*as low as $13.99 shipped after codes
Orville Redenbacher’s Hot Air Popcorn Popper
was $34.99
now $19.99
*as low as $13.99 shipped after codes


Take 20% off when you use your Kohls card – LOVEKOHLS exp 9/19
Take 15% off everything – FALLNLOVE – exp 9/19
Take 20% off everything when you spend $100 or more FALLSAVING – exp 9/19
Stack with one of these codes:
Save 15% off Men’s Apparel JUST4MEN15 – exp 9/19/12
or
Extra 15% Off All Jennifer Lopez Collection Apparel JLO4U15 – exp 9/13
or
Free shipping on any order with Kohl’s Charge LUV2BMVC
Free Shipping on $50. No code required.
 Earn $10 in Kohl’s Cash for every $50 you spend from 9/12-9/19.
Please no posting of codes higher than 20%, as requested by Kohl’s.
*HOT* Cruise! 5 Night Bahamas from $209 – Nassau! Departs from FL!

5 Night Bahamas From $209
Brochure price $1,019. Save up to 79% !
Departs Port Canaveral aboard Carnival Cruise Lines – Carnival Ecstasy
Interior: $209 (Sailing: Nov 24-29, 2012)
Bonus: Up to 4-Category Upgrade!Oceanview: $259 (Sailing: Jan 28-Feb 02, 2013)
Bonus: Up to 4-Category Upgrade!Balcony: $449 (Sailing: Sep 29-Oct 04, 2012)
Bonus: Up to 4-Category Upgrade!Suite: $569 (Sailing: Sep 29-Oct 04, 2012)
Bonus: Up to 4-Category Upgrade!
Jet Blue LINK
Hover over PLAN A TRIP
Click CRUISES
Enter the departure port to see results
Itinerary:
- Port Canaveral, Florida
- Freeport, Grand Bahama Island
- Nassau, Bahamas
- Half Moon Cay, Bahamas (Private Island)
- At Sea
- Port Canaveral, Florida
Today’s great deals from Tanga! Clothing, Rings & Family Handyman!
|
Vital by New Balance Woman’s Sports Casual Tank Top 3-Pack Receive a Random Assortment of Sports Tees in your Style and Size! Was $74.85 |

Today Only! Use Coupon Code: HANDYMAN |
25% off all Adult Purchases from Gap.com 4 Hours Only!


9/13 ONLY 25% off all Adult Purchases from 11 AM to 2 PM ET! Use Code GAP25 at checkout. Restrictions apply.
Seventh Generation Diapers – 4 Pack Case $27
 Seventh Generation Diapers – 4 Pack Case
$26.99
$39.99 33% offList Price
$5 flat rate shipping
Welcome Fox 13 Viewers! Here are the HOT deals from PYP and Rebecca Pickett!
1. Deals on Halloween Costumes!

More info HERE
2. Get $25 in Virtual Dollars (for every $50 you spend!) from The Limited!!

More info HERE
3. Twitter and American Express Card: Sync for savings!

More info HERE
4. American Girl DVDs $5!!

More info HERE
5. Harry Potter-Complete DVD Collection only $24!!

More info HERE
6. Restaurant Deals of the Week!

~Get a FREE Salad from California Pizza Kitchen! More info HERE
~Einstein Bros Bagels: Buy one Egg Sandwich, get one FREE! More info HERE
~Free Salad from Noodles & Company (first 500)! More info HERE

Special Offers – buy one get one 50%, buy two get $ off
 Buy One Get One 50% off Buy 1 Children’s Listerine, get the 2nd 50% off! Price: $5.49 ea. |
 Buy 2 Aussie hair care products and get $1 off! Price: $3.99 – $6.49 ea. |
 Buy 1 Natural Dentist children’s oral care item, get the 2nd 50% off! Price: $4.99 – $7.49 |